CSS is eating JavaScript

Kevin Powell's Introduction and the Expanding Power of Modern CSS

Anna introduces Kevin Powell as a passionate CSS educator known for his massive YouTube following, prompting him to open day two of CSS Day with a celebration of how far CSS has come. Kevin traces the arc from the checkbox hack — manipulating page content without JavaScript — through scroll-driven animations, anchor positioning, and complex math functions including trigonometry. He showcases a graph theory demo by Thomania Fiff that calculates shortest paths between page elements entirely in CSS, establishing the talk's central theme: CSS is taking over functionality once reserved for JavaScript.

The Separation of Concerns Debate: Critics of CSS Complexity

Kevin shares YouTube comments from his graph theory demo video, highlighting a recurring criticism that CSS is becoming a generalized language and 'going too far.' He addresses the separation of concerns argument — HTML for content, CSS for appearance, JavaScript for everything else — and exposes its irony: many developers who hold this view still have JavaScript fetch data, process logic, and apply inline styles while CSS sits idle. Kevin illustrates this anti-pattern with the Weather Network's 14-day forecast, where precipitation bar heights are set as hardcoded pixel values by JavaScript rather than derived from CSS logic.

From Custom Properties to the Advanced ATTR Function

Kevin advocates for the current best practice of using custom properties as inline styles so CSS can own the math and presentation logic, but notes that tracking where those values come from can be confusing during debugging. He reviews the long-standing but limited ATTR function — restricted to the content property and unable to produce searchable or translatable text — before introducing the advanced ATTR function, currently in Chromium and Safari Tech Preview. Kevin demonstrates how assigning a type (such as `<number>`) to an attribute value is essential: without it, the value is treated as a quoted string and silently fails, a bug that DevTools does not currently surface as an error.

Refactoring the Weather App: Moving Styling Logic from JavaScript into CSS

Kevin live-codes a refactoring of the weather card example, stripping precipitation math out of JavaScript and instead passing raw data as a data attribute on the parent element so CSS can access it. He uses CSS math functions — `calc()` and `min()` — to reproduce the same percentage-height calculation directly in the stylesheet, including an overflow guard, and assigns a `<number>` type to the custom property. Kevin shows how this dramatically improves the information flow: the custom property's origin is now traceable through the data attribute in DevTools, and type assignment causes invalid values to appear crossed out rather than silently broken.

E-Commerce Case Studies: Walmart's Inline Style Problem and Exposing Full Card Data

Kevin examines Walmart's product tag implementation, which uses JavaScript to apply four inline styles — background, color, border-radius, and font-weight — inconsistently across pages, despite having 1,300 design system custom properties already available in the CSS. He argues the right approach is to expose all semantically meaningful card attributes — price, stock, rating, promotion — so CSS can choose which to use for styling decisions. Kevin demonstrates this philosophy with a star rating component adapted from Yuna's blog post, using ATTR with a linear gradient mask to render dynamic star fill percentages, then adding CSS `round()` to snap to half-star increments.

CSS Sorting, Reading Flow, and Dynamic View Transition Names

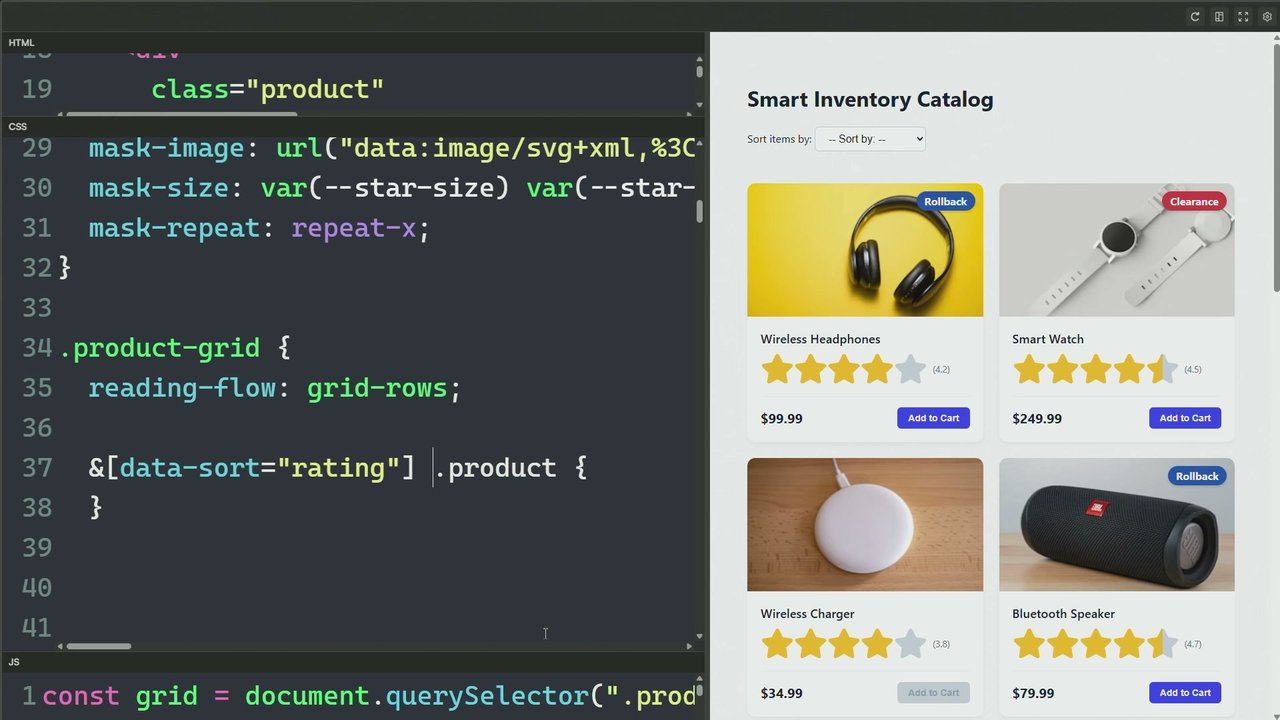
Kevin demonstrates using the CSS `order` property combined with ATTR-derived numeric values to sort product cards by rating and price without JavaScript DOM manipulation, using a negative multiplier to invert sort direction. He introduces the `reading-flow` property, which ensures keyboard tab order follows the visually reordered layout rather than DOM source order, preserving accessibility when CSS resequences content. Kevin also shows how the advanced ATTR function with a `custom-ident` type can assign unique view-transition names dynamically from an ID attribute, enabling smooth animated transitions when the sort order changes.

CSS if() for Conditional Property Values

Kevin introduces the CSS `if()` function — currently Chromium-only — which brings conditional logic directly into property value declarations without needing separate selector rules. He explains the syntax (condition, then value, else fallback) with examples spanning media queries, feature queries, and style queries, then live-codes a weather example where precipitation bar color switches between a snow color and a rain color based on a data attribute value. Kevin notes this approach allows CSS to make styling decisions that previously required JavaScript to evaluate a condition and apply a class, and emphasizes readable formatting to avoid errors with nested semicolons.

ATTR Security Restrictions and Container Style Queries as a Workaround

Kevin explains a spec-defined security restriction called 'attr-tainted' values, which prevents URLs from appearing in any property that depends — even indirectly — on an ATTR function result, blocking his attempt to assign background-image icons via an if() style query. He walks through a three-div debugging demo that isolates the issue and warns the audience to watch for it. As a solution, Kevin turns to container style queries — now baseline newly available across all browsers — which sidestep the restriction and can assign background images based on custom property values. He compares the two approaches: style queries can only target descendants, not the element itself, while if() can query the element directly but returns only one value at a time rather than a full declaration block.

Range Syntax and Chained Conditions for Complex Styling Logic

Kevin demonstrates range syntax within if() and container style queries to handle numeric comparisons, using e-commerce availability sorting as a practical example — products with zero stock are pushed to the end by substituting a large sentinel value via `stock > 0`. He then applies chained `and` conditions to weather icons, distinguishing heavy rain from light rain by precipitation threshold, and combining weather type with precipitation amount to produce a partly-cloudy-with-rain icon for ambiguous API data. Kevin closes by reframing the talk's thesis: CSS isn't eating JavaScript, it's simply growing into its own domain — styling logic, including conditional logic, belongs in the stylesheet where it applies.

Audience Q&A: Security, Performance, and ATTR Practical Considerations

The Q&A covers a range of practical concerns raised by the audience. Kevin addresses security risks in the advanced ATTR function, explaining that the spec's attr-tainted mechanism already guards against URL-based attacks. He fields questions on whether attribute selectors would have been simpler than if() for the rain/snow example (acknowledging they probably would), how to manage design system exposure in the browser, whether the performance cost of CSS computation outweighs JavaScript alternatives (recommending testing but noting raw data handoff is likely faster), and how the string and custom-ident types differ from the default string treatment for use cases like view transition names.

Kevin spoke at CSS Day two editions ago, my first CSS Day ever. And just as he got on stage, I overheard two young lads saying really excited to each other, it's the YouTube guy. He was so cute. I was like, oh, it's so cute. But for Ali, our first speaker is an educator who is very passionate about CSS and a highly talented one because which reflects on the massive YouTube following they have.

But he's also a writer from newsletters to articles, courses, and podcasts. And it takes a lot of talent and a lot of work to do all this. Front end friends, big a big give me a big round of applause for YouTube guy, Kevin.

Hello, my front end friends. I'm so happy to be here kicking off day two of CSS Day. It's a pleasure to be here. Happy to see everyone manage to wake up nice and early. Oh, no. Restart now. Yeah. Another time. And, yeah, I figured what a better way to kick off the day of CSS day than talk about how CSS is eating JavaScript.

Right? We're all CSS enthusiasts here. I'm sure a lot of people here play around with CSS only solutions when they can. Some of us are probably a bit more ambitious with those attempts than others. But for everybody who has done anything that's been a CSS only type of approach, you probably started with a bit of code that looked like this, with the checkbox hack, which Leroy mentioned yesterday. Right? I remember the first time I saw this bit of code. I was like, wait.

I can manipulate the content on the page based on user interactions without any JavaScript? How come nobody told me this earlier? Then, of course, I went and did a whole bunch of probably kind of irresponsible things with it and pushed it to production without knowing any better. But it was really exciting, and I enjoyed that. And you start getting into the world of that and seeing what you can do. But probably what's more amazing now and more exciting is what we can do without hacks.

We have things that used to require lots of JavaScript, like scroll driven animations that we can do with just a couple of lines of CSS now. And I'm really excited scroll triggered animations to make their way in as well. Things like anchor positioning. Jake did allude to the fact that it can be a little finicky. There's still some bugs to work out.

But so often, when we're using things like anchor positioning, know for me when I play with it, I'm like, this is kind of too easy. I feel like I'm cheating a little bit at times as well. And not only can we get rid of some tooltip dependencies that we might have needed in the past, but we can also do some other cool things with it and be a little bit more creative. And it just, again, works so easily.

And it's it's a bit of magic. Modern CSS is so great. And not only can we do things like that, though, there's some behind the scenes things as well where we're taking away from what we used to require JavaScript for with all the math functions that are coming in now. We can do all of these things that we used to have to require or have to use JavaScript for to do all the complex math and calculations.

Now we can do this directly in CSS. I won't lie. When this first happened, I was a little bit intimidated. I like making backgrounds change the color, maybe center a div somewhere. Then all of a sudden, trig shows up, and I'm like, that's not what I signed up for. But I managed to figure out how to make this slide.

This is CSS. I got everything in a circle with no magic numbers. I was very proud of myself for that. Of course, other people who actually understand how trigonometry works, they can do a little bit more with it. This is a demo by Thomania Fiff, graph theory demo, where he's measuring the distance between the different points on the page in real time with CSS and then calculating the shortest path between those points from one to the other, all without any JavaScript.

It's crazy that we can do things like that these days. And I mean, we're at CSS today. I know everybody here thinks all of these things are just amazing and incredible. Right? CSS is coming to such a wonderful place. What you might be surprised to learn is outside of these walls, there are some people who don't actually think all of this is a good idea.

So as Anna alluded to, have a YouTube channel. When you post things on YouTube, people leave comments. And I did a video. I did a video where I looked at that graph theory demo by Tammany, trying to figure it out. I never really understood it, but I sort of dug in a little bit to see what was going on.

And it got a lot of comments, and most people were just blown away with what we can do with modern CSS. But there was definitely a theme in the comments that started to emerge. And I did pick one specific one. This is the one that I I found that I thought you'd all enjoy. We're gonna skip to the last paragraph to start with where he said CSS should not need calc functions.

If you don't know what color your web page should be at generation time, what are you doing? I thought you guys would like that one. So it's a YouTube comment section, People are gonna be trolling. They're gonna, you know, whatever. It's part of the game. That's completely fine. But I did also pick this one because what he said in the second paragraph goes more with the general theme that I did see emerging, where he said, languages should specialize.

And shifting from style to programming is making CSS a generalized language now, which is silly at best. And this is a theme that I saw in that video. I've seen it in other videos too, where I'm just playing around having fun, not doing anything complex like graph theory. I've seen it in social media posts. I've seen it or I've heard it through conversations with developers where we're talking a bit about it, they're like, I think CSS is going too far now.

It's starting to do a little bit too much. It's eating into the job of CSS. Separation of concerns. Right? That's the big red flag that goes off for people. They see that CSS is starting to do things they think JavaScript should be doing, so they raise the red flags. HTML should be the content. CSS should make things look pretty.

And I guess JavaScript gets to do everything else. But the funny thing with this, and when you hear the separation of concerns, then you might go to a website that one of these developers is working on. And often, you might see some sort of flow that's like this, where the user visits the page. The JavaScript might have to go get some data from an API, pulls in that data, processes the data, does all the logic, and then they throw an inline style on there based on everything they figured out. Well, CSS just sits there in the background.

The classes are there. They're being applied. It's not really having too much fun. And this I find kind of funny because it's separation of concerns. And of course, it's an inline style. Technically, it's CSS, but JavaScript's doing all the hard work. It took me about two minutes to try and find an example to use in my slides.

This is the one that I did come across. This is from the weather network with their fourteen day forecast that shows the next six days of weather. And this is that typical flow. The user lands on the page. They have to hit the they get the location data, have to hit the API, get all the information for there, bring in the temperatures, everything else. And they have those rain bar indicators underneath.

And that's a nice little UX thing, five millimeters of rain. Is that a lot? I don't know. So let's give a little bar to let users know. But of course, they're doing that with an inline style with a height of 62 pixels. If you're going to do it with JavaScript, you might as well just magic number the hell out of it.

Right? 62 pixels on there. But this is sort of a very typical way that you see a lot of things done. Now, some of a lot of people here are very smart and we're CSS people. So you might be going, well, that's not the right way to do it. Maybe you want to do something like this. Right? Have JavaScript set a custom property instead as an inline style.

And then if you do that, then you can do some processing and some of the math and other things on there. And I think this is the right way to work. Right now, this is fantastic. It allows us to pass information to the CSS, and then we can do what we need to do. But I don't know about you, but I I've run into situations with this. It works really well.

But I find that the flow of information can be a little bit strange at times. You get stuck. So here's an example. I took the you know, recreating the weather network and what they were up to. And here we can see in my JavaScript, I have sort of the fake API data. Everything's coming in. And if I come and look in the CSS, I find my visual.

And here is the block size, which is my precipitation amount. I didn't put the math in here. I was lazy. I kept the math in the JavaScript. But if I start looking for this custom property anywhere in the CSS, I can't actually find it. And you start poking around. You get a little bit annoyed. And eventually, do an inspect element on there.

And when you do your inspect, you eventually find it. There, you can see it as an inline style with the percentage coming in or whatever it is, whatever the value is. And it's not the end of the world. It's a great way to work currently, but I think things are going to start changing in a pretty dramatic way.

And there's a way that we can make this flow of information a lot more clear going into the future using the adder function. I might call it the adder function. I might call it the attribute function. I might say ATTR. I always call it something different, but I think all the spec people call it the adder function.

So I'll try to stick with that. Show of hands who's used this already, just like the basic version of it? Cool. So we'll do the next part pretty fast. But just as a quick one, not everyone put their hand up. So basic way that it used to work because we've had this forever. It's been in CSS for a really long time.

But if I come on my card here, I have a custom property set up with a content. I can put content there, it shows up in the tag of my card. But instead of that, I can do ATTR, and I can put in my data. Whoops, promo. And it pulls that in. And it's the text or the value of the data promo is there. So if I change the content, it changes inside of there.

It's fantastic. You can do this for any attribute you want, but up until now, it only worked on the content property, so a little bit limited. You could use it for a few things, though. If I change this content or the data promo to be sale, I have a styling hook down here with an attribute selector. So then we can have some styling hooks, other things.

And that's kind of good. But again, it's been limited to the content property. Because it's limited to the content property, it also means the text can't be searched for or selected. And there's internationalization issues because it won't be translated because it's not in the DOM. That text is being generated by CSS. So there are some limitations to it, which some niche use cases, which can be really good.

But sometimes it's a deal breaker and you don't always want content being injected that way. I I had remembered there also being screen reader issues with it, but Manuel did some tests for me and a bit I did a bit of research after and I haven't I think modern screen readers do read the text without any issues.

So at least that's a good thing. The exciting thing now is we have the advanced adder function. And this can be used to provide a value for any property. We're no longer limited just to the content. This is currently in Chromium. It's also in Safari's technical preview. And it's behind a flag in Firefox. So we're right around the corner from this hopefully becoming at least newly available. And as a quick thing, this is actually the very first demo I created when I heard about this and when it was first in Chrome, where I was like, oh, I like Grid, As you might know, I always play around with it.

But one thing that can be annoying is we need lots of modifier classes for different column counts. So like, can I just do an attribute on all of these and throw that on there so I put the different attribute on each one? I have my grid template column set up looking at a custom property. So if I put three in there, obviously, it's going to be three columns for all of them.

But now I can say, a t t r, and it was my data column count. But it doesn't work. It could work. One frustrating thing though is if you go and look in your dev tools at this point because Kevin told me I could do this. Why isn't it working? So you go look in your dev tools to make sure you didn't make a typo.

Chrome people that are here, maybe you could fix this. But currently, in my dev tools, if I go take a look, I don't see any problems. I see the three coming through here. I see the three even coming here, and there's no point anywhere here this is showing up as invalid. That's a little bit weird and annoying because it is invalid.

And it's invalid because you can see it's in quotation marks because it's actually a string. And that's why we could traditionally only use it with the content property because it was bringing in a string of content. Anyone who's used registered custom properties now knows that we can actually assign types or the syntax to the different types of data we're using in CSS now.

And this allows us to do that. So I can come here. And for now, we're going to talk more about this in a few minutes. But I'm just going to assign this a type of number. And by saying it's a number, CSS now actually sees it as the number three instead of a string of three. And my column counts are all working.

And thank you. We change that. We get eight columns, whatever it is. So a nice little quick win to get rid of a whole bunch of modifier classes. You can just do things that way. Really important, you do not need to be using data attributes. It can prevent naming collisions, either current or in the future.

And it's also handy if you are using JavaScript to use data attributes, but you don't have to. I could remove the data attribute from each one of these. And you can use custom attributes as well. We just have to keep the name the same in our HTML or in our yeah. In the HTML and the CSS, and it still works.

And I did that when I was playing around with the first demo. I'm like, oh, this is really cool. And I was like, wait. Is our favorite utility framework soon going to feel like it's writing HTML like it's 1995 all over again? I don't want to worry too much about that. We'll see where that if that goes down that road.

But for me, the most important thing is I started thinking about different ways we could actually leverage this to improve the flow of information from JavaScript into CSS. And let's look here again at how we can do that. So the same demo as before. Right now, everything is happening in JavaScript.

I have a max participation here that's being used, but down here, we have the math being done for different things, and we have it is doing it as a style of my precip amount. So I'm going to take all of this out from here. So I just have my precipitation visuals, an empty div waiting to get styled. Then we can jump in.

Oh, actually, before we jump in, I need to pass that information over. So I can come up to here and say that my data, I'm going to call it I'll do this on another line actually so we can see it. We can say data precip is going to be equal to and you just call it whatever in this case, I don't call it whatever I want. I believe it is my precipitation that I didn't spell correctly.

Oh, my dollar sign's on the wrong side. Thank you. There we go. Perfect. So now I've exposed that to the CSS. I've made it available if the CSS wants that information. I could pull that directly in on this class because this is where I'm going to be using it. But I find it really valuable, and we'll see why with some other examples in a minute.

But I find it really valuable to actually come here and do it on the parent. So I'm going to do this on my weather card. It's going to have and you don't even need to make these custom properties, but I find it useful to hook into them. It just makes it a bit easier. The data attribute's kind of long.

So on here, let's just call it preset make it or I'll do preset amount actually because I already have that down below. And that would be my a t t r. And then here, I would put in my data preset. And once again, it's not working yet because I haven't assigned it a type. I said I'd mention types a little bit more.

There are a lot of types. I don't even have a slide to show you all the types because you're going to take a picture of it. You'll never look at it again, and you're going to forget which one you want anyway. There's a whole bunch of them. I would just suggest looking up which one you want. I always forget. But you have number.

You have angle. You have color, custom idents, and a few others. Just if you get lost or you're not sure, I would just suggest looking it up on the MDM. It's the easiest thing to do. But before I go into the types, you can do something else, which is just assign it a unit. I could do l h, and it's now going to be 8.2 l h and 3.6 l h high, which is kind of cool.

This works for any unit whatsoever. Rem or m, it could be a pixel value. As long as it's a number, it's just going to say, oh, I see that's a number. I see that you want it to be this specific unit. So I'm just going to assign it and make it that unit. Makes it a lot easier to work with if you know what unit you want it to be.

Pixels is kind of small. You can also do percentages. It doesn't show too much in the demo. In this case, though, I am going to keep it as a type of number. Don't forget the triangle brackets when you're assigning a type. It feels weird putting triangle brackets in CSS, but it is what it is. Then we get down here.

I can do a quick I'm going do a min function. Min, we can do our precip amount. Then, well, if I want to actually do the math that I was doing in the JavaScript previously, I had that max precipitation, which was 10. If it's a magic number related to styling, the magic number might as well live in the CSS.

So here we can do max precip of 10. So if it's 10 millimeters or above, we get a full bar. So precipitation amount divided by my var of max precip, max precip, and let's put this on a few lines so it keeps it readable. That will be times 100%.

So it becomes a percentage based on Well, you get the idea. And then I did it in a min function just because if ever we got a really rainy day, then we don't want it to overflow. So by being in a min, I can just add the comma 100% here, and it never overflows. And so we've improved the flow because now if I wanted to look at this, I mentioned it earlier about getting lost with a custom property a little bit.

It's like this hidden bit of information. You have to hunt down where it's actually coming from. Now if I have my preset amount, I can go and actually find that where I see this existing here. I see it's coming from a data attribute. Then I know it's coming from the JavaScript. And I can just make the connection a lot easier.

So for me, this is already a really big win. Next. But on top of that, we can assign the types as well. And I think assigning types is a really important thing that helps with debugging and other issues that can potentially come up. So if we go back to this example where I was looking at the column counts, the top one isn't working this time.

I go, darn, why isn't the top one working? Let me go look in my dev tools. And if I get in there and I find the right element, we will see that the number is actually getting crossed off now because I have assigned it a type. Type number, and right away it's saying, well, this one, it doesn't have a type number.

And if I go and take a look, it's because I used a string of three instead. I didn't put the number. So it goes, it's not an actual number. So this is showing up crossed off. And then the column count is actually not defined for that one. So the flow of information is a bit more clear. We can follow the path a bit easier.

And we've built type safety into this, which helps with debugging and other things, which is really, really amazing and awesome. And I'm pretty happy with that. But I think this can then be used in a lot of really good ways. This is another example that I found. This is from Walmart. You can see that Walmart puts tags on all their e commerce things. They're I don't know why, but, you can see on there that their tag has four inline styles, the background, the color, the border radius, the font weight.

And this is probably something that server side rendered in this case. So it's not necessarily about the flow of information because it had to get done by JavaScript, but it's, you know, the servers hitting up the database or a CMS or something to grab some information. It's processing things, doing some logic, and all of its things, and once again ends up applying some inline styles while the CSS just sits there not actually doing anything.

In this case of Walmart, I think it probably looked something like this, probably a React component or something. You had some setup. Those numbers that I've hard coded at the top, they're probably not hard coded. They're probably getting that from a design system somewhere. So they're going and fetching this, and then the developer's inline styling these. What's kind of confusing with their example, they also have a class on the badge that's being used for some styles but not all the styles, which is interesting.

And if you go to different pages to show that they actually have some of the pages, it's a hex. Other pages, it's an RGB value. So that's, I know, not part of this talk. That's just large companies doing things in strange ways. They also have their entire design system exposed through 1,300 custom properties. So those values are also sitting there waiting to be used, not being used, which is fun.

And they're all there. But again, that's big companies with large teams that don't communicate. Another talk maybe. But I really think there's a good argument to be made that we should just be doing something like this. And you could say, well, Kevin, do we even need it to be like this? This could just be a class. That would work. And I think so.

Like, why not just throw that in as a class? It'd probably make life a lot easier. You wouldn't get inconsistencies between pages, which is super strange. And that would all work out really well. But I think this doesn't even really cover the important part of it. I think if we're going to be exposing this information, we should be taking a step back at the entire card, like I looked a little bit at the weather card, and exposing as much information as we can be.

So if we know what the promotion is, if we know what the price is, the stock, the rating, all of this can be passed through as data attributes that CSS can then choose to use or not use if it could be useful for some of the styling. So here's a little e commerce shop that I've set up.

We have some tags and other things. And in this case, I'm not going to look at the tags. That one's fairly straightforward. But I'm gonna I stole this I don't know if, Yuna is here, but I stole this demo from her blog post. These slides are all available after, so you can get a link. I did leave it as a comment here.

It's a nice one that looks at a few different use cases of the advanced adder function. And she looked at doing a star rating. So I've already set this up to have all my data attributes coming through. And then I'm already grabbing those data attributes in my CSS. So we're not too worried. The JavaScript that we'll get to in a second.

But we're grabbing the ones that we want to be using, and then I can go in my star rating and I can just style it. So I could do calc of my whoops. We want that to be a var rating. And I'm going to say divide by five times 100%. Yeah. There we go. We get a star rating coming in.

I'm doing that just with a background linear gradient. So that's controlling the color stops. So if I need like 80 if it's an 80%, it goes up to 80% on the gradient. And there's a mask set up to give me the star shape. The only thing that's a little bit annoying with this, and you might need half ratings.

Right? Like right now, the first one is 4.2, and you get like this little piece of the star being highlighted. It's a little bit awkward. But luckily, we can just come here and say this should be round instead. And we can round that by 10%. And now it'll be half star ratings instead the whole way down. So that makes, you know, a bit more consistent and and no issues that are coming there.

But this is sort of like some basic styling we can do. I said that we should be exposing as much information as possible. And so why don't we expose or I did expose other things. We can use those as well. A little bit lower down or I have this sorry. We have a sort by that's right here.

I might as well take advantage of that. And I'll talk more about this in a second. But you can see I'm actually using a little bit of JavaScript here. You could do this CSS only if you really wanted to. And again, I think Sarah had mentioned yesterday there's issues with selects if they're not really in a form necessarily, but we're going to be doing it this way for today.

Where I am using I'm just setting a data attribute on the parent or based on the value from my select menu. And I'm doing this because I want to look at view transitions as well. Bramis inspired me yesterday. So and as I said, if you don't need the view transitions, you could even do this CSS only sort of a checkbox hack version of it if you really wanted to.

And what I could actually do here is the order of these. And if I'm doing the order, this could be don't do this in production today. But I do have the reading flow just above, so I'll show what that does in just a second. But on my order, I could get a calc. I am going to do calc of the var of the rating that we had. And I'm actually going to say times 10.

And the reason I'm saying times 10 is my ratings are like 4.2, 3.1, whatever it is. The decimal place, it won't work in the order. So times 10, it gives me twenty, thirty, five, forty two, whatever it is. And now I believe that should work. We'll see. Sometimes when I do this there we go. The only problem is we have the worst product is coming up first, which is probably the opposite.

So we just make sure that this is a negative 10, and now it will actually sort it the way around that you want. So that's a little bit better. And again, I'm doing this using the reading flow that's there, which is a new feature, not well supported. But what that means is if I'm using the order and I'm rearranging things on the page out of order from the DOM, I can actually tab through.

I should have made this a little bit more obvious. I apologize. But we can see as I'm going through, even though I've reordered it with CSS, the reading flow is actually following or my tab order is following the rearrangement of content, which is pretty neat. And there's a lot that you can look into for reading flow if you're interested in that.

I've also already set things up down here for the price sorting. And in this case, I just did it with the data attribute. I hadn't made a custom property. I mentioned you don't have to have custom properties. I just find this a little bit more difficult to look at. It makes reading things a little easier when they are.

But that means if I come high to low or low to high, it also works, which is fun. View transitions. I threw this in just because Brahmas was talking about it yesterday. And maybe some of you were inspired. You were making some demos last night playing around with what you learned. Hope you were. But you might have run into the issue with view transitions where you have to give everything a name.

That sucks. It's the worst. With this, this is a bit off topic from what I want to do, but view transition name, you can now do a data attribute. As long as you have an ID on everything that you want to do or a different something that's unique for each one of them. So often, you'd probably use an ID.

Whoops. You'd probably use an ID. And you'd be completely fine to do it this way. I actually called it the data ID just because I was putting data attributes on everything. So I have a data ID. And if you do that, you want to do the type. I said I'd mention it. It is a custom ident. Oops, wrong thing right there.

Custom ident. I wouldn't suggest it for sorting things like I'm doing here necessarily for e commerce. But if I did that correctly, which I didn't So you used that to add to the Oh, thank you. ATTR. There we go. Now, yeah, we get a nice little fun flippy transition instead.

Again, you probably don't want that on an e commerce shop, but maybe for your portfolio or something, it could be interesting. So yeah, that's a nice little win for a few transitions that I wanted to include in there. But up until now, I've just been looking at the data attribute.

And we've been doing a lot with it, passing the information, trying to make the flow of information a lot more clear. And then we've just been processing the data there, doing some math on it, which is already amazing. Like, it's super cool that we can do things like that. But it doesn't completely replace what we would be doing with JavaScript a lot of the time.

When we're using JavaScript, we're doing things where you have to decide, like in this situation, do this thing. In this other situation, do something else. And now with CSS, we have the capability or the ability to start doing that with two new features. The first feature is one two features that can help. The first one is If.

You haven't well, it's only in Chromium right now, so it is a bit limited. But this is going to be a really nice one. I'm very excited for if. I'm happy that we have it in CSS now. If you haven't seen it before, it looks something like this. You have an if statement or an if function with a condition.

And if that condition is met, it will apply a value. Usually, you won't only have one. You'll have a whole bunch of if conditions to finally get to something. And if none of those conditions are met, then you'll have your else value that comes in. Some actual situations where you might use this. If you have a one liner for a media query, you could do that directly on your flex direction where you change it.

If the media is a certain size, then you can switch from row or else it will be a column. We can do this with feature queries as well. So if supports display grid lanes, we get our grid lanes. If not, you have your fallback of a display grid. What's most relevant for what I'm talking about today would be doing it with style queries.

So if we have a certain style, give me a specific value. And we can read the values of the custom properties to get anything that we want along the way. So let's go back to our weather. You might have noticed all of a sudden, Wednesday got really cold. It's no longer raining. It's actually snowing. We're not really telling our users that it's snowing.

We have the blue bar filling up. It's not the best indication. They have to pay too much attention, so it probably makes sense to actually change the color of that. Now we shouldn't only use color, but we'll use it for now and then we'll add to that. So what I could do is on my rainfall visual, instead of just saying that the color is rain, let's get rid of that.

And we're going to say if. My suggestion to you, because every time I use if, I get confused with where things should open and close, you have nested, semicolons, and it can get a little bit funky. So do your if, then just go on a new line and put every single one of the statements on its own line, and it becomes very easy to read and much easier not to make mistakes. I want a style query, so I do a style.

We want to look for, in this case, I'm grabbing both the amount of precipitation, which I misspelled on this one. I thought I fixed it in all my slides, but I missed this demo. But I want to get my style of weather. And we can say, is the weather snow? If the weather is snow, the background color should be my color of snow. And we can see the first one changed over.

And now I can just say else because in this, we only have rain or snow. So I get to say else, We're going to do our color of rain. And the two colors come through that way. So a nice way, again, to let CSS start deciding on what should be happening instead of JavaScript making these types of decisions for us. But, this is one of those things where we shouldn't only be using color to convey information to our users.

Right? Usually on a weather app, you have icons and other things that can also help out. And I found out the hard way when prepping this demo and went into panic mode about two days before I got on the plane. Luckily, Bramis pointed me in the right direction for this one. But the adder function has some rules around URLs.

And this is directly in the spec. I'm not going to read the whole thing. It's something. But it's basically about preventing people from doing bad things, that we don't want to be passing certain types of information through adder functions. I actually knew about this when I ran into the bug. The part that I circled, though, was the part that was actually tripping me up, which says, to guard against this, the values produced by an adder function are considered adder function tainted.

And the red part, the important part, as are functions that contain an adder tainted value. Sounds kind of weird. In trying to debug and understand what was going on, I made this demo that's right here where we have three divs. The div on the top is well, we have example one, example two, and example three is the control, making sure that everything I'm doing isn't actually broken.

You can see example one, I'm putting a custom property of test one. The second one, I'm doing a custom property of test. But in this one, I'm actually getting the number one from the data attribute up here. And then three doesn't have anything. So that's why it's the control. If we take a look at the CSS on this one, we'll start with the border because the border is working as intended.

So we're saying, if test is one, give me a dashed orange red border. It's working on the first one. It's working on the second one. And our control at the bottom is doing the else statement just as we'd expect it to. So the borders are working fine, but the images aren't. There's a weird thing in the middle one, and that's coming from here where if the style test one used this background image, else set a gradient. First one's working because it just has a custom property. Third one's doing the gradient because it doesn't have anything.

The middle one, if you go and look in the dev tools, it actually says that the value of the image is none. And I was like, what am I doing wrong here? But this is part of that loop of the whole idea of an add or tainted value. The value isn't being set by the custom property or by the data attribute coming through in there.

But the end result of the whole, you know, doing the style query to then set that based on that data function is meaning that it won't accept the URL there. And I just don't want any of you to run into this situation because it can be a little bit hard to figure out. So I wanted to mention it.

Be very careful with your URLs with data attributes or with the adder function. Luckily, there's a way around this using the other feature that I wanted to talk about today, which is container style queries, which are now baseline newly available, which is awesome. All the browsers now support this. Yeah. A hand to all the developer or all the browser engineers, because this is super exciting.

There's a lot we can do with this. I could do a whole talk on it. We're just going look at a few quick things today. But we can come back to here with this to bring in our icons. And you can see I have icons that are set up here. Then if we go down a little bit further, what I ideally wanted to do is something like this with an if statement. But as we just saw, that doesn't actually work.

This would have been cool if I could do that, just set all of them on one spot. But I can't do that. As I said, I can do it with a container style query. So I should have done this as one big comment. Did each one in its own. But I can just do a style query for each one of those instead and bring in the icons that way.

And let's on break the demo. There we go. So if it's raining, our background image is rain. If it's partly cloudy, we get the partly cloudy icon and so on. There's a few important caveats to what I'm doing here and a few distinctions I just want to make between if and style queries and another thing on how I'm doing this because it may be not the best, but we'll talk about that in a second.

The differences between style queries and if that I don't really have a lot in my demos but I wanted to make sure that I talked about. Style queries can't query the element itself. So in the example that I have there, have a card setting a class of or the theme, a custom property of theme. The card itself, you can't do an at container to look for that on the card itself.

It's only going to work on the children or the descendants of that card. So really, really important. I think most people here at least would be familiar with this, doing it with any type of container query where you have that restriction. One of the things that's so great about if statements, though, is with if, they can actually see the custom property on that selector, which can be really powerful.

But there is the limitation with if that you're doing it line by line, whereas with a container query, you can do an entire declaration block, as many property values as you want. If is always returning just a single value every single time, so it can lead to a bit more verbose depending on what you're doing. Just pick and choose.

Well, right now, you'd probably pick a style query because browser support's better. But once we get there, then you pick and choose depending on the situation that you're in. The other thing some of you might have been wondering about or looking at that last demo, you might be going, Kevin's showing us this really cool thing we can do with this advanced feature that's not even well supported yet.

Couldn't we just do this instead? And in the example I was showing, you could have. I'm really good at finding these new things and going down these rabbit holes and then being like, this is the best thing. The amount of stuff I've done with has where I'm like, oh, this is amazing. And then someone looks at it and they're like, couldn't you have just done this really simple selector instead?

I'm like, oh, yeah. I could have. So don't fall down. Just because we can do it in a a not cooler way maybe, it doesn't mean that we should. Attribute selectors have been around forever. We can still pass that through with JavaScript and set things up that way, and it would work perfectly fine. That would be, if this was the end of the talk, it'd be a bit of a bummer.

But there's a really special ability that if and style queries both have now. And that special ability is the range syntax. Range syntax is amazing. So it's currently only in Chromium, including on the container style queries. So style queries are or the container style queries are supported in all browsers, but what we're about to look at would only be Chromium, so just so you know.

We'll go back to this example here because I do have time. I wasn't sure if I'd have to skip this one or not, but we have time for this one where I've set up my ecommerce shop once again, and we'll look at how we can do this with an if statement. So if I come down, we have all my products.

We've set up my sorting, and I skipped the availability sorting earlier because Because the availability sorting, we'd have to do this one a little bit different. We want to use our order once again. So say I come on the order. And in this case, I think that I did it as do we have our we have stock.

So my data stock's being put in as a custom property of stock. And then we can come down here. So I can say my order is my var of stock. And this should actually work just like that. So if I sort by availability, it works. But the problem is the ones that are sold out end up first because they have zero stock.

That sucks. We want those to be at the end. But if I'm doing it by availability, or I guess it depends how you're doing it, but you might want items that are almost sold out to be the first one that people see. So here, what I could say is, whoops, if and I guess we don't really need the range for this one, but it still works. If the stock is less, not less, if it's, let's do greater than zero. If whoops.

See, this is where you screw up with, I'm gonna delete everything and start my if statement again because I was getting myself confused. So if open close, go on a new line, bring in your style query or whatever you are querying for, feature query or media query. Style of stock is greater than zero, then we could just say that this will be my var of stock.

Else, just spam nines on there like we do with our zed index. And now the availability will always push. You know, it'd be the the things being sold out first or almost sold out. And then the further down you go and the ones all the way at the end, end up getting pushed down to the end. So people aren't worried about using those.

Maybe not the best example, but I still like it. We can also play around a little bit with our custom or sorry, the well, we're using the images here. So we're gonna be using our style queries. And in this case, my broken. And the reason the rain is broken is we've changed some of the icons. We now have icons for heavy rain or not a lot of rain. So let's go and fix that.

We'll find where it's raining. And this is another thing you can do with container style queries is we can chain different conditions together. So I can say and if the style of I think I called it precip spelled like that this time. If the precip is greater than, let's say, five millimeters, the icon will change to a heavy rain.

And then I know my layout is broken. We have overflow, but, we get the icon coming in. And we can take the same thing and do it for light rain. Copy that. Paste it in. And if it's less than or equal to, because we want to make sure there's not a missing decimal in there anywhere, keep the five there. And we could change that one to rain light.

And let's just fix the icons. Come over to here. And maybe now the first day, it's only raining 1.2. So we have less raindrops. We go back to a rainy day. We get more raindrops coming in. And you could do more than just that. We could also check for other conditions. So maybe the API, it probably will tell you if it's partly raining, partly cloudy, all this information.

But let's say our API is not very good, and it's only telling us it's partly cloudy. But we can see it's partly cloudy and raining, so we want to update that icon as well. So I come here. Whoops. Let's do the end on this line because it'd be easier to read. And style precip is greater than zero.

So as long as it rains at all, then we can do part rain and have a rain cloud coming in, a bit of rain, a bit of what we need to sort of indicate what's actually happening on that day as well. And these are fairly simple examples that I'm showing you. I just want to show you what's actually possible with these.

There's obviously a lot more that we can do with them as well. But I think in doing this, we can see that we've sort of improved the flow of what we're doing because JavaScript's still responsible for fetching the data, getting the data. But then it can take the relevant pieces that would be useful and pass those off to CSS.

Now CSS can get them. If we're doing it today, we might be getting this and applying these as custom properties. And that's going to work fantastic. It's going to work really well. But in the future, we're going be able to get them and then add type to them, which is a good thing. Having type values, as we saw, can help with debugging, help with the information flow. And then we're to do all of our styling and all of our logic over in the CSS using things like if statements and container style queries and using our math functions that some people don't even think should be in CSS to be able to do these things.

And for me, this is you know, my talk was CSS is eating JavaScript. I But don't think it has anything to do with CSS actually eating JavaScript. I think it's a JavaScript was overstepping its bounds maybe a little before through necessity because we didn't have these. This is more about CSS starting to grow into its own and starting to do what it can do.

And I think that anytime we can apply styling, whether the you know, it doesn't matter if it's logic. Logic shouldn't be living in JavaScript. Logic should be living where it's needed. If it's needed for some JavaScript stuff, it can live over there. And if it's needed for styling things, then all of that logic should live where the styling is actually happening.

Thank you very much.

Thank you. Would you join me? This one. There's our fancy camera. It's just over there.

Perfect.

I was gonna call this the round table, but then I've only just realized right now it's not round.

So I'm just

gonna stick with the table. We've got a few questions for you. That was a great talk.

Thank you

so much, and great way to start the day. So first question, we've got time for a couple. Khalil asks, are there any security issues to be considered with the advanced attribute, ATTR?

The old I as far as I know, no, because they thought of that. You know, they're I think in the old days, probably, could have been, but these days, I think the working group realizes when those security risks are there. That's why I ran into that image with the issue, which even shows how much you're thinking about it because it wasn't getting it directly from the data attribute.

It's getting it from it's seeing, like, the whole chain that's getting there to eventually assign a URL, it's even blocking that. So I think we should be pretty safe.

Nice. Right. Sid. Who is Sid? I don't know who that is. Just a random Sid. Is there an advantage for using attribute ID over the match element for the VT name, probably for cross document view transitions?

I don't know. Problems.

Fair enough. I don't know. We can

talk about later. Yeah. Sorry.

Hang out. Go hang out and chat. We've got time for a couple of more. Let me have a look. This question doesn't have a name attached to it. For the rain snow, wasn't it easier and cleaner to use cascade and an attribute selector to assign colors, like you mentioned at the end?

In that case, because it was zero oh, we're just doing the weather? Yeah. You probably could have just done an attribute selector with like, if it's snowing or if it's not, that would most probably work. That's where maybe I was having too much fun.

I hope I'm pronouncing this correctly. Homan Homan Homan Wonders. Not directly related, but you mentioned they have their design systems exposed. Any suggestions on how to hide it?

Do you need to hide it? I don't know. I'm I'm I come from the view source generation where it's like, want every I think it's cool that you can see everything that's there. I think the main concern they might have is potential performance issues because they had that wasn't just the design system parts they were going be using. I actually saw every layer of the design system, which you probably don't need as custom properties.

So maybe something like that's a little bit overboard, which would just come down to however you're engineering things. But it was like 1,600 custom props with and it even said in the name of each one. But yeah, I don't think the design system values like, even if you try and abstract it away, you're still gonna find the value somewhere in there. So I don't know if it's worth the headache.

Maybe that's just me, though. I don't know.

That's a great segue because the next question is, at what point do we need to worry about the runtime performance of all this new CSS computation?

That's a good question. I do think for a lot of it too, like, if I'm path like, say we're doing some of these calculations in JavaScript, you'd have to compare what's happening. Like, if you're looking at the weather app, especially coming in with the height there, it's going to the API, fetching that data, bringing it back, and then JavaScript's having to go, Okay, here's the information.

I have to measure the height of the div I'm filling up, figure out how tall to make that. They didn't do a percentage. I don't know why they figured it out in pixels then to so that's all happening through JavaScript. So that will you know, it has to happen anyway. I would assume that that's probably more performant if you just provide the raw data to CSS.

It would definitely be worth testing, though. I I haven't measured anything with performance, and it's also brand new. So even if it's a little bit slow now, like even attribute selectors, there was all those articles and Everything Forever saying attribute selectors are slower. But modern browsers these days, the selector performance is amazing. So it's not something you start worrying about.

But if it's something you're thinking about trying, I would suggest testing just to see if there is an impact.

Right. One last question. I believe this question was put in before you reached this that bit of the slide, but in case anyone else missed it. From CJ, is it possible to use the the type string instead of number as well as in the attribute?

Sorry. Say that again. Is

it possible to use the type string instead of number as well in the

Oh, yes. Yeah. Yeah. I think there's string. And, like, I did the custom ident at one point. The custom ident or actually, if you want it as a string, you just don't have to even assign a type. It's going to treat it as a string. I'm 90% sure on that. It just that's what it is as a default value.

And then if you'd need a different type, that's where you can do it. I use the custom ident for the view transition names just because then it comes without the quotes around it. It probably can be useful for other purposes as well. But with the view transition name, you just then don't have to treat it as a string.

You can write the words in there. So it depend it's a little bit different from a string. If you wanna know the difference between a string and a custom ident, go ask someone who works at the browsers and not me. They would have a better answer.

Yeah. They're around. Yeah. Right. That's all the questions we've got. But a few weeks ago, Kevin wrote a blog post called Reach Out and Say Thanks, which was a lovely blog post. And go ahead and read it. The human summary of it is, if someone shares educational and fun content you appreciate and makes you smile, please tell them thank you.

And I really want to encourage you to go to our speakers today during the breaks and just say a quick thanks if you enjoyed it, and I promise you'll make their day. So please do go ask Kevin everything you didn't ask online. I'm sure you'll be more than happy to chat, and don't feel discouraged to approach our speakers throughout the day and the breaks.

It'll be really lovely to see you all chat, which leads me to our break. We are going to have a break now. Thank you so much. Give a round of applause for Kevin.

Thank you.

CSS is eating JavaScript
Kevin Powell

.css-day {
    date: 'June 11 & 12 2026';
    location: 'Amsterdam'
}
#identifier-sponsors {
    Google
    AG Grid
}

selector-sponsors {
    9ELEMENTS
    Polypane
}
A geometric logo formed by white rectangular blocks on a black background, spelling out 'CSS DAY'. Headshot of speaker Kevin Powell, a smiling man. Logos for Google, AG Grid, 9ELEMENTS, and Polypane are displayed as sponsors.
Logo for the "CSS DAY" event.

.now {

09:30 | Kevin Powell

A presentation slide featuring the CSS Day logo in the top right corner. The bottom of the slide displays sponsor logos for Google and AG Grid.

.now {

09:30 | Kevin Powell

A stylized logo for CSS Day is in the top right corner. The text '.now {' with a stylized bracket symbol is in the top left. Sponsor logos for Google and AG Grid are displayed at the bottom of the slide.

.now {

09:30 | Kevin Powell

Google

AG Grid

CSS Day logo.

Google logo.

AG Grid logo.

A square icon containing an 'X' and a right arrow.

09:30 | Kevin Powell

.now {

09:30 | Kevin Powell

A geometric CSS Day logo is displayed in the top right corner.

.now {

09:30 | Kevin Powell

A stylized CSS Day logo is in the top right corner. The bottom banner of the slide features a Google logo, an AG Grid logo, and an 'X' icon.

.now {

09:30 | Kevin Powell

09:30 | Kevin Powell

.now {

Google AG Grid

The CSS Day logo, a geometric pattern, is displayed in the top right and bottom right of the slide. Sponsor logos for Google and AG Grid, which includes a colorful abstract element, are at the bottom of the slide. There is also an 'X' icon in the bottom right corner.

.now {

09:30 | Kevin Powell

Google

AG Grid

Logo for CSS DAY in the top right corner. Google logo at the bottom left of the slide. AG Grid logo at the bottom middle of the slide. An 'x' icon at the bottom right of the slide.

We've got an update for you

Screenshot of a Windows update prompt.

CSS is eating JavaScript

A decorative wavy line in pink and purple colors is displayed below the word "eating", extending towards "JavaScript".

CSS is eating JavaScript

CSS Day 2026 | Kevin Powell

Google publishes exploit code threatening of Chromium

x86 CPU made in CSS by Lena Bohm

Screenshot of an Ars Technica article headline. Screenshot of a web application with a purple console-like interface displaying a menu for an "x86 CPU made in CSS" demo.

CSS only CPU mode in CSS

Screenshot of a web browser displaying an Ars Technica article on the left and a terminal-like interface for a CSS-only CPU emulator demo on the right.
input:checked ~ .nav {
  display: block;
}

The anchor ⚓

I'm anchored to the other element!

A diagram showing two rectangular elements: one labeled "The anchor" with a pink dashed border, and another labeled "I'm anchored to the other element!" positioned below and to the left of the anchor element.

Anchor Positioning Demonstration

The anchor ⚓

I'm anchored to the other element!

Two rectangular elements are displayed on a gray background. The top element is labeled "The anchor" and includes a small anchor icon. Directly below it, the second element is labeled "I'm anchored to the other element!".

I'm anchored to the other element!

The anchor ↓

A diagram showing two rectangular UI elements. The bottom element is labeled "The anchor ↓" and has a dashed border. The top element is labeled "I'm anchored to the other element!" and is positioned directly above the anchor element, illustrating an anchored UI component.

I'm anchored to the other element!

The anchor ⚓

An illustration showing a rectangular element labeled "The anchor" with a dashed border, and a speech bubble-like element above it labeled "I'm anchored to the other element!".

Website Navigation Example

Aerial view of a coastline with rocky cliffs and ocean. A white motorboat with a wake is visible in the water. Overlaid on the image is a dark navigation bar featuring links: Home, About, Our team, Blog, and Contact. The 'About' link is visually highlighted, suggesting it is the active page.
Screenshot of a webpage featuring a navigation menu ('Home', 'About', 'Our team', 'Blog', 'Contact') displayed over an aerial image of a coastal area with an island and a boat; 'Blog' is highlighted.
  • tan()
  • rem()
  • random()
  • calc()
  • min()
  • max()
  • sin()
  • cos()
A circular diagram illustrating various CSS math functions, including trigonometric, calculation, and utility functions.
  • tan()
  • rem()
  • random()
  • calc()
  • min()
  • max()
  • sin()
  • cos()
A circular diagram illustrating various CSS math functions, including tan, rem, random, calc, min, max, sin, and cos, connected by a dashed line.
  • tan()
  • rem()
  • random()
  • calc()
  • min()
  • max()
  • sin()
  • cos()
A diagram shows eight CSS functions arranged in a circle, connected by dashed lines: tan(), rem(), random(), calc(), min(), max(), sin(), and cos().

CSS Math Functions

  • `cos()`
  • `tan()`
  • `rem()`
  • `random()`
  • `calc()`
  • `min()`
  • `max()`
  • `sin()`
A circular diagram illustrating various CSS math functions, including trigonometric functions, utility functions, and mathematical operations, connected by dashed lines.
  • sin()
  • max()
  • min()
  • calc()
  • rando
A diagram showing five interconnected nodes arranged in a circle, linked by dashed lines, representing a flow of functions. The nodes contain the text: sin(), max(), min(), calc(), and rando.

CSS functions:

  • tan()
  • rem()
  • random()
  • calc()
  • min()
  • max()
  • sin()
  • cos()

A circular diagram displays eight CSS functions: tan(), rem(), random(), calc(), min(), max(), sin(), and cos(). They are arranged clockwise in a circle and connected by a dashed line, illustrating their relationship or grouping.

CSS Mathematical Functions

  • tan()
  • rem()
  • random()
  • calc()
  • min()
  • max()
  • sin()
  • cos()
A diagram displaying eight CSS functions arranged in a circle and connected by a dotted line. The functions shown are tan(), rem(), random(), calc(), min(), max(), sin(), and cos().
  • tan()
  • rem()
  • random()
  • calc()
  • min()
  • max()
  • sin()
  • cos()
A diagram displaying eight CSS functions arranged in a circle and connected by a dashed line. The functions are tan(), rem(), random(), calc(), min(), max(), sin(), and cos().

Graph Theory (Chrome-only)

Screenshot of a web application demonstrating graph theory. The application displays an interactive graph with nodes labeled S, A, B, C, D, and E, connected by edges with numerical weights. The shortest path from S to E, specified as S-A-C-E with a total weight of 2358, is highlighted. The interface includes instructions to 'Drag the circles to get the shortest path between S and E' and a 'View Source Code' button.

Graph Theory (Chrome-only)

A screenshot of an interactive web application demonstrating graph theory. It displays six circular nodes labeled S (start, green), A, B, C, D (intermediate, blue), and E (end, red). These nodes are connected by lines (edges) with numerical weights. A path from S to E, specifically S-B-D-E, is highlighted in a darker color, indicating it is the shortest path, with a total weight of 2156. Other potential paths are shown in lighter grey. Instructions on the screen state, "Drag the circles to get the shortest path between S and E."

Graph Theory (Chrome-only)

A screenshot of an interactive graph visualization tool. It displays a network of six nodes labeled S, A, B, C, D, E connected by weighted edges. Node S is green, node E is red, and intermediate nodes A, B, C, D are light blue. Visible edge weights include S-A (664), S-B (806), A-D (627), A-C (1376), C-D (1583), C-E (702), and D-E (1178). The path S-A-D-E is highlighted as the shortest path, with a total calculated weight of 2469. Instructions on the screen state, "Drag the circles to get the shortest path between S and E".

Graph Theory (Chrome-only)

Instruction: Drag the circles to get the shortest path between S and E

Current Shortest Path: S-A-C-E (2420)

A graph visualization demonstrating shortest path calculation. Nodes are labeled S, A, B, C, D, E, with S (green) as the start and E (red) as the end. Edges connecting nodes have numerical weights. A dark line highlights the shortest path found: S-A-C-E, with edge weights S-A: 664, A-C: 914, and C-E: 841. Other unhighlighted paths and weights are visible between the nodes.

Graph Theory (Chrome-only)

Drag the circles to get the shortest path between S and E

Shortest Path: S-A-C-E (2420)

A web application demonstrating graph theory, showing an interactive graph with labeled nodes (S, A, B, C, D, E) and weighted edges. A green line highlights the calculated shortest path from S to E, currently S-A-C-E, with a total weight of 2420.

Graph Theory (Chrome-only)

Drag the circles to get the shortest path between S and E

Shortest Path: S-A-D-E (2332)

A diagram showing an interactive graph visualization. It features several nodes (circles labeled S, A, B, C, D, E) connected by weighted edges (lines with numerical values like 184, 1009, 459). The node labeled 'S' is green, and the node labeled 'E' is red. A path from S to A, then A to D, then D to E is highlighted, indicating the shortest path found, with an associated total weight of 2332.

These are all amazing!

@aarondcmedia

  • This is the wro
  • Languages sho
  • "programming"
  • generalised lan
  • CSS should not
  • colour your web

A circular profile picture shows a man with glasses and a beard.

@aarondcmedia9585 2 months ago (edited)

This is the wrong way to go IMO.

Languages should specialise, and shifting from "style" to "programming" is making CSS (= hierarchical style information) a generalised language now, which is silly at best.

CSS should not need calc functions either. If you don't know what colour your webpage should be at generation time WYD?

Show less

A circular profile picture of a person with glasses and a dark hoodie.

@aarondcmedia9585 2 months ago (edited)

CSS should not need calc functions either. If you don't know what colour your webpage should be at generation time WYD?

Screenshot of a YouTube comment.

@aarondcmedia9585 4 months ago (edited)

This is the wrong way to go IMO.

Languages should specialise, and shifting from "style" to "programming" is making CSS (= hierarchical style information) a generalised language now, which is silly at best.

CSS should not need calc functions either. If you don't know what colour your webpage should be at generation time WYD?

Show less

Screenshot of a YouTube comment with opinions on CSS features like calc functions and the direction of the language.

YouTube comment about programming languages and CSS

Screenshot of a social media comment section with a user's profile picture and partial text of their comment.

@aarondcmedia9585 2 months ago (edited)

This is the wrong way to go IMO.

Languages should specialise, and shifting from "style" to "programming" is making CSS (= hierarchical style information) a generalised language now, which is silly at best.

CSS should not need calc functions either. If you don't know what colour your webpage should be at generation time WYD?

Show less

Screenshot of a YouTube comment.

@aarondcmedia9585 2 months ago (edited)

This is the wrong way to go IMO.

Languages should specialise, and shifting from "style" to "programming" is making CSS (= hierarchical style information) a generalised language now, which is silly at best.

CSS should not need calc functions either. If you don't know what colour your webpage should be at generation time WYD?

Screenshot of a social media comment discussing the role of CSS.

Separation of concerns!

JavaScript

CSS

Two rectangular boxes with rounded corners are displayed side-by-side. The left box is labeled "JavaScript", and the right box is labeled "CSS".

JavaScript

  • Fetch data from API
  • Process data
  • inline style

CSS

A diagram contrasting JavaScript and CSS roles. Under 'JavaScript', a flowchart shows a sequence of steps: Fetch data from API, followed by Process data, followed by inline style. Under 'CSS', an empty box is shown.

JavaScript

  • Fetch data from API
  • Process data
  • inline style

CSS

A flowchart illustrates a JavaScript process: first, "Fetch data from API," then "Process data," followed by "inline style." Each step is enclosed in a dotted rectangle, and arrows indicate the flow. On the right, under a "CSS" heading, is an emoji depicting a face with a hand over its mouth, typically associated with yawning or boredom.

JavaScript

  • Fetch data from API
  • Process data
  • inline style

CSS

A flowchart illustrates a JavaScript process with three steps connected by downward arrows: "Fetch data from API", "Process data", and "inline style". The "inline style" step is outlined with a dashed border.

Adjacent to the JavaScript flowchart, a "face with hand over mouth" emoji represents CSS.

JavaScript

Fetch data from API

Process data

inline style

CSS

A slide divided into two columns. The JavaScript column displays a flowchart showing three sequential steps: Fetch data from API, followed by Process data, and finally an inline style (which is highlighted with a dashed border). The CSS column contains a thinking face emoji.

14 Days

All 14 days →

Sat

May 23

16°

Night 6°

10%

Sun

May 24

19°

Night 9°

20%

Mon

May 25

12°

Night 10°

70%

20-25mm

Tue

May 26

17°

Night 9°

40%

~1mm

Wed

May 27

14°

Night 7°

70%

20-25mm

Thu

May 28

12°

Night 6°

70%

5-10mm

A screenshot of a 6-day weather forecast from a weather application, displaying daily temperature, night temperature, precipitation probability, and rainfall amounts for each day, along with corresponding weather icons.

14 Days Forecast

All 14 days

Saturday, May 23

Sunny

Day: 16°

Night: 6°

Precipitation: 10%

Sunday, May 24

Partly cloudy

Day: 19°

Night: 9°

Precipitation: 20%

Monday, May 25

Heavy rain

Day: 12°

Night: 10°

Precipitation: 70%

Rainfall: 20-25mm

Tuesday, May 26

Partly cloudy with light rain

Day: 17°

Night: 9°

Precipitation: 40%

Rainfall: ~1mm

Wednesday, May 27

Heavy rain

Day: 14°

Night: 7°

Precipitation: 70%

Rainfall: 20-25mm

Thursday, May 28

Partly cloudy with heavy rain

Day: 12°

Night: 6°

Precipitation: 70%

Rainfall: 5-10mm

A weather forecast interface showing daily weather conditions for six days, each in a separate card. Each card displays the day, date, a weather icon, day and night temperatures, and precipitation percentage. Some cards also include an estimated rainfall amount visually represented by a blue bar.

14 Days Weather Forecast

Screenshot of a weather application interface showing a 14-day forecast with daily weather details for several days, including temperature, precipitation chance, and precipitation amount for each day.

14 Days

All 14 days →

Sat

May 23

16°

Night 6°

10%

Sun

May 24

19°

Night 9°

20%

Mon

May 25

12°

Night 10°

70%

20-25mm

Tue

May 26

17°

Night 9°

40%

<1mm

Wed

May 27

14°

Night 7°

70%

20-25mm

Thu

May 28

12°

Night 6°

70%

5-10mm

A screenshot of a weather forecast interface showing a 14-day forecast, with individual cards for six consecutive days (Saturday May 23rd to Thursday May 28th). Each card displays the day, date, a weather icon (sun, sun with clouds, rain, or clouds with rain), day temperature, night temperature, chance of precipitation, and for some days, the expected precipitation amount.

14 Days

Screenshot of a weather forecast application showing a 6-day forecast from Saturday, May 23rd to Thursday, May 28th, with daily temperatures, weather icons, precipitation chance, and expected rainfall amounts.

14 Days Weather Forecast

A screenshot of a weather forecast application interface displaying a '14 Days' section. It shows a daily forecast for six days, from Saturday, May 23rd to Thursday, May 28th. Each day's card includes the date, a weather icon (sunny, partly cloudy, or rainy), day and night temperatures, chance of precipitation, and some days include expected rainfall amounts.

14 Days

Screenshot of a weather forecast application showing a 6-day forecast with daily temperature, weather conditions, and precipitation details.

14 Days

Sat

May 23

16°

Night 6°

10% chance of rain

Sun

May 24

19°

Night 9°

20% chance of rain

Mon

May 25

12°

Night 10°

70% chance of rain

20-25mm rainfall

Tue

May 26

17°

Night 9°

40% chance of rain

~1mm rainfall

Wed

May 27

14°

Night 7°

70% chance of rain

20-25mm rainfall

Thu

May 28

12°

Night 6°

70% chance of rain

5-10mm rainfall

Screenshot of a weather forecast user interface showing a 6-day outlook. Each day displays the day of the week, date, a weather icon (sun, sun with clouds, rain cloud, or sun behind rain cloud), day temperature, night temperature, probability of precipitation, and predicted rainfall amount displayed with a blue bar indicator at the bottom.
A dark, low-contrast technical diagram illustrating a data flow or application architecture. Faint rectangular shapes and connecting lines are visible, representing steps such as a user landing on a page, fetching location data, hitting an API for information, and displaying UI elements like "rain bar indicators." The diagram appears to include details on how these elements are styled, possibly highlighting an inline style with a height of 62 pixels.
A dark-themed screenshot showing a user interface. A light grey horizontal bar spans the upper portion, with two small white triangular indicators positioned centrally above the main dark area. A bright blue section is visible on the far right, above the light grey bar.
<div class="weather-card"
	style="--precipitation: ${precipitation}">
.rainfall-visual {
	block-size: calc(
		var(--percinitation)
		/* some math stuff here */
	);
}
A code snippet displaying CSS.
.rainfall-visual {
  block-size: calc(
    var(--percicipitation)
    /* some math stuff here */
  );
}

This works, but the flow of data isn't clear.

HTML

<div class="wrap">
  <div class="weather-cards"></div>
</div>

CSS

.precipitation-visual {
  position: absolute;
  isolation: isolate;
  inset-block-end: 0;
  inset-inline: 0;
  ...
}

JavaScript

const MAX_precipitation = 10;
const data = {
  forecast: [
    {
      day: "Wednesday",
      ...
    }
  ]
};
A screenshot of a web interface displaying a weather forecast. Three cards are visible for Wednesday, Thursday, and Friday, each showing the date, day and night temperatures, and precipitation percentage with a corresponding bar graph indicating precipitation amount.

HTML

<div class="wrap">
  <div class="weather-cards"></div>
</div>

CSS

.precipitation-visual {
  position: absolute;
  isolation: isolate;
  inset-block-end: 0;
  inset-inline: 0;
}

JavaScript

const MAX_precipitation = 10;
const data = {
  forecast: [
    {
      day: "Wednesday",
...
Screenshot of a development environment showing code editors for HTML, CSS, and JavaScript, next to a live preview of a weather forecast application. The application displays three weather cards for Wednesday, Thursday, and Friday. Each card shows the day, date, day temperature, night temperature, a percentage, and a precipitation amount with a blue fill bar (8.2mm, 3.8mm, and 0mm respectively).

HTML

<div class="wrap">
  <div class="weather-cards"></div>
</div>

CSS

.precipitation-visual {
  position: absolute;
  isolation: isolate;
  inset-block-end: 0;
  inset-inline: 0;
  block-size: var(--precip-amount);
  background: var(--brand-blue);
}

JS

return `
<div class="weather-card">
...
Screenshot of a code editor showing HTML, CSS, and JavaScript code. Adjacent to the code, a browser preview displays a weather application with three cards. The cards show weather forecasts for Wednesday, Thursday, and Friday, including temperature, night temperature, precipitation chance, and a blue bar indicating precipitation amount (8.2mm, 3.8mm, 0mm).

HTML Code


<div class="wrap">
<div class="weather-cards"></div>
</div>
  

CSS Code


.precipitation-visual {
  position: absolute;
  isolation: isolate;
  inset-block-end: 0;
  inset-inline: 0;
  block-size: var(--precip-amount);
  background: var(--brand-blue);
}
  

JavaScript Code Snippet


return `
<div class="weather-card">
  

Weather Forecast Cards

  • Wednesday

    May 27

    14°

    Night 7°

    70%

    Precipitation: 8.2mm

  • Thursday

    May 28

    12°

    Night 6°

    40%

    Precipitation: 3.8mm

  • Friday

    May 29

    17°

    Night 9°

    10%

    Precipitation: 0mm

Screenshot of a development environment showing HTML, CSS, and JavaScript code on the left, and a live preview of a weather application on the right. The application displays three weather forecast cards for Wednesday, Thursday, and Friday, each with temperature, night temperature, precipitation chance, and a visual representation of precipitation amount using a blue bar.
<div class="wrap">
    <div class="weat
    </div>
...
<div class="lo
.precipitation-visual {
    position: abs
    isolation: is
    inset-block-e
    inset-inline:
    block-size: v
    background: v
}
return `
<div class="precipitation-info`
<div class="precipitation-visual" style="--precip-amount: 82%;">
element.style {
    --precip-amount: 82%;
}

.precipitation-visual {
    /* ... */
}
Screenshot of a code editor on the left displaying HTML, CSS, and JavaScript code. On the right, Chrome DevTools inspects a web page showing a weather forecast. The DevTools Elements panel highlights a `div.precipitation-visual` element with an inline style setting `--precip-amount: 82%`. The Styles panel shows `element.style` with this custom property and the `.precipitation-visual` CSS rule. The web page itself shows weather cards for Wednesday (14°C, 8.2mm precipitation), Thursday (12°C, 3.8mm precipitation), and Friday (17°C, 0mm precipitation).

Code Snippets from a Development Environment

HTML

1 <div class="wrap">
2   <div class="weat
3 </div>
4 

CSS

1 .precipitation-
2   position: abs;
3   isolation: is;
4   inset-block-el
5   inset-inline:
6   block-size: v
7   background: v
8 }

JavaScript

46 return `
47 <div class="l"
48 

Chrome DevTools Styles Panel

The selected element displays an inline style:

element.style {
  --precip-amount: 82%;
}

And inherited styles from the .precipitation-visual class:

.precipitation-visual {
  position: absolute;
  isolation: isolate;
}
A screenshot of a development environment. On the left, a code editor with a dark theme displays HTML, CSS, and JavaScript code snippets. On the right, a web browser shows a weather forecast widget with three daily cards for Wednesday, Thursday, and Friday. Each card displays the date, temperature, night temperature, precipitation percentage, and a visual bar graph of precipitation amount (8.2mm, 3.8mm, and 0mm respectively). Below the browser window, Chrome DevTools is open to the 'Elements' tab, with the 'Styles' panel visible. The styles panel shows an inline style '--precip-amount: 82%' for the selected element and the beginning of the '.precipitation-visual' CSS rule, along with a 'What's new in DevTools 149' banner.
<div class="wrap">
  <div class="weather-cards"></div>
</div>
.precipitation-visual {
  position: absolute;
  isolation: isolate;
  inset-block-end: 0;
  inset-inline: 0;
  block-size: var(--precip-amount);
  background: var(--brand-blue);
}
return `
  <div class="weather-card">
...
A UI preview showing three weather forecast cards. The cards display weather information for Wednesday, Thursday, and Friday, including date, day and night temperatures, precipitation percentage, and a horizontal bar indicating the precipitation amount (8.3mm, 3.8mm, 0mm respectively).

We can make this flow a lot more clear.

attr()

attr()

A blue rounded rectangle containing the text 'attr()'.
A stylized geometric logo or abstract pattern made of dark rectangular blocks on a white background.
-1);
border-subt

Milk, 1 gal

A code editor showing a partial CSS code snippet. To its right, a white rectangular element with rounded corners displays the text "Milk, 1 gal".

<div class="wrapper">
	<ul class="card-grid" role="list">
		<li class="card" data-promo="Rollback">
			<div class="card__media">
				<img
					src="https://images.unsplash.com/photo-1629864222049-7c4f4a3f1b4c?ixlib=rb-4.0.3&ixid=M3wxMjA3fDB8MHxzZWFyY2h8Mnx8bWlsdHwwfDB8fHww&auto=format&fit=crop&w=800"
					alt="Great Value Milk"
					width="800"
...
.card {
	position: relative;
	list-style: none;
	background: var(--surface-1);
	border: 1px solid var(--border-subtle);
	border-radius: 8px;
	overflow: hidden;
	max-inline-size: 280px;
...
A code editor showing HTML and CSS code on the left, and a live preview of a product card on the right. The product card displays a bottle of milk, its price '$3.47', and a description 'Milk, 1 gal', with a small green indicator at the top right.

Using data-attributes with ::before and content

<div class="wrapper">
  <ul class="card-grid" role="list">
    <li class="card" data-promo="Rollback">
      <div class="card_media">
scale: 1.5;

&::before {
  content: "dfgh";
  position: absolute;
  inset: var(--space-s) var(--space-s) auto;
  background: hsl(120, 50%, 32%);
  color: hsl(120, 30%, 92%);
  font-size: var(--fs-0);
  font-weight: 700;
  letter-spacing: 0.05em;
  text-transform: uppercase;
  /* ... more code likely */
}
A screenshot of a code editor showing HTML and CSS code on the left. On the right, a preview pane displays a product card with a bottle of organic milk, priced at $3.47, with the text "Milk, 1 gal". A small green rectangular element is visible at the top right of the product card.

HTML

<div class="wrapper">
  <ul class="card-grid" role="list">
    <li class="card" data-promo="Rollback">
      <div class="card_media">...

CSS

  scale: 1.5;

  &::before {
    content: attr(dat);
    position: absolute;
    inset: var(--space-s) var(--space-s) auto;
    background: hsl(120, 50%, 32%);
    color: hsl(120, 30%, 92%);
    font-size: var(--fs-0);
    font-weight: 700;
    letter-spacing: 0.05em;
    text-transform: uppercase;...
A screenshot of a web development environment showing HTML and CSS code on the left, and a rendered product card on the right. The product card displays an image of a glass bottle of organic milk, a price of $3.47, and the text "Milk, 1 gal".
<div class="wrapper">
  <ul class="card-grid" role="list">
    <li class="card" data-promo="Rollback">
      <div class="card__media">
scale: 1.5;

&::before {
  content: attr(data-promo);
  position: absolute;
  inset: var(--space-s) var(--space-s) auto;
  background: hsl(120, 50%, 32%);
  color: hsl(120, 30%, 92%);
  font-size: var(--fs-0);
  font-weight: 700;
  letter-spacing: 0.05em;
  ...
A code editor displays HTML and CSS. The HTML shows a list item with a `data-promo` attribute. The CSS shows styles for a `::before` pseudo-element, using `attr(data-promo)` for its content. To the right, a rendered web component shows a product card for "Organic Milk" priced at "$3.47", with a small green banner at the top right of the card, styled by the CSS.
<div class="wrapper">
<ul class="card-grid" role="list">
  <li class="card" data-promo="Rollback">
    <div class="card__media">
scale: 1.5;

&::before {
    content: attr(data-promo);
    position: absolute;
    inset: var(--space-s) var(--space-s) auto
    background: hsl(120, 50%, 32%);
    color: hsl(120, 30%, 92%);
    font-size: var(--fs-0);
    font-weight: 700;
    letter-spacing: 0.05em;
    text-transform: uppercase;
...
A screenshot of an IDE showing HTML and CSS code on the left, and a web page preview on the right. The HTML code shows a list item with a `data-promo="Rollback"` attribute. The CSS code defines styles for a `::before` pseudo-element, using `content: attr(data-promo)` to display the attribute's value. The web page preview shows a product card featuring a bottle of milk, priced at $3.47, with a green "ROLLBACK" tag at the top, which is dynamically generated from the `data-promo` attribute.
<div class="wrapper">
  <ul class="card-grid" role="list">
    <li class="card" data-promo="Rollback">
      <div class="card__media">
  scale: 1.5;

  &::before {
    content: attr(data-promo);
    position: absolute;
    inset: var(--space-s) var(--space-s) auto;
    background: hsl(120, 50%, 32%);
    color: hsl(120, 30%, 92%);
    font-size: var(--fs-0);
    font-weight: 700;
    letter-spacing: 0.05em;
    text-transform: ...
A code editor is displayed on the left, showing HTML and CSS code. On the right, a rendered webpage section features a product card. The product card displays an image of a bottle of organic milk, with a green "ROLLBACK" banner positioned at the top. Below the image, the price "$3.47" and the description "Milk, 1 gal" are shown.
<div class="wrapper">
  <ul class="card-grid" role="list">
    <li class="card" data-promo="sa">
      <div class="card__media">
scale: 1.5;

&&::before {
  content: attr(data-promo);
  position: absolute;
  inset: var(--space-s) var(--space-s) auto;
  background: hsl(120, 50%, 32%);
  color: hsl(120, 30%, 92%);
  font-size: var(--fs-0);
  font-weight: 700;
  letter-spacing: 0.05em;
  text-transform: uppercase;
}
A split screen showing a code editor on the left and a product card preview on the right. The code editor displays HTML and CSS. The HTML shows a `div` with class "wrapper" containing a `ul` with class "card-grid" and an `li` with class "card" and `data-promo="sa"`. The CSS pane shows styles including `scale: 1.5;` and a `::before` pseudo-element rule that uses `content: attr(data-promo);` to display text based on the `data-promo` attribute, styled with a green background and uppercase text. The preview pane shows a product card featuring a bottle of "ORGANIC MILK". A green "ROLLBACK" label is displayed at the top right of the product image. Below the image, the price "$3.47" and "Milk, 1 gal" are displayed.
<div class="wrapper">
  <ul class="card-grid" role="list">
    <li class="card" data-promo="sale">
      <div class="card_media">
scale: 1.5;

&::before {
  content: attr(data-promo);
  position: absolute;
  inset: var(--space-s) var(--space-s) auto;
  background: hsl(120, 50%, 32%);
  color: hsl(120, 30%, 92%);
  font-size: var(--fs-0);
  font-weight: 700;
  letter-spacing: 0.05em;
  text-transform: uppercase;
}
Screenshot of a code editor showing HTML and CSS code on the left, and the rendered output of a product card on the right. The HTML defines a list item with a `data-promo="sale"` attribute. The CSS uses a `&::before` pseudo-element with `content: attr(data-promo)` to display the value of the attribute. The rendered product card features an image of an organic milk bottle, displays the price "$3.47" and text "Milk, 1 gal", and has a red "SALE" badge in the top right corner, generated by the CSS.
<div class="wrapper">
<ul class="card-grid" role="list">
<li class="card" data-promo="sale">
<div class="card__media">
  text-transform: uppercase;
  padding: 0.25em 0.75em;
  border-radius: 4px;
}

&[data-promo="sale"]::before {
  background: firebrick;
}

.card__media {
  background: #fff;
A split-screen view showing a code editor on the left and a product card preview on the right. The code editor displays HTML and CSS. The HTML shows a wrapper div containing an unordered list with a list item that has a `data-promo="sale"` attribute. The CSS shows rules for `text-transform`, `padding`, `border-radius`, a `::before` pseudo-element for elements with `data-promo="sale"` (setting its background to firebrick), and a `.card__media` class (setting its background to white). On the right, a product card displays a glass bottle of organic milk with a green cap and label, priced at $3.47 and labeled "Milk, 1 gal". A red "SALE" badge is visible in the top right corner of the card.
  • Can't search for, or select
  • Internationalization

We can now use `attr()` with any property!

In Chromium (since 133), Safari TP, and behind a flag in Firefox.

We can now use attr() with any property!

In Chromium (since 133), Safari TP, and behind a flag in Firefox.

<section class="columns" data-column-c
  <div></div>
  <div></div>
  <div></div>
  <div></div>
  <div></div>
  <div></div>
  <div></div>
  <div></div>
.columns {
  --col-count: ;
  display: grid;
  gap: 12px;
  grid-template-columns: repeat(var(--
}
Screenshot of a code editor showing HTML and CSS code, with a browser preview displaying multiple pink horizontal bars arranged in a grid.
<section class="columns" data-column-count="3">
  <div></div>
  <div></div>
  <div></div>
  <div></div>
  <div></div>
  <div></div>
  <div></div>
  <div></div>
</section>
.columns {
  --col-count: ;
  display: grid;
  gap: 12px;
  grid-template-columns: repeat(var(--col-count),
}
A screenshot of a code editor showing HTML and CSS code. On the right, a live preview displays multiple evenly spaced, purple horizontal rectangles with rounded corners, currently stacked in a single column.
<section class="columns" data-column-count="3">
  <div></div>
  <div></div>
  <div></div>
  <div></div>
  <div></div>
  <div></div>
  <div></div>
</section>
.columns {
  --col-count: ;

  display: grid;
  gap: 12px;
  grid-template-columns: repeat(var(--col-count), ...
}
Screenshot of a code editor showing HTML and CSS code on the left, and a browser preview on the right displaying a single column of numerous purple rectangular elements with rounded corners.
<div></div>
<div></div>
<div></div>
</section>

<section class="columns" data-column-count="2">
    <div></div>
    <div></div>
.columns {
    --col-count: ;
    display: grid;
    gap: 12px;
    grid-template-columns: repeat(var(--col-count),);
}
A screenshot of a code editor displaying HTML and CSS. The HTML shows a section with class "columns" and an attribute `data-column-count="2"`, containing several `div` elements. The CSS defines styles for the `.columns` class, using `display: grid`, `gap`, and `grid-template-columns` with a custom property `--col-count`. To the right, a browser preview pane shows a series of identical purple rounded rectangles stacked vertically, forming a single column.

...
  <div></div>
  <div></div>
...
  

.columns {
  --col-count: 3;
  display: grid;
  gap: 12px;
  grid-template-columns: repeat(var(--col-count),...
}

section {
  margin-block: 2rem;
}

div {
...
}
  
Screenshot of a code editor displaying HTML and CSS code, with a live preview on the right showing a grid of multiple purple rectangular items arranged in three columns.
<div></div>
<div></div>
<div></div>
.columns {
  --col-count: ;
  display: grid;
  gap: 12px;
  grid-template-columns: repeat(var(--col-count),
}
section {
  margin-block: 2rem;
}
div {
Screenshot showing a code editor displaying HTML and CSS on the left, and a web browser preview on the right. The browser preview shows a vertical stack of purple rectangular elements.

Code Editor and Browser Output

<div></div>
<div></div>
.columns {
  --col-count: attr(data-column);

  display: grid;
  gap: 12px;
  grid-template-columns: repeat(var(--col-count),
}

section {
  margin-block: 2rem;
}

div {
A code editor window on the left displays HTML and CSS code. The HTML shows two empty div tags. The CSS defines a `.columns` class using custom properties and grid layout. On the right, a browser preview shows a vertical stack of numerous light purple rectangular bars, each with rounded corners and separated by a small gap. The bars currently occupy the full width of their container, indicating a single-column layout.

<div>
<div></div>
<div></div>

.columns {
	--col-count: attr(data-column-count);

	display: grid;
	gap: 12px;
	grid-template-columns: repeat(var(--col-count), );
}
section {
	margin-block: 2rem;
}
div {
A split-screen view showing a code editor on the left with HTML and CSS code, and a web browser on the right displaying a page with purple horizontal bars. A right-click context menu is open in the browser, with the "Inspect" option highlighted.
<div></div>
<div></div>
.columns {
	--col-count: attr(da...

	display: grid;
	gap: 12px;
	grid-template-column...
}
section {
	margin-block: 2rem;
}
div {
...
}
Screenshot showing a split view of a code editor and browser developer tools. On the left, a code editor displays HTML code containing two empty `div` elements, and CSS code defining rules for `.columns`, `section`, and `div`. The `.columns` rule includes an incomplete custom property `--col-count` using `attr()`, along with `display: grid`, `gap`, and an incomplete `grid-template-column`. On the right, Chrome DevTools' Elements panel is open, showing a `div` element selected. A tooltip appears over this `div`, displaying its dimensions as "284 x 32". Below, a series of identical purple rectangular `div` elements are rendered in the browser preview pane within DevTools. The DevTools also show the Console and a "What's new in DevTools 149" section at the bottom.

Code Example and DevTools Inspection

HTML:

<div></div>
<div></div>

CSS:

.columns {
  --col-count: attr(da
  display: grid;
  gap: 12px;
  grid-template-column
}

section {
  margin-block: 2rem;
}

div {
  padding: 1rem;
  background: orchid;
  border-radius: 6px;
}

In DevTools, the parent element section.columns has attribute data-column-count="3". The selected div element displays the following applied styles:

div {
  padding: 1rem;
  background: orchid;
  border-radius: 6px;
}
Screenshot of a web development environment with a code editor on the left displaying HTML and CSS. A browser preview in the center shows a column of purple rounded-corner div elements. On the right, Chrome DevTools' Elements panel is open, inspecting a div element and showing its applied CSS styles.
<div></div>
<div></div>
.columns {
  --col-count: attr(da
  display: grid;
  gap: 12px;
  grid-template-column
}
section {
  margin-block: 2rem;
}
div {
}
<section class="columns" data-column-count="3">
.columns {
  --col-count: attr(data-column-count);
  display: grid;
  gap: 12px;
}
Screenshot of a code editor on the left displaying HTML and CSS code, alongside Chrome DevTools on the right. The HTML section shows empty `div` tags. The CSS section shows a `.columns` rule with `display: grid;`, `gap: 12px;`, and partially `grid-template-column`. It also shows a `section` rule with `margin-block: 2rem;` and an empty `div` rule. In the DevTools, the Elements panel highlights a `
` element. The Styles panel shows the `.columns` CSS rule with properties `--col-count: attr(data-column-count);`, `display: grid;`, and `gap: 12px;`. A small browser preview frame above DevTools displays a series of stacked purple and orange rectangular blocks.

CSS Custom Property Debugging in Chrome DevTools

HTML element being inspected in DevTools:

<section class="columns" data-column-count="3">

CSS from editor (showing incomplete custom property declaration):

.columns {
    --col-count: attr(da
    display: grid;
    gap: 12px;
    grid-template-column
  }

  section {
    margin-block: 2rem;
  }

  div {
  

CSS as displayed in DevTools Styles panel:

.columns {
    --col-count: attr(data-column-count);
    display: grid;
    gap: 12px;
  }
Screenshot of a web development environment. On the left, an HTML/CSS code editor displays snippets of HTML `div` elements and CSS rules for `.columns`, `section`, and `div`. In the center, a browser preview shows a vertical stack of evenly spaced purple rectangular elements. On the right, Chrome DevTools is open to the 'Elements' tab, with a `section` element having the class `columns` and `data-column-count="3"` attribute selected. The 'Styles' sub-panel shows the applied CSS rules for `.columns`, including a custom property `--col-count` using `attr(data-column-count)`. Below the styles, a 'What's new in DevTools 149' section is visible.

Debugging CSS Grid with Custom Properties

HTML Structure (from Elements panel):

<section class="columns" data-column-count="3">
  <div></div>
  <div></div>
  <div></div>
  <div></div>
  <div></div>
  <div></div>
</section>

CSS Styles (from Editor and Styles panel):

.columns {
  --col-count: attr(data-column-count); /* In editor, this line is cut off as 'attr(da' */
  display: grid;
  gap: 12px;
  grid-template-columns: var(--col-count); /* In editor, this line is cut off as 'grid-template-column' */
}

section {
  margin-block: 2rem;
}

div {
  /* ... Partially visible styles for div elements ... */
}

The speaker is debugging an issue where the --col-count custom property, set using attr(data-column-count), doesn't function as expected for grid-template-columns. Despite the DevTools showing the data-column-count="3" attribute, the attr() function returns a string value ("3") which is causing the grid layout to fail because it requires a numeric value or valid track sizing syntax.

Screenshot of a web development environment. The left panel shows a code editor displaying HTML code for `div` elements and CSS code defining styles for `.columns`, `section`, and `div`. The central panel contains a live browser preview, rendered as a single vertical column of purple, rounded rectangular elements. The right panel shows browser developer tools, with the "Elements" tab selected, revealing the HTML structure of a `section.columns` element that has a `data-column-count="3"` attribute and contains multiple child `div` elements. Below this, the "Styles" tab is active, displaying the CSS rules applied to the selected element, including `display: grid`, `gap: 12px`, and a custom property `--col-count` set using `attr(data-column-count)`.
<div></div>
<div></div>
<div></div>
.columns {
  --col-count: attr(data-column-count);
  display: grid;
  gap: 12px;
  grid-template-columns: repeat(var(--col-count), 1fr);
}

section {
  margin-block: 2rem;
}
Screenshot of a web development environment split into three main areas. On the left, a code editor shows HTML markup with multiple empty div elements and CSS rules for a .columns class. In the center, a live preview displays a single column of numerous purple rectangular bars. On the right, Chrome DevTools' Elements and Styles panels are open, showing the computed CSS for a selected section.columns element, highlighting the custom CSS properties and grid-template-columns rule.
<div></div>
<div></div>
.columns {
  --col-count: attr(data-column-count);
  display: grid;
  gap: 12px;
  grid-template-columns: repeat(var(--col-count), 1fr);
}
section {
  margin-block: 2rem;
}
Screenshot of a web development environment showing a code editor on the left with HTML and CSS, a browser preview in the middle displaying a column of purple rectangles, and Chrome DevTools on the right. The DevTools are inspecting the CSS for a `section.columns` element, specifically highlighting the `--col-count` custom property which uses `attr(data-column-count)`, with a tooltip showing its computed value as the string "3".

Code Editor


HTML
18 <div></div>
19 <div></div>

CSS
1.columns {
2   --col-count: attr(da...
3
4   display: grid;
5   gap: 12px;
6   grid-template-column...
7}
8
9section {
10  margin-block: 2rem;
11}
12
13div {
...
}

Browser Developer Tools (Elements & Styles)

Selected element: section.columns


.columns {
  --col-count: attr(data-column-count);
  display: grid;
  gap: 12px;
  grid-template-columns: repeat(var(--col-count), 1fr);
}

section {
  margin-block: 2rem;
}

section { /* user agent stylesheet */
  display: block;
  unicode-bidi: isolate;
}
Screenshot of a code editor on the left displaying HTML and CSS, and browser developer tools on the right showing the Elements and Styles tabs, with a preview of a two-column grid layout composed of purple striped bars.
<div></div>
<div></div>
.columns {
  --col-count: attr(data-column-count);
  display: grid;
  gap: 12px;
  grid-template-columns: repeat(var(--col-count), 1fr);
}

section {
  margin-block: 2rem;
}

div {
  /* ... */
}
Screenshot of a code editor displaying HTML and CSS files, a browser preview rendering purple rectangular bars, and browser developer tools inspecting CSS styles.

HTML

<div></div>
<div></div>

CSS

.columns {
  --col-count: attr(data-column-count type);
  display: grid;
  gap: 12px;
  grid-template-columns: repeat(var(--col-count), ...);
}

section {
  margin-block: 2rem;
}

div {
  ...
}
A code editor displaying HTML and CSS code on the left, and a live preview on the right showing several horizontal, evenly spaced, purple-colored rectangular bars arranged in a single column.
HTML
<div></div>
<div></div>
<div></div>
CSS
.columns {
  --col-count: attr(data-column-count type());

  display: grid;
  gap: 12px;
  grid-template-columns: repeat(var(--col-count), );
}

section {
  margin-block: 2rem;
}

div {
Screenshot of a code editor showing HTML and CSS code. The HTML section displays three empty div tags. The CSS section defines a `.columns` class using CSS custom properties, grid layout, and a `repeat()` function for `grid-template-columns`. It also shows a `section` selector with `margin-block` and a partially visible `div` selector. A vertical scrollbar is visible on the right, next to a column of purple blocks.

HTML

<div></div>
<div></div>

CSS

.columns {
  --col-count: attr(data-column-count type(<num>));

  display: grid;
  gap: 12px;
  grid-template-columns: repeat(var(--col-count), 1fr);
}

section {
  margin-block: 2rem;
}

div {
  ...
}
Screenshot of a code editor, likely Visual Studio Code, displaying HTML and CSS code.

Code Example: Custom Properties and CSS Grid

<div></div>
<div></div>
.columns {
  --col-count: attr(data-column-count type(<number>));

  display: grid;
  gap: 12px;
  grid-template-columns: repeat(var(--col-count), 1fr);
}

.action {
  margin-block: 2rem;
}

.div {
}
A screenshot of a code editor displaying HTML and CSS code. The HTML section shows two empty `<div>` tags. The CSS section defines a `.columns` class that utilizes CSS Grid properties, including a custom property `--col-count` which retrieves its value from a `data-column-count` attribute with a `number` type. Styles for `.action` and an empty `.div` rule are also visible. To the right of the code editor, a preview panel shows a series of purple rectangular elements arranged in a grid, visually representing the applied CSS Grid layout.

HTML

...
<div>
	<div></div>
	<div></div>

CSS

.columns {
	--col-count: attr(data-column-count type(<number>));

	display: grid;
	gap: 12px;
	grid-template-columns: repeat(var(--col-count), 1fr);
}

section {
	margin-block: 2rem;
}

div {
	...
}
Screenshot of a code editor showing HTML and CSS code.
<div></div>
<div></div>
columns {
  --col-count: attr(data-colum-c...);
  display: grid;
  gap: 12px;
  grid-template-columns: repeat(v...);
}

section {
  margin-block: 2rem;
}

div {
  /* ... */
}
Screenshot of a code editor displaying HTML and CSS code, alongside a browser preview showing a grid layout of purple rectangular blocks. The blocks are arranged in multiple columns, with varying widths across rows.
<!-- ... -->
<div></div>
<div></div>
<div></div>
<div></div>
</section>

<section class="columns" data-co...>
  <div></div>
  <div></div>
  <div></div>
  <div></div>
  <div></div>
</section>
<!-- ... -->
.columns {
  --col-count: attr(data-column-c...);
  display: grid;
}
Screenshot of a browser rendering showing content arranged in multiple columns, with each content block represented by a light purple rectangle.
HTML
  <div></div>
  <div></div>
  <div></div>
</section>

<section class="columns" data-c
  <div></div>
  <div></div>
  <div></div>
  <div></div>
  <div></div>
  <div></div>
  <div></div>
  <div></div>
</section>
CSS
A screenshot of a code editor showing HTML on the left. On the right, a white canvas displays a visual representation of the HTML, with several light purple rectangular blocks arranged in columns, illustrating a layout.
'columns" data-column-count="2">
A live preview of a web page layout showing purple rectangular content blocks primarily arranged in two columns, reflecting the `data-column-count="2"` attribute, alongside some full-width and three-column arrangements.
<columns" data-column-count="8">
A screenshot showing a code editor on the left with HTML code for a 'columns' element with a 'data-column-count' of 8. On the right, a live preview displays several pink rectangular blocks arranged in an 8-column layout, reflecting the code's effect.

   <div></div>
   <div></div>
   <div></div>
</section>

<section class="columns" datcolumn-count="8">
   <div></div>
   <div></div>
   <div></div>
   <div></div>
   <div></div>
   <div></div>
   <div></div>
   <div></div>
</section>
  
Screenshot of an HTML code editor. The code defines two sections: one containing three `div` elements, and another with `class="columns"` and a custom attribute `datcolumn-count="8"` containing eight `div` elements. To the right, a preview area displays a column layout visualized with purple rectangular blocks.

	<div></div>
	<div></div>
	<div></div>
	<div></div>
	<div></div>
	<div></div>
</section>

<section class="columns" column-count="8">
	<div></div>
	<div></div>
	<div></div>
	<div></div>
	<div></div>
	<div></div>
	<div></div>
	<div></div>
A screenshot of a code editor displaying HTML code, with line numbers visible.
<section class="columns" data-column-count="5">
    <div></div>
    <div></div>
    <div></div>
    <div></div>
    <div></div>
    <div></div>
    <div></div>
    <div></div>
</section>

<section class="columns" column-count="8">
    <div></div>
    <div></div>
    <div></div>
</section>
Screenshot of a code editor showing HTML code for two section elements, each containing multiple div elements. The right side of the screen displays a visual preview of these sections rendered as columns, appearing as purple rectangular blocks of varying widths, demonstrating different column counts.
</section>

<section class="columns" data-column-count="5">
    <div></div>
    <div></div>
    <div></div>
    <div></div>
    <div></div>
    <div></div>
    <div></div>
    <div></div>
</section>

<section class="columns" column-count="8">
    <div></div>
    <div></div>
Screenshot of a code editor displaying HTML code. The code defines two sections, one with a `data-column-count` attribute set to 5, and another with a `column-count` attribute set to 8.

HTML

</section>

<section class="columns" column-count="5">
	<div></div>
	<div></div>
	<div></div>
	<div></div>
	<div></div>
	<div></div>
	<div></div>
	<div></div>
</section>

<section class="columns" column-count="8">
	<div></div>
	<div></div>
	...
Screenshot of a code editor displaying HTML code.
<section class="columns" dacolumn-count="3">
  <div></div>
  <div></div>
  <div></div>
  <div></div>
  <div></div>
  <div></div>
  <div></div>
  <div></div>
  <div></div>
</section>

<section class="columns" column-count="5">
  <div></div>
  <div></div>
  <div></div>
  <div></div>
  ...
</section>
Code editor showing HTML code with two section elements, each containing multiple empty div elements. The first section has a `dacolumn-count` attribute set to 3, and the second section has a `column-count` attribute set to 5, with a scrollbar indicating more content.

HTML Code Example

<section class="columns" column-count="3">
	<div></div>
	<div></div>
	<div></div>
	<div></div>
	<div></div>
	<div></div>
	<div></div>
	<div></div>
	<div></div>
</section>

<section class="columns" column-count="5">
	<div></div>
	<div></div>
	<div></div>
	<div></div>
	<div></div>
	...
Screenshot of a code editor displaying HTML code.

HTML

<section class="columns" data-column-count="3">
  <div></div>
  <div></div>
  <div></div>
  ...

CSS

.columns {
  --col-count: attr(data-column-count type(<number>));

  display: grid;
  gap: 12px;
  grid-template-columns: repeat(var(--col-count),

}

.ection {
  margin-block: 2rem;
}
Screenshot of a code editor showing HTML and CSS code.
<section class="columns" column-count="3">
  <div></div>
  <div></div>
  <div></div>
  ...
</section>
.columns {
  --col-count: attr(datcolumn-count type(<number>));

  display: grid;
  gap: 12px;
  grid-template-columns: repeat(var(--col-count), ...);
}

section {
  margin-block: 2rem;
}
Screenshot of a code editor showing HTML and CSS. The HTML defines a section with class "columns" and a custom attribute `column-count="3"`, containing three empty div elements. The CSS defines styles for `.columns`, including a custom property `--col-count` which attempts to read the `datcolumn-count` attribute, sets `display: grid`, `gap: 12px`, and `grid-template-columns` using `repeat()` with the custom property. A separate rule for `section` sets `margin-block: 2rem`.
<section class="columns" column-count="3">
  <div></div>
  <div></div>
  <div></div>
  ...
columns {
  --col-count: attr(column-count type(<number>));

  display: grid;
  gap: 12px;
  grid-template-columns: repeat(var(--col-count), ...);
}

section {
  margin-block: 2rem;
}
/* ... */
A code editor screenshot displaying HTML and CSS code panels. The HTML panel shows a `section` element with `class="columns"` and `column-count="3"`, containing multiple `div` elements. The CSS panel defines styles for `.columns`, setting a custom property `--col-count` based on the `column-count` attribute, and using `display: grid`, `gap: 12px`, and `grid-template-columns: repeat(var(--col-count), ...)`. On the right, a live preview panel shows purple rectangular elements arranged in a three-column grid.
<div card grid w="80" p="8" gap="5" bg="zinc-900" rounded="3xl" shadow="">
  <h2 text-color="zinc-50" text-size="2xl" font="semibold" tracking="tig">
    Tailwind v6?
  </h2>
  <p text-color="zinc-400" text-size="sm" leading="relaxed">
    No classes, just design tokens nailed
    directly to the DOM, one attribute at a time.
  </p>
  <button text-color="white" text-size="sm"
          fw="semibold" px="5" py="3" rounded="xl"
          bg="indigo-500" hover:bg="indigo-400">
    Write code like it's 1995
  </button>
</div>
Screenshot of an HTML code example showing a div containing a heading, a paragraph, and a button, all styled using custom attributes instead of traditional CSS classes.
<div card grid w="80" p="8" gap="5" bg="zinc-900" rounded="3xl" shadow="">
  <h2 text-color="zinc-50" text-size="2xl" font="semibold" tracking="tight">
    Tailwind v6?
  </h2>
  <p text-color="zinc-400" text-size="sm" leading="relaxed">
    No classes, just design tokens nailed
    directly to the DOM, one attribute at a time.
  </p>
  <button text-color="white" text-size="sm"
          fw="semibold" px="5" py="3" rounded="xl"
          bg="indigo-500" hover:bg="indigo-400">
    Write code like it's 1995
  </button>
</div>
Screenshot of a code editor displaying HTML code.

We can use it to improve the flow of data.

HTML

<div class="wrap">
  <div class="weather-cards"></div>
</div>

CSS

.precipitation-visual {
  position: absolute;
  isolation: isolate;
  inset-block-end: 0;
  inset-inline: 0;
}

JavaScript

const MAX_precipitation = 10;
const data = {
  forecast: [
    {
      day: "Wednesday",
...
A code editor displaying HTML, CSS, and JavaScript code snippets. Adjacent to the code, a UI renders three weather forecast cards for Wednesday, Thursday, and Friday. Each card shows the day, date (May 27, May 28, May 29), high temperature (14°, 12°, 17°), night temperature (Night 7°, Night 6°, Night 9°), precipitation percentage (70%, 40%, 10%), and a blue bar indicating precipitation amount (0.3mm, 1.8mm, 0.5mm). The first two bars are visibly blue, while the third is nearly empty.

Code editor with HTML, CSS, and JavaScript, and a live preview of a weather application

<div class="wrap">
	<div class="weather-cards"></div>
</div>
.precipitation-visual {
	position: absolute;
	isolation: isolate;
	inset-block-end: 0;
	inset-inline: 0;
}
const MAX_precipitation = 10;
const data = {
	forecast: [
		{
			day: "Wednesday",
A split-screen view showing a code editor on the left and a browser preview on the right. The code editor displays sections for HTML, CSS, and JavaScript. The HTML code shows a div with class "wrap" containing a div with class "weather-cards". The CSS code defines styles for ".precipitation-visual" including absolute positioning and inset properties. The JavaScript code defines a constant `MAX_precipitation` and the start of a `data` object containing a `forecast` array, with the first item having a `day` of "Wednesday". The browser preview shows three weather forecast cards for Wednesday, Thursday, and Friday. Each card displays the day, date, temperature, night temperature, precipitation chance (percentage), and a blue bar with a specific precipitation amount (e.g., 8.2mm, 3.8mm, 0mm).
<div class="wrap">
  <div class="weather-cards"></div>
.precipitation-visual {
  position: absolute;
  isolation: isolate;
  inset-block-end: 0;
  inset-inline: 0;
  block-size: var(--precip-amount);
  background: var(--brand-blue);
}
const MAX_precipitation = 10;
const data = {
  forecast: [
    {
      day: "Wednesday",
A screenshot of a code editor on the left with HTML, CSS, and JavaScript code visible. On the right, a live preview displays three weather forecast cards for Wednesday, Thursday, and Friday, each showing the date, day and night temperatures, and precipitation percentage. The first two cards also visually represent precipitation with a blue bar and text labels of "8.2mm" and "3.8mm", while the third card shows "0mm".

Live Code Editor and Weather App Demo

HTML

<div class="wrap">
<div class="weather-cards"></div>

JavaScript

const MAX_precipitation = 10;
const data = {
  forecast: [
    {
      day: "Wednesday",
      date: "May 27",
      high: 14,
      night: 7,
      chance: 70,
     precipitation: 8.2,
     condition: "rain",
    },
    {
A split-screen view showing a code editor on the left and a weather forecast application preview on the right. The code editor displays HTML with two div elements and JavaScript defining `MAX_precipitation` and a `data` object containing forecast information for Wednesday, including temperature, chance of rain, and precipitation. The right side shows a dark-themed weather application with three forecast cards. The first card for Wednesday displays 14 degrees high, 7 degrees night, 70% chance of rain, and an 8.2mm precipitation bar. The second card for Thursday shows 12 degrees high, 6 degrees night, 40% chance of rain, and a 3.8mm precipitation bar. The third card for Friday shows 17 degrees high, 9 degrees night, 10% chance of rain, and 0mm precipitation.

Code Editor and Browser Preview

<div class="wrap">
<div class="weather-cards"></div>
	night: 9,
	chance: 10,
	precipitation: 0,
	condition: "sun",
},
],
};
function renderCard({
	day,
	date,
	high,
	night,
Screenshot of a code editor on the left displaying HTML and JavaScript code, and a browser preview on the right showing a weather application. The weather app displays three cards for Wednesday, Thursday, and Friday. Each card shows the day, date, high temperature, night temperature, and a percentage, with a blue bar indicating precipitation for Wednesday (8.2mm) and Thursday (3.8mm), and 0mm for Friday.

HTML Code

<div class="wrap">
  <div class="weather-cards"></div>

JavaScript Code

condition,
}) {
  const precipitationAmount = Math.min
  (precipitation / MAX_precipitation
  100,
  );
  return `
  <div class="weather-card">
  <div class="card-body">
  <p class="day">${day}</p>
  <p class="date">${date}</p>
  <p class="temp-high">${high}°<
  <p class="temp-night">Night ${
Screenshot of a code editor (likely VS Code) on the left, displaying HTML and JavaScript code, and a live preview of a web application on the right. The web application shows three weather forecast cards for Wednesday, Thursday, and Friday. Each card displays the day, date, high temperature, night temperature, precipitation percentage, and a blue bar indicating precipitation in millimeters. Wednesday shows 14 degrees and 8.2mm precipitation, Thursday shows 12 degrees and 3.8mm precipitation, and Friday shows 17 degrees and 0mm precipitation.

Code Editor Snippet and UI Preview

<div class="wrap">
 <div class="weather-cards"></div>

And a JavaScript template literal containing HTML for a weather card:

<p class="day">${day}</p>
<p class="date">${date}</p>
<p class="temp-high">${high}°</p>
<p class="temp-night">Night ${low}°</p>
<span class="chance">${chance}</span>
</div>
<div class="precipitation-info">
 <span class="precipitation-lab
 <div class="precipitation-visu
 </div>
</div>
A code editor (VS Code-like) is shown on the left displaying HTML and JavaScript code snippets. On the right, three weather forecast cards are displayed. The first card, for Wednesday May 27, shows 14 degrees Celsius, night 7 degrees, 70% chance of rain, and 8.2mm precipitation indicated by a blue bar. The second card, for Thursday May 28, shows 12 degrees Celsius, night 6 degrees, 40% chance of rain, and 3.8mm precipitation indicated by a blue bar. The third card, for Friday May 29, shows 17 degrees Celsius, night 9 degrees, 10% chance of rain, and 0mm precipitation.
<div class="wrap">
<div class="weather-cards"></div>
</p>
e}</p>
${high}°</p>
>Night ${night}°</p>
${chance}%</span>
on-info">
ation-label">${precipitation > 0 ? `${`}
tion-visual" style="--precip-amount: ${`}
Screenshot of a code editor displaying HTML and JavaScript code alongside a live preview of a weather application UI. The UI shows three weather cards for Wednesday, Thursday, and Friday, each with day and night temperatures, a percentage (e.g., 70%), and a visual representation of precipitation amount (8.2mm, 3.8mm, and 0mm respectively) at the bottom.

...
</p>
light}°</p>
%</span>

l">${precipitation > 0 ? `${precipita...
l" style="--precip-amount: ${precipita...
...
  
A split screen view showing a code editor on the left and a web application preview on the right. The code editor displays JavaScript code, with HTML and CSS tabs visible. The web application preview shows three weather cards for Wednesday, Thursday, and Friday. Each card displays the day, date, current temperature, night temperature, a percentage (e.g., 70% for Wednesday), and a blue horizontal bar indicating precipitation amount (8.2mm, 3.8mm, and 0mm respectively).

Code Editor and Weather Card Demo

<div class="wrap">
  <div class="weather-cards"></div>
</div>
...
// ... (lines 49-55)
precipitation > 0 ? `${precipitation}mm` : "0mm"`
--precip-amount: ${precipitationAmount}%; ">
// ... (lines 58-61)
A screenshot of a code editor showing HTML and JavaScript code, alongside a live preview of a web application. The HTML section shows a `div` with class "wrap" containing a `div` with class "weather-cards". The JavaScript section shows lines 56 and 57, including conditional rendering for precipitation amount and setting a CSS custom property `--precip-amount`. The right side displays a weather application with three cards: 1. **Wednesday, May 27**: 14°C (Night 7°C), 70% chance of precipitation, with a blue bar indicating 8.2mm of precipitation. 2. **Thursday, May 28**: 12°C (Night 6°C), 40% chance of precipitation, with a blue bar indicating 3.8mm of precipitation. 3. **Friday, May 29**: 17°C (Night 9°C), 10% chance of precipitation, with no blue bar and 0mm of precipitation shown.
<div class="wrap">
<div class="weather-cards"></div>
// ... (lines 49-51 are not clearly visible)
ight}°</p>
</span>
// ... (lines 54-55 are not clearly visible)
."${precipitation > 0 ? `${precipitati` // ... (code truncated)
.></div>
A screenshot of a code editor displaying HTML and partial JavaScript code snippets, next to a live preview of a weather card UI component showing forecast information for Wednesday and Thursday.

HTML

<div class="wrap">
<div class="weather-cards"></div>

JS

<p class="day">${day}</p>
<p class="date">${date}</p>
<p class="temp-high">${high}°</p>
<p class="temp-night">Night ${night}°</p>
<span class="chance">${chance}%</span>
<!-- Line 54 is incomplete or blank -->
<div class="precipitation-info">
<span class="precipitation-label">${preci...
<div class="precipitation-visual"></div>
Screenshot of a code editor (likely VS Code) showing HTML and JavaScript code, next to a browser preview displaying a weather card widget. The HTML section shows basic div structures. The JavaScript section shows HTML template literals for displaying weather data including day, date, high and night temperatures, chance of precipitation, and a precipitation info section. The browser preview shows a weather card for Wednesday, May 27, with a temperature of 14°, night temperature of 7°, 70% chance of precipitation, and 8.2mm of precipitation. Below the current weather card, a heading for Thursday is visible, indicating more cards might follow.
<div class="wrap"">
	<div class="weather-cards"></div>
<p class="day">${day}</p>
<p class="date">${date}</p>
<p class="temp-high">${high}°</p>
<p class="temp-night">Night ${night}°</p>
<span class="chance">${chance}%</span>
</div>
<div class="precipitation-info">
	<span class="precipitation-label">${pr...</span>
	<div class="precipitation-visual"></div>
</div>
Screenshot of a code editor (likely VS Code) displaying HTML and JavaScript code, alongside a browser preview showing three weather forecast cards. Each card displays the day of the week, date, high and night temperatures, chance of precipitation, and the amount of precipitation.
<div class="wrap">
<div class="weather-cards"></div>
.precipitation-visual {
	position: absolute;
	isolation: isolate;
	inset-block-end: 0;
	inset-inline: 0;
	block-size: var(--precip-amount);
	background: var(--brand-blue);
}

.card-body {
<p class="day">${day}</p>
<p class="date">${date}</p>
<p class="temp-high">${high}°</p>
A screenshot of a code editor showing HTML, CSS, and JavaScript panels. On the right, a live preview displays three weather cards for Wednesday, Thursday, and Friday, each showing the date, high temperature, night temperature, precipitation percentage, and precipitation amount.
<p class="day">${day}</p>
<p class="date">${date}</p>
<p class="temp-high">${high}°</p>
<p class="temp-night">Night ${night}°</p>
<span class="chance">${chance}%</span>
</div>
<div class="precipitation-info">
	<span class="precipitation-label">${pr</span>
	<div class="precipitation-visual"></div>
</div>
A screenshot of a code editor (likely VS Code) displaying an HTML template literal within a JavaScript section, showing elements like day, date, high/night temperatures, chance of precipitation, and precipitation info. To the right, a live preview of a web application displays three weather forecast cards for Wednesday (14°), Thursday (12°), and Friday (17°), each detailing temperature, night temperature, precipitation chance, and precipitation amount (8.2mm, 3.8mm, 0mm respectively).
<div class="wrap">
<div class="weather-cards"></div>
        <p class="day">${day}</p>
        <p class="date">${date}</p>
        <p class="temp-high">${high}°</p>
        <p class="temp-night">Night ${night}°</p>
        <span class="chance">${chance}</span>
    </div>
    <div class="precipitation-info">
        <span class="precipitation-lab...
        <div class="precipitation-visu...
    </div>
</div>
'i
}
A code editor is shown on the left, displaying HTML code on lines 1-2, and Javascript code (likely an HTML template literal) on lines 49-61. On the right, a web preview displays three weather forecast cards. The first card shows "Wednesday May 27, 14°, Night 7°, 70%, 8.2mm". The second card shows "Thursday May 28, 12°, Night 6°, 40%, 3.8mm". The third card shows "Friday May 29, 17°, Night 9°, 10%, 0mm".
1 <div class="wrap">
2   <div class="weather-cards"></div>
45 );
46 return `
47 <div class="weather-card" da>
48   <div class="card-body">
49     <p class="day">${day}</p>
50     <p class="date">${date}</p>
51     <p class="temp-high">${high}°<
52     <p class="temp-night">Night ${
53       <span class="chance">${chance}
54   </div>
55   <div class="precipitation-info">
56     <span class="precipitation-lab
57     <div class="precipitation-visu
Screenshot of a code editor showing HTML and JavaScript, alongside a browser preview displaying a weather application. The application shows three weather cards for Wednesday (14°, Night 7°, 70% chance, 8.2mm precipitation), Thursday (12°, Night 6°, 40% chance, 3.8mm precipitation), and Friday (17°, Night 9°, 10% chance, 0mm precipitation).

HTML

<div class="wrap">
<div class="weather-cards"></div>

JS

 );
return `
	<div class="weather-card" data-p[re...
		<div class="card-body">
			<p class="day">${day}</p>
			<p class="date">${date}</p>
			<p class="temp-high">${high}°</p>
			<p class="temp-night">Night ${n:...
			<span class="chance">${chance}%</span>
		</div>
		<div class="precipitation-info">
		<span class="precipitation-label...
		<div class="precipitation-visual...
Screenshot of a code editor displaying HTML and JavaScript code, alongside a browser preview. The preview shows three weather forecast cards for Wednesday, Thursday, and Friday. Each card includes the day, date, high temperature, night temperature, a percentage value, and a precipitation amount.
<div class="wrap">
<div class="weather-cards"></div>
...
<div class="weather-card d>
    <div class="card-body">
        <p class="day">${day}</p>
        <p class="date">${date}</p>
        <p class="temp-high">${high}°</
        <p class="temp-night">Night ${n:
        <span class="chance">${chance}%
    </div>
    <div class="precipitation-info">
        <span class="precipitation-label">
        <div class="precipitation-visual">
Screenshot of a code editor (likely VS Code) displaying HTML code on the left, and a browser preview showing a weather application on the right. The application displays three weather cards for Wednesday, Thursday, and Friday. Each card shows the day and date (e.g., Wednesday, May 27), a high temperature (e.g., 14°), a night temperature (e.g., Night 7°), a precipitation chance (e.g., 70%), and a precipitation amount (e.g., 8.2mm) with an empty gray bar for the visual representation.
<div class="wrap">
<div class="weather-cards"></div>
);
return `
<div class="weather-card"
>
<div class="card-body">
<p class="day">${day}</p>
<p class="date">${date}</p>
<p class="temp-high">${high}°</p>
<p class="temp-night">Night ${n:</p>
<span class="chance">${chance}%</span>
</div>
<div class="precipitation-info">
<span class="precipitation-label">
A screenshot of a code editor on the left and a UI preview on the right. The UI preview displays three weather forecast cards. The first card is for Wednesday, May 27, showing 14° high, Night 7°, 70% chance of precipitation, and 8.2mm precipitation. The second card is for Thursday, May 28, showing 12° high, Night 6°, 40% chance of precipitation, and 3.8mm precipitation. The third card is for Friday, May 29, showing 17° high, Night 9°, 10% chance of precipitation, and 0mm precipitation.
<div class="wrap">
  <div class="weather-cards"></div>
);
return `
  <div class="weather-card"
    data-preci>
    <div class="card-body">
      <p class="day">${day}</p>
      <p class="date">${date}</p>
      <p class="temp-high">${high}°</p>
      <p class="temp-night">Night ${n:</p>
      <span class="chance">${chance}%</span>
    </div>
    <div class="precipitation-info">
      <span class="precipitation-label">

A screenshot of a code editor (likely VS Code) on the left and a web browser preview on the right. The code editor displays HTML markup for a wrapper and a container for weather cards, followed by JavaScript code that generates an individual weather card using a template literal. This generated HTML includes placeholders for day, date, high temperature, night temperature, chance of precipitation, and a "data-preci" attribute.

The browser preview shows three rendered weather forecast cards with rounded corners:

  • Wednesday, May 27: 14° high, Night 7°, 70% precipitation chance, 8.2mm.
  • Thursday, May 28: 12° high, Night 6°, 40% precipitation chance, 3.8mm.
  • Friday, May 29: 17° high, Night 9°, 10% precipitation chance, 0mm.
<div class="wrap">
<div class="weather-cards"></div>
);
return `
<div class="weather-card"
   data-precip="{}">
   <div class="card-body">
      <p class="day">${day}</p>
      <p class="date">${date}</p>
      <p class="temp-high">${high}°</p>
      <p class="temp-night">Night ${n:</p>
      <span class="chance">${chance}%</span>
   </div>
   <div class="precipitation-info">
      <span class="precipitatio-lab" ...
A screenshot showing a code editor on the left and a weather application UI on the right. The code editor displays HTML for page structure and JavaScript code defining a weather card component. The UI preview shows three weather cards for Wednesday, Thursday, and Friday, each detailing the day, date (May 27-29), high and night temperatures (14°/7°, 12°/6°, 17°/9°), a percentage (70%, 40%, 10%), and precipitation amount (8.2mm, 3.8mm, 0mm).

HTML Markup within JavaScript Return Function

45 );
46 return `
47   <div class="weather-card"
48     data-precip="${$precip}">
49     <div class="card-body">
50       <p class="day">${$day}</p>
51       <p class="date">${$date}</p>
52       <p class="temp-high">${$high}°</p>
53       <p class="temp-night">Night ${$n:
54       <span class="chance">${$chance}%
55     </div>
56     <div class="precipitation-info">
57       <span class="precipitation-label"
Screenshot of an IDE showing HTML code structure for a weather card component on the left, and a live preview of the UI on the right. The UI displays three weather forecast cards for Wednesday, Thursday, and Friday, each showing the day, date, high temperature, night temperature, chance of precipitation, and actual precipitation amount at the bottom.

JavaScript Code for Weather Cards


45 );
46 return `
47   <div class="weather-card"
48     data-precip="${$precipitatio}"
49   <div class="card-body">
50     <p class="day">${$day}</p>
51     <p class="date">${$date}</p>
52     <p class="temp-high">${$high}°</p
53     <p class="temp-night">Night ${$n:
54     <span class="chance">${$chance}%
55   </div>
56 <div class="precipitation-info">
57   <span class="precipitatio-label"
A screenshot of a code editor (likely VS Code) showing HTML, CSS, and JavaScript file tabs. The JavaScript tab is active, displaying an HTML template literal for generating weather cards. To the right, a live preview of a web page displays three weather forecast cards. Each card shows the day of the week, date, high temperature, night temperature, chance of precipitation (percentage), and precipitation amount in millimeters. The first card is for Wednesday, May 27, showing 14° (Night 7°), 70% chance of precipitation, and 8.2mm of precipitation. The second card is for Thursday, May 28, showing 12° (Night 6°), 40% chance of precipitation, and 3.8mm of precipitation. The third card is for Friday, May 29, showing 17° (Night 9°), 10% chance of precipitation, and 0mm of precipitation.
<div class="wrap">
<div class="weather-cards"></div>
precipitation,
condition,
) {
  const precipitationAmount = Math.min(
    (precipitation / MAX_precipitation)
    100,
  );
  return `
    <div class="weather-card"
      data-precip="${precipitation}">
      <div class="card-body">
        <p class="day">${day}</p>
        <p class="date">${date}</p>
...
A split-screen view showing a code editor on the left and a web application preview on the right. The code editor displays HTML and JavaScript code. The JavaScript code snippet defines a function that calculates precipitation amount and returns an HTML string for a "weather-card" element, including a `data-precip` attribute. The web application preview shows three weather cards for Wednesday, Thursday, and Friday, each displaying the day, date, main temperature, night temperature, a percentage (e.g., 70%), and the precipitation amount (8.2mm, 3.8mm, and 0mm respectively).
<div class="wrap">
    <div class="weather-cards"></div>
precipitation,
condition,
) {
    const precipitationAmount = Math.min(
        (precipitation / MAX_precipitation)
        100,
    );
    return `<div class="weather-card"
        data-precip="${precipitation}">
        <div class="card-body">
            <p class="day">${day}</p>
            <p class="date">${date}</p>`
Screenshot of a code editor (likely VS Code) split into HTML and JavaScript sections, displayed next to a browser preview showing three weather cards. The HTML section shows a `div` with class "wrap" containing a `div` with class "weather-cards". The JavaScript section displays a portion of a function's code, including the calculation of `precipitationAmount` using `Math.min` and a return statement that builds an HTML template literal for a "weather-card". This template includes a `data-precip` attribute, a `card-body` div, and paragraphs for the day and date. The browser preview displays detailed weather forecasts: Wednesday, May 27, 14°C (Night 7°), 70% chance of rain, 8.2mm precipitation; Thursday, May 28, 12°C (Night 6°), 40% chance of rain, 3.8mm precipitation; and Friday, May 29, 17°C (Night 9°), 10% chance of rain, 0mm precipitation.

HTML

<div class="wrap">
  <div class="weather-cards"></div>

CSS

.precipitation-visual {
	position: absolute;
	isolation: isolate;
	inset-block-end: 0;
	inset-inline: 0;
	block-size: var(--precip-amount);
	background: var(--brand-blue);
}

.card-body {
	position: relative;
}

JS

precipitation,
condition,
A screenshot of a code editor interface showing HTML, CSS, and JavaScript code. On the right, a live preview displays three weather cards for Wednesday, Thursday, and Friday. Each card shows the date, day and night temperatures (e.g., 14°, Night 7°), precipitation percentage (e.g., 70%), and precipitation amount in millimeters (e.g., 8.2mm).

Code Editor with HTML, CSS, and JavaScript, and Weather App Preview

<div class="wrap">
<div class="weather-cards"></div>
.weat

.precipitation-visual {
    position: absolute;
    isolation: isolate;
    inset-block-end: 0;
    inset-inline: 0;
    block-size: var(--precip-amount);
    background: var(--brand-blue);
}
precipitation,
condition,
Screenshot of a code editor (likely VS Code) showing HTML, CSS, and JavaScript code. On the right, a browser preview displays a weather application with three cards: Wednesday (May 27, 14°, Night 7°, 70%, 8.2mm), Thursday (May 28, 12°, Night 6°, 40%, 3.8mm), and Friday (May 29, 17°, Night 9°, 10%, 0mm).
<div class="wrap">
<div class="weather-cards"></div>
.weather-card {}

.precipitation-visual {
	position: absolute;
	isolation: isolate;
	inset-block-end: 0;
	inset-inline: 0;
	block-size: var(--precip-amount);
	background: var(--brand-blue);
}
precipitation,
condition,
A screenshot of a code editor showing HTML, CSS, and JavaScript code. On the right, a web browser preview displays a weather application with three cards for Wednesday, Thursday, and Friday, each showing the date, temperature, night temperature, precipitation percentage, and precipitation amount.
<div class="wrap">
<div class="weather-cards"></div>
.weather-card {
    --
}

.precipitation-visual {
    position: absolute;
    isolation: isolate;
    inset-block-end: 0;
    inset-inline: 0;
    block-size: var(--precip-amount);
    background: var(--brand-blue);
}
precipitation,
condition,
...
A code editor is shown on the left, displaying HTML, CSS, and JavaScript code. On the right, a browser preview shows three vertical weather cards for Wednesday, Thursday, and Friday. Each card displays the day, date, current temperature, night temperature, precipitation percentage, and a blue bar at the bottom indicating the precipitation amount (8.2mm for Wednesday, 3.8mm for Thursday, 0mm for Friday).

HTML

<div class="wrap">
  <div class="weather-cards"></div>

CSS

.weather-card {
  --precip
}

.precipitation-visual {
  position: absolute;
  isolation: isolate;
  inset-block-end: 0;
  inset-inline: 0;
  block-size: var(--precip-amount);
  background: var(--brand-blue);
}

JS

precipitation,
condition,
A code editor is shown on the left. On the right, a UI preview displays three weather cards for Wednesday, Thursday, and Friday. Each card shows the date, day temperature, night temperature, a percentage, and precipitation amount (8.2mm, 3.8mm, 0mm). Blue bars at the bottom of the first two cards visually represent the precipitation amount.

HTML

<div class="wrap">
<div class="weather-cards"></div>

CSS

.weather-card {
--precip-
}

.precipitation-visual {
position: absolute;
isolation: isolate;
inset-block-end: 0;
inset-inline: 0;
block-size: var(--precip-amount);
background: var(--brand-blue);
}

JavaScript

precipitation,
condition,

Weather Forecast

  • Wednesday

    May 27

    14°

    Night 7°

    70%

    8.2mm

  • Thursday

    May 28

    12°

    Night 6°

    40%

    3.8mm

  • Friday

    May 29

    17°

    Night 9°

    10%

    0mm

Screenshot of a code editor (VS Code-like) with HTML, CSS, and JavaScript panels open on the left, and a live browser preview on the right displaying a web application with three weather forecast cards. The cards show daily weather for Wednesday, Thursday, and Friday, including temperature, night temperature, a percentage, and precipitation amount.

Live Coding Example: CSS Custom Properties

<div class="wrap">
  <div class="weather-cards"></div>
.weather-card {
  --precip-amount: att;
}

.precipitation-visual {
  position: absolute;
  isolation: isolate;
  inset-block-end: 0;
  inset-inline: 0;
  block-size: var(--precip-amount);
  background: var(--brand-blue);
precipitation,
condition,
A split screen showing a code editor on the left and a web application preview on the right. The code editor displays HTML, CSS, and JavaScript. The web application preview shows three dark-themed weather forecast cards for Wednesday, Thursday, and Friday, each displaying date, temperature, night temperature, precipitation percentage, and precipitation amount in millimeters.

HTML

<div class="wrap">
<div class="weather-cards"></div>

CSS

.weather-card {
	--precip-amount: attr();
}

.precipitation-visual {
	position: absolute;
	isolation: isolate;
	inset-block-end: 0;
	inset-inline: 0;
	block-size: var(--precip-amount);
	background: var(--brand-blue);
}

JS

precipitation,
condition,

Weather Forecast

  • Wednesday May 27 14° Night 7° 70% 8.2mm
  • Thursday May 28 12° Night 6° 40% 3.8mm
  • Friday May 29 17° Night 9° 10% 0mm
A split-screen screenshot showing a code editor on the left and a browser preview on the right. The code editor displays HTML, CSS, and partial JavaScript code. The browser preview shows three weather forecast cards for Wednesday, Thursday, and Friday, each displaying date, current temperature, night temperature, precipitation chance, and precipitation amount.

Code Snippet and Related Data

count: attr(data-preset)
n-visual {
    absolute;
    isolate;
    -end: 0;
    e: 0;
    var(--precip-amount);
    var(--brand-blue);
}
  • 70%, 8.2mm
  • 40%, 3.8mm
  • 10%, 0mm
A split slide showing a code editor on the left displaying a CSS-like snippet, and three vertical cards on the right. Each card displays a percentage and a millimeter value. The cards show: 70% and 8.2mm, 40% and 3.8mm, and 10% and 0mm.

--precip-amount: attr(data-precip);

.visual {
  position: absolute;
  isolation: isolate;
  inset-inline-end: 0;
  top: 0;
  height: var(--precip-amount);
  background-color: var(--brand-blue);
}
  
  • 70%
  • 8.2mm
  • 40%
  • 3.8mm
  • 10%
  • 0mm
A screenshot of a code editor displaying CSS code on the left, and three rectangular UI cards on the right showing a percentage and a millimeter measurement each.
unt: attr(data-precip);

-visual {
  solute;
  solate;
  end: 0;
  : 0;
  var(--precip-amount);
  var(--brand-blue);
}
A screenshot showing a code editor on the left displaying CSS code, and a UI preview on the right. The UI preview consists of three cards or columns. The first card shows 70% and 8.2mm. The second card shows 40% and 3.8mm. The third card shows 10% and 0mm.

HTML

<div class="wrap">
<div class="weather-cards"></div>

CSS

.weather-card {
  --precip-amount: attr(data-precip);
}

.precipitation-visual {
  position: absolute;
  isolation: isolate;
  inset-block-end: 0;
  inset-inline: 0;
  block-size: var(--precip-amount);
  background: var(--brand-blue);
}
...
precipitation,
condition,
...
Screenshot of a code editor showing HTML and CSS code on the left, and a preview of a web UI on the right. The UI displays three weather forecast cards for Wednesday, Thursday, and Friday, each showing the date, day and night temperatures, precipitation percentage, and precipitation amount.

5.precipitation-visual {
6  position: absolute;
7  isolation: isolate;
8  inset-block-end: 0;
9  inset-inline: 0;
10  block-size: var(--precip-amount);
11  background: var(--brand-blue);
...
39 precipitation,
40 condition,
...
    

Values displayed: 0.2mm, 3.8mm, 0mm

Screenshot of a code editor displaying CSS rules for '.precipitation-visual', including properties like 'position', 'isolation', 'inset-block-end', 'inset-inline', 'block-size', and 'background'. Further down, CSS selectors 'precipitation' and 'condition' are visible. In the top right, three UI elements are shown, each containing a measurement: '0.2mm', '3.8mm', and '0mm'.

.precipitation-visual {
  position: absolute;
  isolation: isolate;
  inset-block-end: 0;
  inset-inline: 0;
  block-size: var(--precip-amount);
  background: var(--brand-blue);
}

...

precipitation,
condition,

Three rectangular UI elements are shown at the top right, displaying values likely related to precipitation amounts: "0.2mm", "3.6mm", and "0mm".

.weather-card {
  --precip-amount: attr(data-precip l);
}

.precipitation-visual {
  position: absolute;
  isolation: isolate;
  inset-block-end: 0;
  inset-inline: 0;
  block-size: var(--precip-amount);
  background: var(--brand-blue);
}
...
precipitation,
condition,
Screenshot of a code editor displaying CSS, alongside a live preview of three weather forecast cards. Each card shows night temperature, precipitation percentage, and a precipitation amount in millimeters (e.g., "Night 7°", "70%", "8.2mm").
<div class="wrap">
<div class="weather-cards"></div>
.weather-card {
  --precip-amount: attr(data-precip );
}

.precipitation-visual {
  position: absolute;
  isolation: isolate;
  inset-block-end: 0;
  inset-inline: 0;
  block-size: var(--precip-amount);
  background: var(--brand-blue);
}
precipitation,
condition,
Screenshot of a code editor displaying HTML, CSS, and JavaScript code. On the right, a live preview shows three weather cards for Wednesday, Thursday, and Friday, each with a blue bar indicating precipitation amount (8.2mm, 3.8mm, 0mm respectively).
<div class="wrap">
<div class="weather-cards"></div>
weather-card {
  --precip-amount: attr(data-precip r);
}

precipitation-visual {
  position: absolute;
  isolation: isolate;
  inset-block-end: 0;
  inset-inline: 0;
  block-size: var(--precip-amount);
  background: var(--brand-blue);
precipitation,
condition,
...
Screenshot of a code editor displaying HTML, CSS, and JavaScript code. On the right, a live preview shows two weather cards. The first card displays weather for Wednesday, May 27, with 14 degrees Celsius, Night 7 degrees, 70%, and a blue bar indicating 8.2mm precipitation. The second card shows weather for Thursday, May 28, with 12 degrees Celsius, 40%, and a smaller blue bar indicating 3.8mm precipitation.
<div class="wrap">
  <div class="weather-cards"></div>
.weather-card {
  --precip-amount: attr(data-precip em);
}

.precipitation-visual {
  position: absolute;
  isolation: isolate;
  inset-block-end: 0;
  inset-inline: 0;
  block-size: var(--precip-amount);
  background: var(--brand-blue);
}
precipitation,
condition,
A screenshot of a code editor showing HTML, CSS, and JavaScript code. On the right, a live preview displays two weather cards. The first card shows Wednesday, May 27, with a high of 14°, night low of 7°, and 8.2mm of precipitation visualized by a blue bar. The second partially visible card shows Thursday, May 28, with a high of 1°, night low of 4°, and 3.8mm of precipitation visualized by a blue bar.

HTML

<div class="wrap">
<div class="weather-cards"></div>

CSS

.weather-card {
	--precip-amount: attr(data-precip px);
}

.precipitation-visual {
	position: absolute;
	isolation: isolate;
	inset-block-end: 0;
	inset-inline: 0;
	block-size: var(--precip-amount);
	background: var(--brand-blue);
}

JS

precipitation,
condition,
Screenshot of a code editor on the left, displaying HTML, CSS, and partial JavaScript code. On the right, a live preview shows three weather forecast cards for Wednesday, Thursday, and Friday. Each card displays the day, date, day temperature, night temperature, a percentage (e.g., 70%), and a visual bar at the bottom indicating the precipitation amount (8.2mm, 3.8mm, 0mm), with the bar's height varying based on the amount.
.d {
  --amount: attr(data-precip px);
}

.non-visual {
  position: absolute;
  isolation: isolate;
  block-end: 0;
  inline-end: 0;
  width: var(--precip-amount);
  background: var(--brand-blue);
}

14

  • Night 7°
  • 70%
  • 8.2mm

12

  • Night 6°
  • 40%
  • 3.8mm
Screenshot showing a code editor displaying CSS code on the left, and a weather forecast UI on the right with two cards showing precipitation data.

HTML

<div class="wrap">
  <div class="weather-cards"></div>

CSS

.weather-card {
  --precip-amount: attr(data-precip type);
}

.precipitation-visual {
  position: absolute;
  isolation: isolate;
  inset-block-end: 0;
  inset-inline: 0;
  block-size: var(--precip-amount);
  background: var(--brand-blue);
}

JS

precipitation,
condition,
...
A screenshot of a code editor, likely VS Code, with three panels: HTML, CSS, and JS code on the left, and a live preview of a web application on the right. The web application displays three weather forecast cards for Wednesday, Thursday, and Friday, showing date, temperature, night temperature, precipitation percentage, and precipitation amount (8.2mm, 3.8mm, 0mm).
<div class="wrap">
  <div class="weather-cards"></div>
.weather-card {
  --precip-amount: attr(data-precip type());
}

.precipitation-visual {
  position: absolute;
  isolation: isolate;
  inset-block-end: 0;
  inset-inline: 0;
  block-size: var(--precip-amount);
  background: var(--brand-blue);
}
precipitation,
condition,
...
A screenshot of a code editor showing HTML, CSS, and JavaScript code. On the right, a live preview displays three weather cards for Wednesday, Thursday, and Friday, each showing the date, temperature, night temperature, a percentage, and a precipitation amount (8.2mm, 3.8mm, 0mm). The CSS code defines a custom property `--precip-amount` using `attr(data-precip type())` and applies it to the `block-size` of `.precipitation-visual` elements, which are styled with a blue background and positioned at the bottom of their container.

HTML

<div class="wrap">
  <div class="weather-cards"></div>

CSS

weather-card {
  --precip-amount: attr(data-precip type(<...));


precipitation-visual {
  position: absolute;
  isolation: isolate;
  inset-block-end: 0;
  inset-inline: 0;
  block-size: var(--precip-amount);
  background: var(--brand-blue);

JS

precipitation,
condition,
A screenshot of a code editor showing HTML, CSS, and JavaScript code. On the right, a browser preview displays three weather cards. The first card shows "Wednesday May 27, 14°, Night 7°, 70%, 8.2mm". The second card shows "Thursday May 28, 12°, Night 6°, 40%, 3.8mm". The third card shows "Friday May 29, 17°, Night 9°, 10%, 0mm".

Code Editor and Live Preview

<div class="wrap">
  <div class="weather-cards"></div>
weather-card {
  --precip-amount: attr(data-precip type(<>));
}

precipitation-visual {
  position: absolute;
  isolation: isolate;
  inset-block-end: 0;
  inset-inline: 0;
  block-size: var(--precip-amount);
  background: var(--brand-blue);
}
precipitation,
condition,
A screenshot of a code editor showing HTML, CSS, and JavaScript. On the right, a live preview displays three weather cards for Wednesday, Thursday, and Friday, each showing the date, day and night temperatures, precipitation percentage, and a visual representation of precipitation amount at the bottom (8.2mm, 3.8mm, 0mm). The CSS code shows how the `--precip-amount` custom property is used to set the `block-size` of a `precipitation-visual` element, which corresponds to the blue bars in the weather cards.

HTML

<div class="wrap">
  <div class="weather-cards"></div>

CSS

weather-card {
  --precip-amount: attr(data-precip type(<number>));
}

precipitation-visual {
  position: absolute;
  isolation: isolate;
  inset-block-end: 0;
  inset-inline: 0;
  block-size: var(--precip-amount);
  background: var(--brand-blue);
}

JS

precipitation,
condition,
...
A code editor is shown on the left, displaying HTML, CSS, and JavaScript code. On the right, three weather forecast cards are displayed vertically. The first card, for Wednesday, May 27, shows a daytime temperature of 14°C and a night temperature of 7°C, 70% chance of precipitation, and 8.2mm precipitation. The second card, for Thursday, May 28, shows a daytime temperature of 12°C and a night temperature of 6°C, 40% chance of precipitation, and 3.8mm precipitation. The third card, for Friday, May 29, shows a daytime temperature of 17°C and a night temperature of 9°C, 10% chance of precipitation, and 0mm precipitation.

Code Editor Showing HTML, CSS, and JavaScript for a Weather App

<div class="wrap">
<div class="weather-cards"></div>
.weather-card {
  --precip-amount: attr(data-precip type(<number>));
}

.precipitation-visual {
  position: absolute;
  isolation: isolate;
  inset-block-end: 0;
  inset-inline: 0;
  block-size: var(--precip-amount);
  background: var(--brand-blue);
}
precipitation,
condition,

A screenshot of a code editor interface displaying HTML, CSS, and JavaScript code snippets. On the right, a browser preview shows a weather application with three vertical cards for Wednesday, Thursday, and Friday. Each card displays the date, day temperature, night temperature, precipitation chance (percentage), and precipitation amount in millimeters (e.g., 8.2mm, 3.8mm, 0mm).

<div class="wrap">
  <div class="weather-cards"></div>
.precipitation-visual {
    position: absolute;
    isolation: isolate;
    inset-block-end: 0;
    inset-inline: 0;
    block-size: var(--precip-amount);
    background: var(--brand-blue);
}

.card-body {
    position: relative;
}
precipitation,
condition,
Screenshot of a code editor showing HTML, CSS, and JavaScript code. On the right, a live preview of a weather application displays three weather cards. The first card is for Wednesday, May 27, showing 14° day temperature, 7° night temperature, 70% chance of precipitation, and 8.2mm precipitation. The second card is for Thursday, May 28, showing 12° day temperature, 6° night temperature, 40% chance of precipitation, and 3.8mm precipitation. The third card is for Friday, May 29, showing 17° day temperature, 9° night temperature, 10% chance of precipitation, and 0mm precipitation.
<div class="wrap">
<div class="weather-cards"></div>
.precipitation-visual {
  position: absolute;
  isolation: isolate;
  inset-block-end: 0;
  inset-inline: 0;
  block-size: minvar(--precip-amount);
  background: var(--brand-blue);
}

.card-body {
  position: relative;
}
precipitation,
condition,
Screenshot of a code editor (likely VS Code) displaying HTML, CSS, and JavaScript code snippets. Adjacent to the code editor is a live preview pane showing three weather cards. Each card represents a day (Wednesday, Thursday, Friday) and displays the date, daily temperature, night temperature, a percentage value, and a precipitation amount (8.2mm, 3.8mm, 0mm). At the bottom of each card, a blue bar visually represents the precipitation amount, with its height corresponding to the value.
<div class="wrap">
  <div class="weather-cards"></div>
.precipitation-visual {
  position: absolute;
  isolation: isolate;
  inset-block-end: 0;
  inset-inline: 0;
  block-size: min(var(--precip-amount));
  background: var(--brand-blue);
}

.card-body {
  position: relative;
precipitation,
condition,
A screenshot of a code editor (likely VS Code) showing HTML, CSS, and JavaScript code panels on the left. On the right, a live preview displays three weather forecast cards for Wednesday, Thursday, and Friday. Each card shows the day, date, current temperature, night temperature, precipitation chance, and precipitation amount (e.g., Wednesday: 14°, Night 7°, 70%, 8.2mm; Thursday: 12°, Night 6°, 40%, 3.8mm; Friday: 17°, Night 9°, 10%, 0mm).

HTML

<div class="wrap">
<div class="weather-cards"></div>

CSS

.precipitation-visual {
    position: absolute;
    isolation: isolate;
    inset-block-end: 0;
    inset-inline: 0;
    block-size: min(var(--precip-amount));
    background: var(--brand-blue);
}

.card-body {
    position: relative;
}

JS

precipitation,
condition,
Screenshot of a code editor showing HTML, CSS, and JavaScript code. On the right, a web application preview displays three weather forecast cards for Wednesday, Thursday, and Friday, showing daily temperatures, night temperatures, precipitation percentages, and precipitation amounts (e.g., 8.2mm, 3.8mm, 0mm).

Code for Weather Card Visuals

HTML

<div class="wrap">
<div class="weather-cards"></div>

CSS

.precipitation-visual {
position: absolute;
isolation: isolate;
inset-block-end: 0;
inset-inline: 0;
block-size: min(var(--precip-amount));
background: var(--brand-blue);

JS

precipitation,
condition,
) {
const precipitationAmount = Math.min(
(precipitation / MAX_precipitation) * 100,
100,
);
A code editor interface displaying HTML, CSS, and JavaScript code snippets. On the right, a live preview shows three weather forecast cards. The cards display weather for Wednesday, May 27 (14° day, 7° night, 70% chance of rain, 8.2mm), Thursday, May 28 (12° day, 6° night, 40% chance of rain, 3.8mm), and Friday, May 29 (17° day, 9° night, 10% chance of rain, 0mm).
<div class="wrap">
  <div class="weather-cards"></div>
</div>
.precipitation-visual {
  position: absolute;
  isolation: isolate;
  inset-block-end: 0;
  inset-inline: 0;
  block-size: min(var(--precip-amount));
  background: var(--brand-blue);
}
const MAX_precipitation = 10;
const data = {
  forecast: [
    {
      day: "Wednesday",
      date: "May 27",
...
Screenshot of a code editor showing HTML, CSS, and JavaScript, alongside a live preview of a weather forecast UI for Wednesday, Thursday, and Friday, displaying temperature, precipitation chance, and precipitation amount.
<div class="wrap">
  <div class="weather-cards"></div>
.precipitation-visual {
  --max
  position: absolute;
  isolation: isolate;
  inset-block-end: 0;
  inset-inline: 0;
  block-size: min(var(--precip-amount))
const MAX_precipitation = 10;
const data = {
  forecast: [
    {
      day: "Wednesday",
      date: "May 27",

Screenshot of a code editor displaying HTML, CSS, and JavaScript code in the left pane, and a live preview of a web application on the right. The web application shows three weather forecast cards. The first card for Wednesday, May 27, displays 14 degrees Celsius (Night 7 degrees), 70% probability, and 8.2mm precipitation. The second card for Thursday, May 28, shows 12 degrees Celsius (Night 6 degrees), 40% probability, and 3.8mm precipitation. The third card for Friday, May 29, shows 17 degrees Celsius (Night 9 degrees), 10% probability, and 0mm precipitation.

HTML

<div class="wrap">
<div class="weather-cards"></div>

CSS

.precipitation-visual {
  --max-preci
  position: absolute;
  isolation: isolate;
  inset-block-end: 0;
  inset-inline: 0;
  block-size: min(var(--precin-amount))...

JavaScript

const MAX_precipitation = 10;
const data = {
  forecast: [
    {
      day: "Wednesday",
      date: "May 27",
...

Weather Forecast UI Preview

  • Wednesday, May 27: 14° (Night 7°), 70% precipitation, 8.2mm
  • Thursday, May 28: 12° (Night 6°), 40% precipitation, 3.8mm
  • Friday, May 29: 17° (Night 9°), 10% precipitation, 0mm
A split-screen view showing a Visual Studio Code editor on the left and a weather forecast application UI on the right. The editor displays HTML, CSS, and JavaScript code snippets. The UI shows three weather cards for Wednesday, Thursday, and Friday, each displaying the date, day temperature, night temperature, precipitation percentage, and precipitation amount.
<div class="wrap">
  <div class="weather-cards"></div>
.precipitation-visual {
  --max-precip: 1;
  position: absolute;
  isolation: isolate;
  inset-block-end: 0;
  inset-inline: 0;
  block-size: min(var(--precip-amount));
}
const MAX_precipitation = 10;
const data = {
  forecast: [
    {
      day: "Wednesday",
      date: "May 27",
...
A screenshot of a code editor (likely VS Code) displaying HTML, CSS, and JavaScript code. On the right, a preview panel shows a weather card for Wednesday, May 27, with a temperature of 14°, night temperature of 7°, 70% humidity, and 8.2mm of precipitation.
<div class="wrap">
  <div class="weather-cards"></div>
.precipitation-visual {
  --max-precip: 10;
  position: absolute;
  isolation: isolate;
  inset-block-end: 0;
  inset-inline: 0;
  block-size: min(var(--precip-amount)); /* ... */
}
const MAX_precipitation = 10;
const data = {
  forecast: [
    {
      day: "Wednesday",
      date: "May 27",
      // ...
A code editor interface showing HTML, CSS, and JavaScript code. On the right, a preview pane displays a weather card showing "Wednesday", "May 27", "14°", "Night 7°", "70%", and "8.2mm".

HTML

<div class="wrap">
  <div class="weather-cards"></div>
</div>

CSS

...
  --max-precip: 10;
  position: absolute;
  isolation: isolate;
  inset-block-end: 0;
  inset-inline: 0;
  block-size: min(var(--precip-amount)));
  background: var(--brand-blue);
...

JavaScript

const MAX_precipitation = 10;
const data = {
  forecast: [
    {
      day: "Wednesday",
      date: "May 27",
...

Live Preview

Wednesday

May 27

14°

Night 7°

70%

8.2mm

A screenshot of a code editor showing HTML, CSS, and JavaScript code panels, with a live preview of a weather card displaying weather details on the right.

HTML

<div class="wrap">
  <div class="weather-cards"></div>

CSS

--max-precip: 10;
position: absolute;
isolation: isolate;
inset-block-end: 0;
inset-inline: 0;
block-size: min(var(--precip-amount) / var(--max-precip));
background: var(--brand-blue);

JavaScript

const MAX_precipitation = 10;
const data = {
  forecast: [
    {
      day: "Wednesday",
      date: "May 27",
...

Weather Card Preview

  • Wednesday
  • May 27
  • 14°
  • Night 7°
  • 70%
  • 8.2mm
Screenshot of a code editor showing HTML, CSS, and JavaScript code snippets in separate panels, with a live preview of a weather card displaying "Wednesday, May 27, 14°, Night 7°, 70%, 8.2mm" on the right side.
<div class="wrap">
  <div class="weather-cards"></div>
   --max-precip: 10;
   position: absolute;
   isolation: isolate;
   inset-block-end: 0;
   inset-inline: 0;
   block-size: min(var(--precip-amount) / var(--max ...
   background: var(--brand-blue);
const MAX_precipitation = 10;
const data = {
	forecast: [
		{
			day: "Wednesday",
			date: "May 27",
...
Screenshot of a code editor showing HTML, CSS, and JavaScript code panels. A small preview pane on the right displays a weather card showing 'Wednesday, May 27', '14°', 'Night 7°', '70%', and '8.2mm'.
<div class="wrap">
  <div class="weather-cards"></div>
</div>
--max-precip: 10;
position: absolute;
isolation: isolate;
inset-block-end: 0;
inset-inline: 0;
block-size: min(var(--precip-amount))) / var(--max-precip)...;
background: var(--brand-blue);
const MAX_precipitation = 10;
const data = {
  forecast: [
    {
      day: "Wednesday",
      date: "May 27",
A code editor split into three panels for HTML, CSS, and JavaScript. A live preview pane on the right displays a weather card for Wednesday, May 27, showing a temperature of 14° and 8.2mm precipitation.
<div class="wrap">
  <div class="weather-cards"></div>
</div>
  position: absolute;
  isolation: isolate;
  inset-block-end: 0;
  inset-inline: 0;
  block-size: min(var(--precip-amount) / var(--max-precipitation), 1);
  background: var(--brand-blue);
...
const MAX_precipitation = 10;
const data = {
  forecast: [
    {
      day: "Wednesday",
      date: "May 27",
      // ...
    }
  ]
};
Screenshot of a code editor showing HTML, CSS, and JavaScript code, alongside a rendered weather card displaying 'Wednesday, May 27', '14°', 'Night 7°', '70%', and '8.2mm' precipitation.
<div class="wrap">
<div class="weather-cards"></div>
max-precip: 10;
position: absolute;
isolation: isolate;
inset-block-end: 0;
inset-inline: 0;
block-size:
min(var(--precip-amount) / var(--max-precip));
const MAX_precipitation = 10;
const data = {
  forecast: [
    {
      day: "Wednesday",
      date: "May 27",
Screenshot of a code editor showing HTML, CSS, and JavaScript code panels, with a live preview of a weather application displaying three daily weather cards for Wednesday, Thursday, and Friday, including temperature, night temperature, precipitation chance, and precipitation amount.
<div class="wrap">
  <div class="weather-cards"></div>
</div>
inset-inline: 0;
block-size: min(var(--precip-amount) / var(--max-precip) * 100%);
background: var(--brand-blue);
const MAX_precipitation = 10;
const data = {
  forecast: [
    {
      day: "Wednesday",
      date: "May 27",
...
A screenshot of a code editor showing HTML, CSS, and JavaScript code panels on the left, and a live preview on the right. The live preview displays three weather forecast cards for Wednesday, Thursday, and Friday, each showing temperature, night temperature, precipitation chance, and precipitation amount (8.2mm, 3.8mm, 0mm).
<div class="wrap">
<div class="weather-cards"></div>
onset-inline: 0;
lock-size:
  min(var(--precip-amount) / var(--max-precip) * 100);
background: var(--brand-blue);
const MAX_precipitation = 10;
const data = {
  forecast: [
    {
      day: "Wednesday",
      date: "May 27",
Screenshot of a code editor environment showing HTML, CSS, and JavaScript code. On the right, a live preview displays a web application with three weather cards for Wednesday, Thursday, and Friday, each showing the day, date, current temperature, night temperature, precipitation percentage (70%, 40%, 10%), and precipitation amount (8.2mm, 3.8mm, 0mm).
<div class="wrap">
  <div class="weather-cards"></div>
</div>
  set-inline: 0;
  lock-size:
    min(var(--precip-amount) / var(--max-precip) * 100%);
  background: var(--brand-blue);
const MAX_precipitation = 10;
const data = {
  forecast: [
    {
      day: "Wednesday",
      date: "May 27",

A screenshot of an online code editor interface, likely CodePen, showing HTML, CSS, and JavaScript code in separate panes. On the right side, a live preview displays a weather application user interface. The UI features three vertical cards, each representing a day: Wednesday, Thursday, and Friday. Each card displays the day, date (e.g., May 27), day temperature (e.g., 14°), night temperature (e.g., Night 7°), and a percentage (e.g., 70%). Below these details, a horizontal bar graph illustrates precipitation. The Wednesday card shows a blue bar indicating 8.2mm, Thursday shows a shorter blue bar for 3.8mm, and Friday shows "0mm" with no blue bar.

Code Editor and Weather Forecast UI

<div class="wrap">
<div class="weather-cards"></div>
set-inline: 0;
ock-size:
min(var(--precip-amount) / var(--max-precip) *
ckground: var(--brand-blue);
const MAX_precipitation = 10;
const data = {
	forecast: [
		{
			day: "Wednesday",
			date: "May 27",
A screenshot of a code editor (likely Visual Studio Code) showing HTML, CSS, and JavaScript code on the left, and a browser preview on the right. The browser preview displays three weather forecast cards. The first card, for Wednesday, May 27, shows a temperature of 14°C (Night 7°C), 70% precipitation chance, and 8.2mm of precipitation visualized with a blue fill bar. The second card, for Thursday, May 28, shows 12°C (Night 6°C), 40% precipitation chance, and 3.8mm of precipitation with a blue fill bar. The third card, for Friday, May 29, shows 17°C (Night 9°C), 10% precipitation chance, and 0mm of precipitation.

Code Editor Showing HTML, CSS, and JavaScript for a Weather App

HTML structure:

<div class="wrap">
  <div class="weather-cards"></div>

CSS for a precipitation bar:

inset-inline: 0;
block-size: min(var(--precip-amount) / var(--max-precip) * ...
background: var(--brand-blue);

JavaScript data for Wednesday's weather:

day: "Wednesday",
date: "May 27",
high: 14,
night: 7,
chance: 70,
precipitation: 8.2,
condition: "rain"
A screenshot of a code editor displaying HTML, CSS, and JavaScript code on the left, and a preview of a web application on the right. The web application shows three weather forecast cards for Wednesday, Thursday, and Friday. Each card displays the day, date, high and night temperatures, chance of precipitation (%), and total precipitation in millimeters. The first card (Wednesday) shows 14° high, 7° night, 70% chance, and 8.2mm precipitation with a prominent blue bar indicating the precipitation level. The second card (Thursday) shows 12° high, 6° night, 40% chance, and 3.8mm precipitation with a shorter blue bar. The third card (Friday) shows 17° high, 9° night, 10% chance, and 0mm precipitation with no blue bar.

HTML

<div class="wrap">
    <div class="weather-cards"></div>
</div>

CSS

set-inline: 0;
block-size: min(var(--precip-amount) / var(--max-precip) * 100%, 100%);
background: var(--brand-blue);

JavaScript

day: "Wednesday",
date: "May 27",
high: 14,
night: 7,
chance: 70,
precipitation: 18.2,
condition: "rain"
Screenshot of a code editor displaying HTML, CSS, and JavaScript code. On the right, a live preview shows three weather forecast cards. The cards display Wednesday (May 27), Thursday (May 28), and Friday (May 29) with their respective high and night temperatures (e.g., 14° high, 7° night for Wednesday). Each card also shows a chance of precipitation (e.g., 40% for Thursday) and a blue bar representing precipitation amount (18.2mm for Wednesday, 3.8mm for Thursday, and 0mm for Friday).

HTML Code

<div class="wrap">
  <div class="weather-cards"></div>

CSS Code Snippet

var(--max-precip) * 100%, 1);
);

JavaScript Data Object Properties

day: "Wednesday",
date: "May 27",
high: 14,
night: 7,
chance: 70,
precipitation: 18.2,
condition: "rain"

Screenshot of a code editor, likely VS Code, showing HTML, CSS, and JavaScript code panels. On the right, a live preview displays three weather forecast cards. Each card includes the day, date, high temperature, and a blue bar indicating precipitation level and amount. The cards show forecasts for Wednesday (14°, 18.2mm, high precipitation bar), Thursday (12°, 3.8mm, partial precipitation bar), and Friday (17°, 0mm, empty precipitation bar).

<div class="wrap">
<div class="weather-cards"></div>
var(--max-precip) * 100%, 100%);
day: "Wednesday",
date: "May 27",
high: 14,
night: 7,
chance: 70,
precipitation: 18.2,
A screenshot of a code editor showing HTML, CSS, and JavaScript code snippets on the left, and a live web preview on the right. The web preview displays three weather forecast cards. The first card, for Wednesday, May 27, shows a high of 14°, night 7°, 70% chance of rain, and a blue bar indicating 18.2mm of precipitation. The second card, for Thursday, May 28, shows a high of 12°, night 6°, 40% chance of rain, and a blue bar indicating 3.8mm of precipitation. The third card, for Friday, May 29, shows a high of 17°, night 9°, 10% chance of rain, and 0mm of precipitation.
<div class="wrap">
  <div class="weather-cards"></div>
inset-block-end: 0;
inset-inline: 0;
block-size:
  min(var(--precip-amount) / var(--max-precip...);
background: var(--brand-blue);
day: "Wednesday",
date: "May 27",
high: 14,
night: 7,
chance: 70,
precipitation: 18.2,
condition: "rain"
A screenshot of a code editor showing HTML, CSS, and JavaScript. To the right, a web application preview displays three weather cards for Wednesday, Thursday, and Friday. Each card shows the day, date, high and night temperatures, a percentage chance (likely for precipitation), and a blue bar representing precipitation amount (18.2mm, 3.8mm, 0mm respectively).
<div class="wrap">
  <div class="weather-cards"></div>
...
...
  inset-block-end: 0;
  inset-inline: 0;
  block-size:
    min(var(--precip-amount) / var(--max-precip)
  background: var(--brand-blue);
}
day: "Wednesday",
date: "May 27",
high: 14,
night: 7,
chance: 70,
precipitation: 18.2,
condition: "rain",
...
Screenshot of a code editor showing HTML, CSS, and data on the left. On the right, a live preview displays three weather cards for Wednesday, Thursday, and Friday, each showing temperature, night temperature, and precipitation chance/amount.

HTML

<div class="wrap">
<div class="weather-cards"></div>

CSS

.precipitation-visual {
  --max-precip: 10;
  position: absolute;
  isolation: isolate;
  inset-block-end: 0;
}

JavaScript

day: "Wednesday",
date: "May 27",
high: 14,
night: 7,
chance: 70,
precipitation: 18.2,
Screenshot of a code editor (likely VS Code) showing HTML, CSS, and JavaScript code. On the right, a live preview displays three weather forecast cards for Wednesday, Thursday, and Friday. The Wednesday card shows 14° high, 7° night, 70% chance of precipitation, and a visual bar indicating 18.2mm. The Thursday card shows 12° high, 6° night, 40% chance, and 3.8mm precipitation. The Friday card shows 17° high, 9° night, 10% chance, and 0mm precipitation. Precipitation amounts are visualized with blue fill bars at the bottom of each card.
<div class="wrap">
<div class="weather-cards"></div>
.weather-card {
  --precip-amount: attr(data-precip type(<numbe...
}

.precipitation-visual {
  --max-precip: 10;
  position: absolute;
}
day: "Wednesday",
date: "May 27",
high: 14,
night: 7,
chance: 70,
precipitation: 18.2,
condition: "rain"
Screenshot of a code editor displaying HTML, CSS, and JavaScript code on the left, and a preview of a weather application on the right. The application shows three daily weather cards for Wednesday, Thursday, and Friday, each with temperature, precipitation chance, and a visual bar indicating precipitation amount (18.2mm, 3.8mm, and 0mm respectively).
<div class="wrap">
  <div class="weather-cards"></div>
.weather-card {
  --precip-amount: attr(data-precip type(<numbe);
}

.precipitation-visual {
  --max-precip: 10;
  position: absolute;
}
  day: "Wednesday",
  date: "May 27",
  high: 14,
  night: 7,
  chance: 70,
  precipitation: 18.2,
  condition: "rain"
Screenshot of a code editor showing HTML, CSS, and JavaScript code panels on the left, and a web application preview on the right. The application displays three weather forecast cards for Wednesday, Thursday, and Friday. Each card shows the day, date, high and night temperatures, chance of rain, and a visual bar representing precipitation amount (18.2mm, 3.8mm, and 0mm respectively).
<HTML
1 <div class="wrap">
2   <div class="weather-cards"></div>
CSS
1 .weather-card {
2   --precip-amount: attr(data-precip type(<numbe...
3 }

5 .precipitation-visual {
6   --max-precip: 10;
7   position: absolute;
day: "Wednesday",
date: "May 27",
high: 14,
night: 7,
chance: 70,
precipitation: 18.2,
condition: "rain"
Screenshot of a web application displaying three weather cards for Wednesday, Thursday, and Friday, showing high and night temperatures, chance of precipitation, and precipitation amounts.

HTML

<div class="wrap">
<div class="weather-cards"></div>

CSS

.weather-card {
  --precip-amount: attr(data-precip type(<numbe
}

.precipitation-visual {
  --max-precip: 10;
  position: absolute;
day: "Wednesday",
date: "May 27",
high: 14,
night: 7,
chance: 70,
precipitation: 18.2,
condition: "rain"
Screenshot of a UI preview showing three weather cards for Wednesday, Thursday, and Friday. The Wednesday card displays 14° high, 7° night, 70% precipitation, with a blue bar indicating 18.2mm. The Thursday card displays 12° high, 6° night, 40% precipitation, with a blue bar indicating 3.8mm. The Friday card displays 17° high, 9° night, 10% precipitation, with a blue bar indicating 0mm.

And assigning types helps with this as well.

HTML

<section class="columns" data-column-c...
  <div></div>
  <div></div>
  <div></div>
  <div></div>
  <div></div>
  <div></div>
  <div></div>
  <div></div>
</section>

CSS

.columns {
  --col-count: attr(data-col...);
  display: grid;
  gap: 12px;
  grid-template-columns: repeat(var(--
}
Screenshot of a code editor displaying HTML and CSS. The HTML shows a section with nested div elements. The CSS defines a grid layout for the section, using a custom property derived from a data attribute for column count. The right pane shows a live preview of these elements as purple rectangular blocks, arranged in varying column layouts based on the CSS.
<section class="columns" data-column-c...
<div></div>
<div></div>
<div></div>
<div></div>
<div></div>
<div></div>
<div></div>
<div></div>
.columns {
  --col-count: attr(data-col...
  display: grid;
  gap: 12px;
  grid-template-columns: repeat(var(--...
}
A code editor showing HTML and CSS code side-by-side with a live browser preview. The HTML code displays a section with a class of "columns" containing eight empty div elements. The CSS code defines properties for the ".columns" class, including a custom property `--col-count` using `attr()`, `display: grid;`, `gap: 12px;`, and `grid-template-columns` using `repeat()` and the custom property. The live preview on the right shows a grid layout of purple rectangular bars, with some elements spanning the full width and others arranged in two columns.
<section class="
<div></div>
<div></div>
<div></div>
<div></div>
<div></div>
<div></div>
<div></div>
.columns {
  --col-count: a
  display: grid;
  gap: 12px;
  grid-template-
}

DevTools

<!DOCTYPE html>

  • Elements
  • Styles
  • Computed
  • Layout

Filter

Screenshot of a development environment. On the left, HTML code shows a `
` containing eight `
` elements. Below it, CSS code defines a `.columns` class using `display: grid;`, `gap: 12px;`, `grid-template-`, and a custom property `--col-count: a`. On the right, a browser rendering of the HTML displays a series of purple rectangular elements arranged in a grid. Above the browser rendering, the browser's developer tools are visible, displaying the 'Elements' and 'Styles' tabs.
Screenshot of a web development environment, showing an HTML and CSS code editor on the left, a browser preview of purple block elements in the center, and browser developer tools open to the "Elements" and "Styles" tabs on the right.

Live Coding and DevTools Inspection

<section class="
  <div></div>
  <div></div>
  <div></div>
  <div></div>
  <div></div>
  <div></div>
  <div></div>
  <div></div>
.columns {
  --col-count: a;
  display: grid;
  gap: 12px;
  grid-template-
}
div {
  padding: 1rem;
  background: orchid;
  border-radius: 6px;
}
div {
  display: block; /* user agent stylesheet */
}
Screenshot of a web development environment split into three main panels. The left panel shows an IDE with HTML and CSS code. The middle panel is a browser preview displaying a series of purple, rounded-rectangle blocks arranged in various column layouts. The right panel shows browser developer tools with the 'Elements' tab displaying the DOM structure of div elements and the 'Styles' tab showing applied CSS rules for a div, including padding, background, border-radius, and display: block from the user agent stylesheet.

Web Development Debugging Screenshot

<section class="columns" data-column-count="thre">
  <div></div>
  <div></div>
  <div></div>
  <div></div>
  <div></div>
  <div></div>
  <div></div>
  <div></div>
  ...
</section>
.columns {
  --col-count: a;
  display: grid;
  gap: 12px;
  grid-template-...
}

In the DevTools Styles panel for the selected div element:

div {
  padding: 1rem;
  background: orchid;
  border-radius: 6px;
}
div {
  display: block;
}
Screenshot of a web development environment, displaying HTML, CSS, and a live preview of a grid-based layout. The Chrome DevTools 'Elements' panel is open, highlighting a 'div' element within a 'section' that has a 'data-column-count' attribute set to "thre" and shows a 'grid' badge. The rendered output on the left displays several purple rectangular boxes, some spanning full width and others arranged in three columns. The left-hand code editor panel shows CSS rules for the '.columns' class and 'div' elements.

CSS Custom Property Type Mismatch Debugging

<section class="columns" data-column-count="three">
    <div></div>
    <div></div>
    <div></div>
    <div></div>
    <div></div>
    <div></div>
    <div></div>
    <div></div>
</section>
.columns {
    --col-count: attr(data-column-count type(<number>));
    display: grid;
    gap: 12px;
    grid-template-columns: repeat(var(--col-count), 1fr);
}

The screenshot demonstrates a debugging scenario where the CSS custom property --col-count is intended to derive its value from the HTML attribute data-column-count, expecting a number type. However, the HTML attribute is set to the string "three", causing a type mismatch with type(<number>) in the CSS. As a result, the --col-count property is shown as crossed off in the browser's developer tools, indicating it's invalid and not being applied correctly.

Screenshot of a web development environment showing an HTML editor on the left with a `section` element containing eight `div`s, a CSS editor below it defining styles for `.columns`, and a live preview displaying purple rectangular blocks, some spanning full width and others arranged in a three-column layout. On the right, Chrome DevTools' Elements panel is active, inspecting the `section.columns` element. The Styles pane in DevTools shows the CSS, specifically highlighting the `--col-count` custom property which is crossed out, indicating an invalid value due to a type mismatch where `data-column-count="three"` (string) is used with `type(<number>)`. This visual state demonstrates the debugging of a CSS type error.

Debugging CSS Grid with Custom Properties and attr() type()

HTML structure (from Developer Tools Elements panel):

<section class="columns" data-column-count="thr...">
  <div></div>
  <div></div>
  <div></div>
  <div></div>
  <div></div>
  <div></div>
  <div></div>
  <div></div>
</section>

Associated CSS rules for .columns (from Developer Tools Styles panel):

.columns {
  --col-count: attr(data-column-count
    type(«number»));
  display: grid;
  gap: 12px;
  grid-template-columns: repeat(var(--col-count
    ), 1fr);
}
section {
  margin-block: 2rem;
}

Note: The --col-count property in the DevTools Styles panel is visually struck through, indicating an invalid type for the data-column-count attribute, which is set to a string value "thr..." instead of a number.

Screenshot of a development environment showing: 1. A code editor interface on the left, displaying HTML and CSS code. The HTML shows a <section> element with a class="columns" and a data-column-count attribute, containing eight child <div> elements. The CSS defines styles for the .columns class, including a custom property --col-count. 2. A browser's developer tools interface on the right, specifically the Elements and Styles panels. The Elements panel highlights the same <section.columns> element. The Styles panel shows the computed CSS for this element, where the --col-count property definition, which uses attr(data-column-count type(«number»)), is visibly struck through. 3. A live preview pane in the center, displaying a series of purple rectangular blocks. The first set of blocks appears in a single column, while subsequent blocks are arranged in multiple columns, illustrating the effect of the erroneous --col-count property due to the string value in the data-column-count attribute where a number is expected.

Debugging CSS custom properties with attr() and type() in DevTools

Screenshot of browser developer tools, showing HTML, CSS, and a live preview. The HTML pane shows a section with class 'columns' containing multiple divs. The Styles pane highlights a CSS custom property `--col-count` using `attr(data-column-count type(<number>))` with a strikethrough, indicating a type mismatch, as the `data-column-count` attribute is set to the string 'three'. The live preview displays a grid layout with several purple rectangles.
<section class="columns" data-column-count="three">
  <div></div>
  <div></div>
  <div></div>
  <div></div>
  <div></div>
  <div></div>
  <div></div>
  <div></div>
</section>
.columns {
  --col-count: attr(data-column-count type(number));
  display: grid;
  gap: 12px;
  grid-template-columns: repeat(var(--col-count), 1fr);
}

section {
  margin-block: 2rem;
}
A screenshot of a code editor showing HTML and CSS code, a browser preview displaying purple rectangular blocks in a grid layout, and browser developer tools inspecting the elements and styles.

HTML and CSS Grid Example

<section class="columns" data-column-count="three">
  <div></div>
  <div></div>
  <div></div>
  <div></div>
  <div></div>
  <div></div>
  <div></div>
  <div></div>
</section>
.columns {
  --col-count: attr(data-column-count type(number));
  display: grid;
  gap: 12px;
  grid-template-columns: repeat(var(--col-count), 1fr);
}
Screenshot of browser developer tools showing HTML, CSS, and a live preview. The HTML panel displays a <section> element with class "columns" and a data-column-count attribute set to "three", containing eight <div> child elements. The CSS panel defines grid properties for the ".columns" selector, including a custom property "--col-count" that uses `attr(data-column-count type(number))`. The live preview pane renders purple rectangular blocks, arranged in a mix of single-column and three-column grid layouts, demonstrating the effect of the CSS Grid.

Debugging CSS Custom Properties with `attr()` and `type()`

<section class="columns"
  data-column-count="three">
  <div></div>
  <div></div>
  <div></div>
  <div></div>
  <div></div>
  <div></div>
  <div></div>
</section>
.columns {
  --col-count: attr(data-column-count
    type(<number>));
  display: grid;
  gap: 12px;
  grid-template-columns: repeat(var(--col-count
    ), 1fr);
}

In the browser developer tools, the --col-count custom property is shown as overridden and crossed out. A tooltip indicates "--col-count is not defined" for the grid-template-columns property. This occurs because the data-column-count attribute has a string value ("three") instead of a number, conflicting with the type(<number>) declaration in the CSS.

Screenshot of a web development environment. The left side displays HTML and CSS code in an editor. The HTML shows a section with class 'columns' and a data-column-count attribute set to "three". The CSS defines a custom property --col-count using the attr() function to read the data-column-count attribute, specifying type(number). It also sets display: grid, gap: 12px, and grid-template-columns using the --col-count variable. The right side shows a browser preview displaying horizontal purple and blue striped elements. The top and bottom sections show full-width stripes, while the middle section, where the grid should apply, shows a single column of stripes. Below the browser preview, the Chrome DevTools 'Elements' and 'Styles' tabs are open. The styles panel for 'section.columns' shows the computed CSS, where the --col-count property is crossed out, and a tooltip states "--col-count is not defined", indicating an error in how the custom property is being processed due to the mismatch in type.

Walmart E-commerce Tags Example

A split screenshot showing web browser developer tools on the left and a Walmart e-commerce product page on the right. The developer tools display HTML code for a product tag with inline CSS styles for background, color, border-radius, and font-weight. The Walmart page shows various products like a toy jeep and a dinosaur, with price tags and "Rollback" labels visible.

Walmart E-commerce Tags with Inline Styles

A split-screen screenshot showing browser developer tools on the left and a Walmart e-commerce product page on the right. The developer tools display HTML code for a `` element representing a 'Rollback' tag, with inline CSS styles for background, color, border-radius, and font-weight. The Walmart page shows product listings, including a black toy jeep, a party balloon kit, and a dinosaur toy.

Walmart Product Tag Inline Styles

<span class="Tag_tag__ARIHS Tag_
red_p3m1t Tag_primary__toIMC ta
g-leading-badge absolute" data-
testid="tag-leading-badge"
style="background: rgb(228, 28,
36); color: rgb(255, 255, 255);
border-radius: 4px; font-weight:
700;">Rollback</span> <flex>
</div>
A split screenshot showing web browser developer tools on the left and a Walmart product page on the right. The developer tools display HTML code for a product tag with inline styles. The Walmart page shows various product listings, including toys like a black Jeep, a blue vehicle, and a green dinosaur, each with prices and sometimes a "Best seller" tag.

HTML & CSS for Walmart Rollback Tag

<span class="Tag_tag_ARIHS Tag_red_p3mlt Tag_primary_t0ImC tag-leading-badge absolute" data-testid="tag-leading-badge"
    style="background: rgb(222, 28, 36); color: rgb(255, 255, 255); border-radius: 4px; font-weight: 700;">Rollback</span>
Screenshot of a Walmart.com product page with browser developer tools open, highlighting the HTML and inline CSS styles for a "Rollback" tag applied to products.

Walmart Product Page with Developer Tools

A screenshot displaying a web developer tools interface on the left and a Walmart product page on the right. The developer tools show the 'Sources' tab selected, inspecting an HTML `` element with the text 'Rollback' and inline styles for background, color, border-radius, and font-weight. Below the HTML, elements for opacity, event listeners, DOM breakpoints, and properties are visible, along with a CSS file reference. The Walmart page shows product listings, including a black toy Jeep, a blue inflatable pool, and a dinosaur toy.
Two large, empty rectangular frames with rounded corners, likely placeholders for code or content examples.
Two large, empty, dark grey rectangular frames with white outlines are displayed side-by-side on a darker background, likely placeholders for content.

Fetches data from DB, CMS, etc.

A diagram illustrating a process with two large, empty rectangular boxes.

Server

Fetches data from DB, CMS, etc.

CSS

A diagram showing two main components: 'Server' and 'CSS'. Within the 'Server' component, there is a box stating 'Fetches data from DB, CMS, etc.'.

Server

  • Fetches data from DB, CMS, etc.
  • Processes data
  • Applies inline styles

CSS

A diagram contrasting "Server" and "CSS". The "Server" section outlines its functions: fetching data from databases, CMS, etc., processing data, and applying inline styles. The "CSS" section is empty.

Server

  • Fetches data from DB, CMS, etc.
  • Processes data
  • inline styles

CSS

A diagram divided into two main sections. The left section, labeled "Server", contains a flowchart showing a sequence of steps: "Fetches data from DB, CMS, etc.", followed by "Processes data", and then "inline styles". The "inline styles" step is highlighted with a red dotted border. The right section is labeled "CSS" and contains an empty box.

Server

Fetches data from DB, CMS, etc.

Processes data

inline styles

CSS

A diagram illustrates a server-side process flow from fetching data to processing data and applying inline styles. The CSS section contains a yawning emoji.
const BADGE_STYLES = {
  rollback: { background: rgb(222, 28, 36), color: rgb(255, 255, 255) },
  clearance: { background: rgb(255, 152, 0), color: rgb(255, 255, 255) },
  reduced: { background: rgb(0, 115, 209), color: rgb(255, 255, 255) }
}

function Badge({ type, label }) {
  const styles = BADGE_STYLES[type]

  return (
    <span
      style={{
        background: styles.background,
        color: styles.color,
        borderRadius: "4px",
        fontWeight: 700,
      }}
    ></span>
  )
}
const BADGE_STYLES = {
	rollback: { background: rgb(222, 28, 36), color: rgb(255, 255, 255) },
	clearance: { background: rgb(255, 152, 0), color: rgb(255, 255, 255) },
	reduced: { background: rgb(0, 115, 209), color: rgb(255, 255, 255) }
}

function Badge({ type, label }) {
	const styles = BADGE_STYLES[type]

	return (
		<span
			style={{
				background: styles.background,
				color: styles.color,
				borderRadius: "4px",
				fontWeight: 700,
			}}
		>
		</span>
	)
}
const BADGE_STYLES = {
	rollback: { background: rgb(222, 28, 36), color: rgb(255, 255, 255) },
	clearance: { background: rgb(255, 152, 0), color: rgb(255, 255, 255) },
	reduced: { background: rgb(0, 115, 209), color: rgb(255, 255, 255) }
}

function Badge({ type, label }) {
	const styles = BADGE_STYLES[type]

	return (
		<span
			style={{
				background: styles.background,
				color: styles.color,
				borderRadius: "4px",
				fontWeight: 700,
			}}>
		</span>
	)
}

CSS Styles in Developer Tools

Left Page Styles (Hexadecimal Color)

element.style {
  background: #DE1C24;
  color: #FFFFFF;
  border-radius: 4px;
  font-weight: 700;
}

Right Page Styles (RGB Color)

element.style {
  background: rgb(222, 28, 36);
  color: rgb(255, 255, 255);
  border-radius: 4px;
  font-weight: 700;
}
Screenshot showing two Walmart product pages with browser developer tools open below them. The developer tools display the CSS styles for a selected element on each page, contrasting a hexadecimal color value on the left with an RGB color value on the right.

Walmart.ca product pages: Rollbacks & more and Father's Day Sale

A screenshot displaying two instances of the Walmart.ca website in a web browser. The left pane shows the "Rollbacks & more" page with various products, while the right pane shows the "Father's Day Sale" page with different products. Below the browser windows, the browser's developer tools are open, showing the 'Elements' and 'Styles' tabs. The 'Styles' tab highlights CSS properties for a selected element, showing a background color defined as hex `#DE1C24` on the left and as RGB `rgb(222, 28, 36)` on the right.

Walmart Canada Website with Chrome Developer Tools Open

Screenshot of the Walmart Canada website with Chrome Developer Tools open. The developer tools display the 'Styles' pane, showing a long list of CSS custom properties for colors and border-radii, along with their values.
function Badge({ type }) {
  return (
    <span className="badge" data-promo={type}>{type}</span>
  )
}
A screenshot of a code editor displaying a JavaScript/JSX function named 'Badge'.
function Badge({ type }) {
  return (
    <span className="badge" data-promo={type}>{type}</span>
  )
}
function ProductCard({ name, price, promo, stock, rating }) {
  return (
    <div
      className="product"
      data-promo={promo}
      data-price={price}
      data-stock={stock}
      data-rating={rating}
    >
      {promo && <Badge type={promo} />}
      <p>{name}</p>
      <p>{price}</p>
    </div>
  )
}
Screenshot of a code editor showing a React component definition.

Smart Inventory Catalog

<header class="flow">
  <h1>Smart Inventory Catalog</h1>
</header>
<main>
/* https://una.im/advanced-attr#star-rating */
:root {
  --color-rollback: hsl(220, 74%, 41%);
  --color-clearance: hsl(357, 68%, 53...
}
const grid = document.querySelector(".
document.getElementById("sort").addEve...
if (document.startViewTransition) {
document.startViewTransition(() =>...
A screenshot of a code editor interface on the left, displaying HTML, CSS, and JavaScript code. On the right, a web browser preview shows an e-commerce inventory catalog with product listings, including Wireless Headphones and a Wireless Charger.
<header class="flow">
  <h1>Smart Inventory Catalog</h1>
/* <a href="https://una.im/advanced-attr#star-">https://una.im/advanced-attr#star-...</a> */
:root {
  --color-rollback: hsl(220, 74%, 41%;
  --color-clearance: hsl(357, 68%, 53
}
.product s...
const grid = document.queryS...
document.getElementById("sort").addEve...
if (document.startViewTransition) {
  document.startViewTransition(() =>...

Smart Inventory Catalog

Screenshot of a code editor displaying HTML, CSS, and JavaScript code on the left, and a live preview of a web application on the right. The web application shows a "Smart Inventory Catalog" with product listings for "Wireless Headphones" and "Wireless Charger", each with star ratings, prices, and an "Add to Cart" button.

Smart Inventory Catalog

<header class="flow">
  <h1>Smart Inventory Catalog</h1>
--color-clearance: hsl(357, 68%, 53...
}

.product {
  --stock: attr(data-stock type(<numb
  --rating: attr(data-rating type(<nu
  --sales: attr(data-recent-sales typ
const grid = document.querySelecto(".
document.getElementById("sort").addEve
if (document.startViewTransition) {
  document.startViewTransition(() =>

Sort items by:

  • Wireless Headphones (4.2 stars) $99.99
  • Wireless Charger (3.8 stars) $34.99
A screenshot of a code editor showing HTML, CSS, and JavaScript files, alongside a browser preview of a "Smart Inventory Catalog" web application featuring product listings for headphones and a wireless charger.

Smart Inventory Catalog

Screenshot of a web development environment, split vertically. On the left is a code editor displaying HTML, CSS, and JavaScript code. On the right is a browser preview showing a web page titled "Smart Inventory Catalog" with product listings, including "Wireless Headphones" and "Wireless Charger".

<header class="flow">
  <h1>Smart Inventory Catalog</h1>
</header>
<main>
  <div class="controls">
    <label for="sort">Sort items by:</label>
    <select name="sort" id="sort">
      <option value="" selected>— So...</option>
      <option value="rating">Rating</option>
...

const grid = document.querySelector(".
document.getElementById("sort").addEve
if (document.startViewTransition) {
  document.startViewTransition(() =>
...
A split-screen view showing a code editor on the left and a web application preview on the right. The code editor displays partially visible HTML and JavaScript code. The web application is an 'Smart Inventory Catalog' with a 'Sort items by' dropdown. Below the dropdown are two product cards: 'Wireless Headphones' with a 'Rollback' badge, a 4.2-star rating, and a price of $99.99; and 'Wireless Charger' with a 3.8-star rating and a price of $34.99. Both product cards include an 'Add to Cart' button.

Smart Inventory Catalog

class="product"
data-id="prod-1"
data-price="99.99"
data-stock="3"
data-rating="4.2"
data-recent-sales="4"
data-promo="rollback"
>
<div class="image-container"
<img
const grid = document.querySelector(".
document.getElementById("sort").addEve
if (document.startViewTransition) {
	document.startViewTransition(() =>
  • Sort items by: -- Sort by: --
  • Wireless Headphones
    • Rating: 4.2 stars
    • Price: $99.99
    • Promo: Rollback
  • Wireless Charger
    • Rating: 3.8 stars
    • Price: $34.99
Screenshot of a code editor showing HTML, CSS, and JavaScript code snippets on the left, alongside a web application displaying a "Smart Inventory Catalog" on the right. The catalog shows product cards for "Wireless Headphones" and "Wireless Charger", complete with prices, star ratings, and "Add to Cart" buttons. The "Wireless Headphones" item has a "Rollback" tag.

Smart Inventory Catalog

...class="product"
.product {
  --stock: attr(data-stock type(<numb...
  --rating: attr(data-ratin...
  --sales: attr(data-recent-sales typ...
  --promo: attr(data-promo type(<cust...
}

.stars {
  ...
}
const grid = document.queryS...

document.getElementById("sort").addEve...
if (document.startViewTransition) {
  document.startViewTransition(() => ...
}
Screenshot of a code editor (likely VS Code) showing HTML, CSS, and JavaScript code, alongside a web application displaying a "Smart Inventory Catalog" with product listings.

Smart Inventory Catalog

  <div class="product">
.product {
  --stock: attr(data-stock type(<numb...));
  --rating: attr(data-ratin...);
  --sales: attr(data-recent-sales typ...);
  --promo: attr(data-promo type(<cust...));
}

.stars {
  --star-size: 50px;
  --star-rating: ;
}
const grid = document.queryS...
Screenshot of a code editor on the left, displaying HTML, CSS, and JavaScript code related to product attributes and star ratings. On the right, a 'Smart Inventory Catalog' web application shows two product cards: 'Wireless Headphones' with a 'Rollback' badge, and 'Wireless Charger' with a disabled 'Add to Cart' button.

CSS for Star Rating Component

--rating: attr(data-rating type(nu
--sales: attr(data-recent-sales typ
--promo: attr(data-promo type(<cust
}

.stars {
  --star-size: 50px;
  --star-rating: ;

  inline-size: calc(var(--star-size)
  height: var(--star-size);
  background: linear-gradient(
  90dea.
}
<div class="product">
const grid = document.querySelector(".
Screenshot of a code editor showing HTML, CSS, and JavaScript, with the `.stars` CSS rule highlighted. Alongside, a web browser preview displays a 'Smart Inventory Catalog' featuring product cards for 'Wireless Headphones' and 'Wireless Charger', including star ratings, prices, and 'Add to Cart' buttons.

Smart Inventory Catalog

class="product"
--rating: attr(data-rating type(nu
--sales: attr(data-recent-sales typ
--promo: attr(data-promo type(cust
}

.stars {
  --star-size: 50px;
  --star-rating:
  calc(var);
  inline-size: calc(var(--star-size)
  height: var(--star-size);
  background: linear-gradient(
const grid = document.querySelector(".
Screenshot of a code editor on the left displaying HTML, CSS, and JavaScript code snippets. On the right, a browser preview shows a "Smart Inventory Catalog" with two product cards: Wireless Headphones with a "Rollback" label and a rating of 4.2, and a Wireless Charger with a rating of 3.8.

CSS for Star Rating Component

--star-rating:
	calc(var(--rating) / 5 * 100%);

inline-size: calc(var(--star-size) * 5);
height: var(--star-size);
background: linear-gradient(
	90deg,
	var(--star-fill) 0%,
	var(--star-fill) var(--star-rating),
	var(--star-empty) var(--star-rating),
	var(--star-empty) 100%
);
mask-image: url("data:image/svg+xml;...");
A code editor displays CSS properties defining a star rating system, including calculations for `--star-rating`, `inline-size`, `height`, and a `linear-gradient` for the background, along with a `mask-image` for the star shape. To the right, a screenshot of a "Smart Inventory Catalog" web application demonstrates the styled star ratings on product listings, showing "Wireless Headphones" with a 4.2-star rating and "Wireless Charger" with a 3.8-star rating.
class="product"
calc(var(--rating) / 5 * 100%);

inline-size: calc(var(--star-size));
height: var(--star-size);
background: linear-gradient(
  90deg,
  var(--star-fill) 0%,
  var(--star-fill) var(--star-rating-progress),
  var(--star-empty) var(--star-rating-progress),
  var(--star-empty) 100%
);
mask-image: url("data:image/svg+xml...");
mask-size: var(--star-size) var(--s...);
const grid = document.querySelector(".
Screenshot of a code editor displaying HTML, CSS, and JavaScript code snippets, alongside a live preview of a "Smart Inventory Catalog" web application. The catalog shows product cards for "Wireless Headphones" with a 4.2-star rating and "Wireless Charger" with a 3.8-star rating.

<div class="product">
    

height: var(--star-size);
background: linear-gradient(
	90deg,
	var(--star-fill) 0%,
	var(--star-fill) var(--star-rating),
	var(--star-empty) var(--star-rating),
	var(--star-empty) 100%
);
mask-image: url("data:image/svg+xml ...");
mask-size: var(--star-size) var(--star-size);
mask-repeat: repeat-x;
}
    

const grid = document.querySelector(".
    

A screenshot of a code editor interface displaying HTML, CSS, and JavaScript code. On the right, a browser preview shows a "Smart Inventory Catalog" web page with product listings. The catalog features "Wireless Headphones" with a 4.2-star rating and "$99.99", and "Wireless Charger" with a 3.8-star rating and "$34.99". The visible CSS code block defines styling for star ratings using a linear gradient and a mask image.

Smart Inventory Catalog

.stars {
  --star-size: 50px;
  --star-rating:
    calc(var(--rating) / 5 * 100%);
  inline-size: calc(var(--star-size));
  height: var(--star-size);
  background: linear-gradient(
    90deg,
    var(--star-fill) 0%,
    /* ... more gradient definition ... */
  );
}
Screenshot showing a code editor on the left displaying CSS code for a '.stars' class, and a web UI on the right titled 'Smart Inventory Catalog'. The UI displays product cards with star ratings, demonstrating the effect of the CSS, specifically headphones with a 4.2 rating and a wireless charger with a 3.8 rating, both showing partially filled stars.
<div
	class="product"
--promo: attr(data-promo type)<cust.
}
.stars {
	--star-size: 50px;
	--star-rating:
	round(var(--rating) / 5 * 100%, 1
inline-size: calc(var(--star-size)
height: var(--star-size);
background: linear-gradient(
	90deg,
	var(--star-fill) 0%,
const grid = document.querySelector(".
A split-screen view showing a code editor on the left and a web browser preview on the right. The code editor displays HTML, CSS, and JavaScript code snippets. The web browser preview shows a product listing page with product cards. The top product is 'Wireless Headphones' with a 'Rollback' badge, a 4.2 rating displayed with three full and one partially filled star, and a price of $99.99. The second product is a 'Wireless Charger' with a 3.8 rating displayed with three full and one partially filled star, and a price of $34.99. A third product, a 'USB-C Hub', is partially visible at the bottom.

<div class="product"
.stars {
  --star-size: 50px;
  --star-rating:
    round(var(--rating) / 5 * 100%, 1);
  inline-size: calc(var(--s...);
  height: var(--star-size);
  background: linear-gradient(
    90deg,
    var(--star-fill) 0%,
...
const grid = document.querySelector(".");
A screenshot of a code editor showing HTML, CSS, and JavaScript files. On the right, a web application interface displays a list of products with images, titles, star ratings, prices, and "Add to Cart" buttons. Products shown include Wireless Headphones (4.2 stars, $99.99), a Wireless Charger (3.8 stars, $34.99), and a USB-C Hub (4.1 stars, $45.99).
.stars {
  --star-size: 50px;
  --star-rating:
    round(var(--rating) / 5 * 100%, 10%);
  inline-size: calc(var(--star-size) * 5);
  height: var(--star-size);
  background: linear-gradient(
    90deg,
    var(--star-fill) 0%,
    ...
Screenshot of a code editor displaying CSS code for star ratings, alongside a web page preview showing a list of products with star ratings and prices.
<div class="product">
.stars {
	--star-size: 50px;
	--star-rating:
		round(var(--rating) / 5 * 100%, 10%);

	inline-size: calc(var(--star-size) * 5);
	height: var(--star-size);
	background: linear-gradient(
		90deg,
		var(--star-fill) 0%,
const grid = document.querySelector(".prod")
Screenshot of a code editor displaying HTML, CSS, and JavaScript code snippets. On the right, a web application interface shows product listings, including a 'USB-C Hub' with 4.1 stars and a 'Webcam' with 3.9 stars. The code editor highlights CSS for star ratings, particularly the `round()` function used for calculating the `--star-rating` custom property, and also shows snippets of HTML with `class="product"` and JavaScript for selecting elements with `document.querySelector(".prod")`.

Code Example: CSS for Star Rating Component

.stars {
	--star-size: 50px;
	--star-rating:
		round(var(--rating) / 5 * 100%, 10%);
	inline-size: calc(var(--star-size) * 5);
	height: var(--star-size);
	background: linear-gradient(
		90deg,
		var(--star-fill) 0%,
		/* ...truncated */
A screenshot of a code editor interface on the left displaying HTML, CSS, and JavaScript code, alongside a live web page preview on the right showing product listings with star ratings.

Code Example and Product Listing UI

...
class="product"
...
--promo: attr(data-promo type<custom-1);
}

.stars {
  --star-size: 50px;
  --star-rating:
    round(var(--rating) / 5 * 100%, 10%);

  inline-size: calc(var(--star-size) * 5);
  height: var(--star-size);
  background: linear-gradient(
    90deg,
    var(--star-fill) 0%,
...
const grid = document.querySelector(".prod")
...
Screenshot of a code editor showing HTML, CSS, and JavaScript code, displayed alongside a web application interface featuring a product listing with star ratings for items like a Wireless Charger and a USB-C Hub.

Smart Inventory Catalog

.stars {
    --star-size: 50px;
    --star-rating:
        round(var(--rating) / 5 * 100%, 10%);

    inline-size: calc(var(--star-size) * 5);
    height: var(--star-size);
    background: linear-gradient(
        90deg,
        var(--star-fill) 0%, /* ... */
}
const grid = document.querySelector(".prod...
A split-screen view showing a code editor on the left and a web application interface on the right. The code editor displays CSS code for styling star ratings, including custom properties and a `linear-gradient` function, along with a partial JavaScript line. The web application, titled "Smart Inventory Catalog", features a "Sort items by" dropdown and displays four product cards: Wireless Headphones with a 4.2-star rating and "Rollback" badge, a Smart Watch with a 4.5-star rating and "Clearance" badge, a Wireless Charger with a 3.8-star rating, and a Bluetooth Speaker with a 4.7-star rating and "Rollback" badge. Each product card includes a price and an "Add to Cart" button.

...
19 class="product"
...
    

21 height: var(--star-size);
22 background: linear-gradient(
23     90deg,
24     var(--star-fill) 0%,
25     var(--star-fill) var(--star-rating),
26     var(--star-empty) var(--star-rating),
27     var(--star-empty) 100%
28 );
29 mask-image: url("data:image/svg+xml,%3C...");
30 mask-size: var(--star-size) var(--star-size);
31 mask-repeat: repeat-x;
32 }
    

...
1 const grid = document.querySelector(".prod...
    

Smart Inventory Catalog

Screenshot of an integrated development environment (IDE) on the left displaying HTML, CSS, and JavaScript code, alongside a web browser on the right showing a "Smart Inventory Catalog" application. The catalog displays a grid of four products: Wireless Headphones, Smart Watch, Wireless Charger, and Bluetooth Speaker, each with an image, name, price, star rating, and an "Add to Cart" button. Some products are tagged with "Rollback" or "Clearance". A "Sort items by" dropdown is visible at the top.

Smart Inventory Catalog

HTML


19	class="product"

CSS


29	mask-image: url("data:image/svg+xml,%3C...
30	mask-size: var(--star-size) var(--star-size);
31	mask-repeat: repeat-x;
32	}
33	
34	.product-grid {
35		reading-flow: grid-rows;
36	
37	&[data-sort="rating"]] .product {
38	}

JavaScript


1	const grid = document.querySelector(".prod...

Sort items by options:

  • -- Sort by --
  • Rating
  • Price: High-Low
  • Price: Low-High
  • Availability
A screenshot of a code editor (VS Code) on the left, displaying HTML, CSS, and JavaScript code snippets. On the right, a web application interface shows a product catalog with a dropdown menu labeled "Sort items by" open, revealing options for sorting by Rating, Price (High-Low, Low-High), and Availability. Below the sort options, four product cards are visible: Wireless Headphones, Smart Watch, Wireless Charger, and Bluetooth Speaker, each with a rating, price, and "Add to Cart" button.

Smart Inventory Catalog

mask-image: url("data:image/svg+xml,%3C...
mask-size: var(--star-size) var(--star-...
mask-repeat: repeat-x;
}

.product-grid {
	reading-flow: grid-rows;
}

&[data-sort="rating"] .product {
}
const grid = document.querySelector(".prod...
A split screenshot shows a code editor on the left and a web application on the right. The code editor displays HTML, CSS, and JavaScript code. The web application, titled 'Smart Inventory Catalog', is an e-commerce product listing with a 'Sort items by' dropdown opened, showing options for sorting by Rating, Price (High-Low, Low-High), and Availability. Product cards display items such as Wireless Headphones, Smart Watch, Wireless Charger, and Bluetooth Speaker, each with star ratings, price, and an 'Add to Cart' button. Some product cards also feature 'Rollback' or 'Clearance' badges.

Code Editor and Inventory Catalog Example

HTML Snippet

...
class="product"
...

CSS Code

...
mask-image: url("data:image/svg+xml,%3C
mask-size: var(--star-size) var(--star-
mask-repeat: repeat-x;
}

.product-grid {
	reading-flow: grid-rows;
}

&[data-sort="rating"] .product {
}
...

Note: The `&` in the CSS is likely part of a preprocessor syntax (e.g., Sass) for nesting, resolving to a combined selector.

JavaScript Code

...
const grid = document.querySelector(".prod"
...

Smart Inventory Catalog UI

The catalog displays various products including Wireless Headphones (rated 4.2), Smart Watch (rated 4.5), Wireless Charger (rated 3.8), and Bluetooth Speaker (rated 4.7). Prices are displayed (e.g., $99.99, $249.99, $34.99, $79.99), along with "Add to Cart" buttons. Some products have promotional badges like "Rollback" or "Clearance". A "Sort items by" dropdown is available at the top.

A screenshot showing a split view. On the left is a code editor displaying HTML, CSS, and JavaScript code snippets. On the right is a web application UI titled "Smart Inventory Catalog," featuring a grid of product listings including headphones, a smart watch, a wireless charger, and a Bluetooth speaker. Each product card shows an image, star rating, price, and an "Add to Cart" button, with some displaying promotional badges like "Rollback" or "Clearance." A "Sort items by" dropdown is also visible at the top of the catalog.

Smart Inventory Catalog

HTML fragment showing class="product".

mask-image: url("data:image/svg+xml,%3C...");
mask-size: var(--star-size) var(--star-...);
mask-repeat: repeat-x;
}

.product-grid {
	reading-flow: grid-rows;
}
&[data-sort="rating"] .product {
}
const grid = document.querySelector(".prod...");
A split-screen view showing a code editor on the left and a web application on the right. The code editor displays HTML, CSS, and JavaScript. The CSS section shows properties for `mask-image`, `mask-size`, `mask-repeat` within a rule, followed by a `.product-grid` class definition, and a nested selector `&[data-sort="rating"] .product`. The JavaScript section shows a `document.querySelector` statement. The web application interface, titled "Smart Inventory Catalog", features a "Sort items by" dropdown menu and a grid displaying four product cards, including headphones, a smart watch, a wireless charger, and a Bluetooth speaker. Each card shows a price, star rating, and some include "Rollback" or "Clearance" badges.

Smart Inventory Catalog

...
  class="product"
...
...
mask-image: url("data:image/svg+xml,%3C...");
mask-size: var(--star-size) var(--star-;
mask-repeat: repeat-x;
}
...
...
const grid = document.querySelector(".prod...");
...
document.getElementById("sort").addEventLi...
if (document.startViewTransition) {
	document.startViewTransition(() => {
		grid.dataset.sort = e.target.value;
	});
} else {
	grid.dataset.sort = e.target.value;
}
...
A split screen showing a code editor on the left and a web application on the right. The code editor displays HTML, CSS, and JavaScript code snippets. The web application is an 'Smart Inventory Catalog' page displaying four product cards: Wireless Headphones, Smart Watch, Wireless Charger, and Bluetooth Speaker, each with an image, name, star rating, average rating, price, and 'Add to Cart' button. Some products also have 'Rollback' or 'Clearance' labels.

Smart Inventory Catalog

A screenshot showing a code editor on the left with HTML, CSS, and JavaScript code, and a web application on the right titled 'Smart Inventory Catalog'. The web application displays product cards for items like headphones, a smart watch, and a speaker, with an open dropdown menu for sorting items by options such as Rating, Price, and Availability.

Smart Inventory Catalog

<div class="product">
mask-image: url("data:image/svg+xml,%3C...
mask-size: var(--star-size) var(--star-...);
mask-repeat: repeat-x;
}

.product-grid {
	reading-flow: grid-rows;
}
&[data-sort="rating"] .product {
}
if (document.startViewTransition) {
	document.startViewTransition(() => {
		grid.dataset.sort = e.target.value;
	});
}
A split screenshot showing a code editor (VS Code) on the left, displaying HTML, CSS, and JavaScript code. On the right, a web application interface for a "Smart Inventory Catalog" is displayed, showing product listings with images, names, ratings, prices, and "Add to Cart" buttons. Labels like "Rollback" and "Clearance" are visible on some product images.
...
<div class="product">
...
.product-grid {
  reading-flow: grid-rows;
}

&[data-sort="rating"] .product {
}
if (document.startViewTransition) {
  document.startViewTransition(() => {
    grid.dataset.sort = e.target.value;
  });
}
A split-screen view showing a code editor on the left and a web application on the right. The code editor displays HTML, CSS, and JavaScript code snippets. The web application is a "Smart Inventory Catalog" with a "Sort items by" dropdown. Below the sorting option, there are product cards for "Wireless Headphones," "Smart Watch," "Wireless Charger," and "Bluetooth Speaker," each with an image, name, star rating, price, and an "Add to Cart" button. Some products have "Rollback" or "Clearance" badges.

Smart Inventory Catalog

<class="product"
.product-grid {
    	reading-flow: grid-rows;
    }

    &[data-sort="rating"] .product {
    	order:
    
if (document.startViewTransition) {
    	document.startViewTransition(() => {
    		grid.dataset.sort = e.target.value;
    	});
    
A split-screen view showing a code editor on the left and a web browser displaying an e-commerce catalog on the right. The code editor features sections for HTML, CSS, and JavaScript. The web application, titled "Smart Inventory Catalog," displays a grid of four product cards: Wireless Headphones (with a "Rollback" tag), Smart Watch (with a "Clearance" tag), Wireless Charger, and Bluetooth Speaker (with a "Rollback" tag). Each product card shows an image, product name, star rating, price, and an "Add to Cart" button. A dropdown menu labeled "Sort items by:" is visible at the top of the catalog.
<div class="product"
.product-grid {
  reading-flow: grid-rows;
}
&[data-sort="rating"] .product {
  order: calc(var(--rating) * 10);
}
if (document.startViewTransition) {
  document.startViewTransition(() => {
    grid.dataset.sort = e.target.value;
  });
}
A screenshot of a code editor (likely VS Code) on the left, displaying HTML, CSS, and JavaScript code, alongside a web application interface on the right. The web application is a "Smart Inventory Catalog" showing product cards for items like headphones, smart watches, chargers, and speakers, each with an image, name, star rating, price, and "Add to Cart" button. Some product cards have "Rollback" or "Clearance" labels. A "Sort items by" dropdown is visible at the top of the catalog.

Smart Inventory Catalog

HTML Code Snippet

class="product"

CSS Code Snippet

.product-grid {
	reading-flow: grid-rows;
}
&[data-sort="rating"] .product {
	order: calc(var(--rating) * 10);
}

JavaScript Code Snippet

if (document.startViewTransition) {
	document.startViewTransition(() => {
		grid.dataset.sort = e.target.value;
	});
}

Sorting options from the catalog dropdown:

  • Rating
  • Price: High-Low
  • Price: Low-High
  • Availability
Screenshot of a code editor displaying HTML, CSS, and JavaScript code, positioned next to a web application interface titled 'Smart Inventory Catalog'. The catalog features product listings and an open dropdown menu for sorting items, with the 'Rating' option highlighted.

HTML

class="product"

CSS

.product-grid {
  reading-flow: grid-rows;
}
&[data-sort="rating"] .product {
  order:
    calc(var(--rating) * 10)
}

JS

if (document.startViewTransition) {
  document.startViewTransition(() => {
    grid.dataset.sort = e.target.value;
  });
}
A screenshot showing a code editor (VS Code) on the left and a web browser on the right. The code editor displays HTML, CSS, and JavaScript code snippets, with sections titled "HTML", "CSS", and "JS". The browser shows a "Smart Inventory Catalog" with products displayed in a grid. A dropdown labeled "Sort items by" is set to "Rating". Products shown include a "Cable Organizer", "Wireless Mouse", "Wireless Charger", and "Webcam", each with an image, name, star rating, numerical rating, price, and an "Add to Cart" button. The "Wireless Mouse" and "Webcam" items also have a "Clearance" badge.
class="product"
.product-grid {
	reading-flow: grid-rows;
}
&[data-sort="rating"] .product {
	order: calc(var(--rating) * 10)
}
if (document.startViewTransition) {
	document.startViewTransition(() => {
		grid.dataset.sort = e.target.value;
	});
}
Screenshot of a web page showing a product grid on the right, featuring items like "Smart speaker" and "Earbuds" with images, prices, and star ratings. This grid appears to be demonstrating the sorting functionality implemented by the displayed code.

HTML

class="product"

CSS

.product-grid {
    	reading-flow: grid-rows;

    	&[data-sort="rating"] .product {
    		order:
    			calc(var(--rating) * 10)
    	}
    }
if (document.startViewTransition) {
    	document.startViewTransition(() => {
    		grid.dataset.sort = e.target.value;
    	});
    }
Screenshot of a code editor displaying CSS and JavaScript code snippets. On the right, a web application interface shows a grid of product cards with images, names, star ratings, and prices, demonstrating the effect of the code sorting products.
<div class="product"
.product-grid {
	reading-flow: grid-rows;
}
&[data-sort="rating"] .product {
	order:
		calc(var(--rating) * 10)
}
if (document.startViewTransition) {
	document.startViewTransition(() => {
		grid.dataset.sort = e.target.value;
	});
}
Screenshot of a code editor displaying HTML, CSS, and JavaScript code.
...
<div class="product">
...
.product-grid {
	reading-flow: grid-rows;
}

&[data-sort="rating"] .product {
	order:
		calc(var(--rating) * -10)
}
if (document.startViewTransition) {
	document.startViewTransition(() => {
		grid.dataset.sort = e.target.value;
	});
}
Screenshot of a code editor displaying HTML, CSS, and JavaScript code on the left, alongside a web application interface on the right. The web application shows a "Smart Inventory Catalog" with a grid of product listings, including items like Wireless Headphones, Smart Watch, Wireless Charger, and Bluetooth Speaker. Each product has an image, title, star rating, and price. A dropdown menu labeled "Sort items by" is open, and "Rating" is highlighted as the selected option.

Smart Inventory Catalog

<div class="product">
.product-grid {
  reading-flow: grid-rows;
}
&[data-sort="rating"] .product {
  order:
    calc(var(--rating) * -10)
}
if (document.startViewTransition) {
  document.startViewTransition(() => {
    grid.dataset.sort = e.target.value;
  });
}
A split-screen view showing a code editor on the left and a web application on the right. The code editor, appearing to be VS Code, displays HTML, CSS, and JavaScript code snippets. The web application is a "Smart Inventory Catalog" with a sorting dropdown (showing "Rating") and a grid of four product cards: Portable SSD, Mechanical Keyboard, Bluetooth Speaker, and Smart Watch, each with an image, name, star rating, price, and either a "Rollback" or "Clearance" badge.

<... class="product">

.product-grid {
  reading-flow: grid-rows;
}

&[data-sort="rating"] .product {
  order:
    calc(var(--rating) * -10);
}

if (document.startViewTransition) {
  document.startViewTransition(() => {
    grid.dataset.sort = e.target.value;
  });
}
A web application displaying a grid of product cards. Each card includes an image, product name, star rating, price, and an "Add to Cart" button. Some cards feature "Clearance" or "Rollback" labels. The products are visually sorted by rating.

Code for Smart Inventory Catalog

HTML

class="product"

CSS

reading-flow: grid-rows;

&[data-sort="rating"] .product {
  order:
    calc(var(--rating) * -10)
}

JavaScript

if (document.startViewTransition) {
  document.startViewTransition(() => {
    grid.dataset.sort = e.target.value;
  });
}

A screenshot displaying a code editor on the left and a web application on the right. The code editor shows snippets of HTML, CSS, and JavaScript code. The web application, titled "Smart Inventory Catalog," features product cards for items such as a Portable SSD, Mechanical Keyboard, Bluetooth Speaker, and Smart Watch. It includes a "Sort items by: Rating" dropdown, product prices, star ratings, and labels like "Rollback" or "Clearance" on some products.

Smart Inventory Catalog

class="product"
&[data-sort="price-low-high"] .product {
  order: calc(
    attr(data-price type(<number>))
    * 100);
}
if (document.startViewTransition) {
  document.startViewTransition(() => {
    grid.dataset.sort = e.target.value;
  });
}
A split-screen view showing a code editor on the left and a web application on the right. The code editor displays HTML with `class="product"`, CSS code defining an `order` property for `data-sort="price-low-high"` products, and JavaScript code using `document.startViewTransition` to update `grid.dataset.sort`. The web application on the right is titled "Smart Inventory Catalog" and displays product listings for a Portable SSD, Mechanical Keyboard, Bluetooth Speaker, and Smart Watch, each with prices, star ratings, and "Add to Cart" buttons. A dropdown for "Sort items by: Rating" is visible at the top.

Smart Inventory Catalog

HTML
19 class="product"
CSS
47
&[data-sort="price-low-high"] .product {
    order: calc(
        attr(data-price type(<number>))
        * 100
    );
}
54 &[data-sort="price-high-low"] .product {
    order: calc(
        attr(data-price type(<number>))
        ...
    );
}
JS
4 if (document.startViewTransition) {
5     document.startViewTransition(() => {
6         grid.dataset.sort = e.target.value;
7     });
8 }

The "Sort items by" dropdown is open, displaying the following options: "-- Sort by --", "Rating", "Price: High-Low", "Price: Low-High" (selected), and "Availability".

Visible products include: Portable SSD ($129.99, 4.9 rating), Mechanical Keyboard ($149.99, 4.8 rating), Bluetooth Speaker ($79.99, 4.7 rating, with "Rollback" label), and Smart Watch ($249.99, 4.5 rating, with "Clearance" label).

Screenshot showing a split view: on the left, a code editor (VS Code) displaying HTML, CSS, and JavaScript code snippets related to sorting. On the right, a web application interface titled "Smart Inventory Catalog" is shown, with a product listing. A dropdown menu for sorting items is open, with "Price: Low-High" currently selected.

Smart Inventory Catalog

&[data-sort="price-low-high"] .product {
  order: calc(
    attr(data-price type(<number>))
    * 100);
}

&[data-sort="price-high-low"] .product {
  order: calc(
    attr(data-price type(<number>))
    * 100); /* ... code continues ... */
}
if (document.startViewTransition) {
  document.startViewTransition(() => {
    grid.dataset.sort = e.target.value;
  });
} /* ... code continues ... */
A split-screen view showing a code editor on the left and a web browser on the right. The code editor displays CSS and JavaScript code snippets. The CSS code defines `order` properties for elements based on `data-sort` attributes (`price-low-high` and `price-high-low`), using the `attr()` function to retrieve a numerical `data-price`. The JavaScript code shows a conditional check for `document.startViewTransition` and initiates a view transition to update `grid.dataset.sort` based on `e.target.value`. The web browser displays a 'Smart Inventory Catalog'. A 'Sort items by:' dropdown is open, with 'Price: Low-High' currently highlighted by the mouse cursor. Product cards for items like a 'Smart Watch', 'Mechanical Keyboard', 'Portable SSD', and 'Wireless Headphones' are visible, each showing a price, star rating, and an 'Add to Cart' button. Some products also have a 'Rollback' label.

...
<div class="product">
...
    

&[data-sort="price-low-high"] .product {
  order: calc(
    attr(data-price type(<number>))
    * 100);
}

&[data-sort="price-high-low"] .product {
  order: calc(
    attr(data-price type(<number>))
...
    

if (document.startViewTransition) {
  document.startViewTransition(() => {
    grid.dataset.sort = e.target.value;
  });
}
    

Smart Inventory Catalog

Sort items by: Price: Low-High

  • Cable Organizer: $19.99, Rating: 2.0 stars
  • Phone Case: $24.99, Rating: 4.3 stars (Clearance)
  • Wireless Charger: $34.99, Rating: 3.8 stars
  • Wireless Mouse: $39.99, Rating: 2.7 stars (Clearance)
Screenshot of a code editor displaying HTML, CSS, and JavaScript code, adjacent to a web application showing a "Smart Inventory Catalog". The catalog displays product cards for items like Cable Organizer, Phone Case, Wireless Charger, and Wireless Mouse, each with an image, name, price, star rating, and "Add to Cart" button. Some items also have a "Clearance" badge. A dropdown for sorting items is visible and set to "Price: Low-High".

Smart Inventory Catalog

...
19 	class="product"
...
...
47
48 &[data-sort="price-low-high"] .product {
49 	order: calc(
50 		attr(data-price type(<number>))
51 		* 100);
52 }
53
54 &[data-sort="price-high-low"] .product {
55 	order: calc(
56 		attr(data-price type(<number>))
...
...
4 if (document.startViewTransition) {
5 	document.startViewTransition(() => {
6 		grid.dataset.sort = e.target.value;
7 	});
...
Screenshot of a code editor on the left and a web application on the right. The code editor shows HTML, CSS, and JavaScript. The web application displays a "Smart Inventory Catalog" with products like "Cable Organizer," "Phone Case," "Wireless Charger," and "Wireless Mouse," with options to sort items by price.
.product {
  --stock: attr(data-stock type(<number>));
  --rating: attr(data-rating type(<number>));
  --sales: attr(data-recent-sales type(<number>));
  --promo: attr(data-promo type(<custom-ident>));
}

.stars {
  --star-size: 50px;
}
if (document.startViewTransition) {
  document.startViewTransition(() => {
    grid.dataset.sort = e.target.value;
  });
}

Smart Inventory Catalog

A screenshot of a code editor showing CSS and JavaScript code on the left, and a web application on the right displaying a smart inventory catalog with product listings like Cable Organizer, Phone Case, Wireless Charger, and Wireless Mouse.
...
<div class="product">
...
.product {
	--stock: attr(data-stock type(<number>));
	--rating: attr(data-rating type(<number>));
	--sales: attr(data-recent-sales type(<number>));
	--promo: attr(data-promo type(<custom-i...));
}

.stars {
if (document.startViewTransition) {
	document.startViewTransition(() => {
		grid.dataset.sort = e.target.value;
	});
}

Smart Inventory Catalog

Screenshot of a split screen showing a code editor on the left and a web application on the right. The code editor displays HTML, CSS, and JavaScript code. The web application shows a product catalog titled "Smart Inventory Catalog" with items like "Cable Organizer" and "Wireless Charger," along with a "Sort items by: Price: Low-High" dropdown.

HTML:

...
class="product"
...

CSS:

.product {
  --stock: attr(data-stock type(<number>))
  --rating: attr(data-rating type(<number...
  --sales: attr(data-recent-sales type(<n...
  --promo: attr(data-promo type(<custom-i...
}

JS:

if (document.startViewTransition) {
  document.startViewTransition(() => {
    grid.dataset.sort = e.target.value;
  });
}

Smart Inventory Catalog

Screenshot of a code editor displaying HTML, CSS, and JavaScript code. On the right is a screenshot of a web application titled "Smart Inventory Catalog", showing product listings for "Wireless Headphones" and "Wireless Charger", each with an image, price, and star rating. The headphones listing includes a "Rollback" label. A "Sort items by" dropdown is visible at the top of the catalog.
<div class="product">...</div>
.product {
  --stock: attr(data-stock type(<number>));
  --rating: attr(data-rating type(<number>));
  --sales: attr(data-recent-sales type(<number>));
  --promo: attr(data-promo type(<custom-ident>));

  view-transition-name:
    data(i);
}
if (document.startViewTransition) {
  document.startViewTransition(() => {
    grid.dataset.sort = e.target.value;
  });
}
A screenshot of a code editor on the left and a web application on the right. The code editor shows HTML, CSS, and JavaScript. The CSS section defines custom properties using `attr()` and sets `view-transition-name: data(i);`. The JavaScript section shows an `if` statement checking for `document.startViewTransition` and using it to update `grid.dataset.sort`. The web application on the right is titled "Smart Inventory Catalog" and displays product cards for "Wireless Headphones" and "Wireless Charger", each with a price, star rating, and "Add to Cart" button.

Smart Inventory Catalog

Sort items by: -- Sort by --

.product {
    --stock: attr(data-stock type(<number>))
    --rating: attr(data-rating type(<number)...
    --sales: attr(data-recent-sales type(<n)...
    --promo: attr(data-promo type(<custom-i)...
    view-transition-name:
        data(data-id cu);
}
if (document.startViewTransition) {
    document.startViewTransition(() => {
        grid.dataset.sort = e.target.value;
    });
}
Screenshot of a code editor showing HTML, CSS, and JavaScript. Next to it is a web application displaying a "Smart Inventory Catalog" with a sorting dropdown and product cards, including "Wireless Headphones" and "Wireless Charger", each with an image, rating, price, and an "Add to Cart" button.
<div class="product"
.product {
  --stock: attr(data-stock type(<number>))
  --rating: attr(data-rating type(<number
  --sales: attr(data-recent-sales type(<n
  --promo: attr(data-promo type(<custom-i

  view-transition-name:
  data(data-id tytype);
}
if (document.startViewTransition) {
  document.startViewTransition(() => {
    grid.dataset.sort = e.target.value;
  });
}
Screenshot of a code editor showing HTML, CSS, and JavaScript code on the left, alongside a web browser preview on the right displaying a "Smart Inventory Catalog" with product cards for "Wireless Headphones" and a "Wireless Charger." The headphones product card has a "Rollback" badge.

Smart Inventory Catalog

...
<!-- A DOM element with this class is likely the target of the CSS below -->
<div class="product">...</div>
...
.product {
  --stock: attr(data-stock type(<number>));
  --rating: attr(data-rating type(<number>));
  --sales: attr(data-recent-sales type(<number>));
  --promo: attr(data-promo type(<custom-ident>));

  view-transition-name:
    data(data-id type(<custom-ident>));
}
if (document.startViewTransition) {
  document.startViewTransition(() => {
    grid.dataset.sort = e.target.value;
  });
}
A split screenshot displaying a code editor on the left and a web application on the right. The code editor shows sections for HTML, CSS, and JavaScript code snippets. The web application, titled "Smart Inventory Catalog", features an e-commerce product grid with a "Sort items by" dropdown and listings for products such as "Wireless Headphones" and "Wireless Charger".

Smart Inventory Catalog

class="product"
.product {
  --stock: attr(data-stock type(<number>));
  --rating: attr(data-rating type(<number>));
  --sales: attr(data-recent-sales type(<number>));
  --promo: attr(data-promo type(<custom-ident>));
  view-transition-name:
    data(data-id type(<custom-ident>));
}
if (document.startViewTransition) {
  document.startViewTransition(() => {
    grid.dataset.sort = e.target.value;
  });
}
The slide shows a split screen. On the left is a code editor displaying HTML, CSS, and JavaScript code. On the right is a web application titled "Smart Inventory Catalog". The application shows a dropdown menu for "Sort items by", which is open and has "Rating" highlighted, along with options for Price (High-Low, Low-High) and Availability. Below the dropdown, product listings include "Wireless Headphones" with a 4.2-star rating and "$99.99" price, and "Wireless Charger" with a 3.8-star rating and "$34.99" price.

Smart Inventory Catalog


<div ...
      class="product"
  

.product {
  --stock: attr(data-stock type(<number>)
  --rating: attr(data-ratin
  --sales: attr(data-recent-sales type(<n
  --promo: attr(data-promo type(<custom-i
  view-transition-name:
    data(data-id type(<custom-ident>));
}
  

if (document.startViewTransition) {
  document.startViewTransition(() => {
    grid.dataset.sort = e.target.value;
  });
}
  
Screenshot of a code editor displaying HTML, CSS, and JavaScript code, adjacent to a web application preview. The web application, titled "Smart Inventory Catalog," shows product listings with a "Sort items by: Rating" dropdown. Visible products include a Portable SSD and a Bluetooth Speaker, each with an image, price, star rating, and "Add to Cart" button.
<div class="product">
--stock: attr(data-stock type(<number>));
--rating: attr(data-rating type(<number>));
--sales: attr(data-recent-sales type(<n...));
--promo: attr(data-promo type(<custom-i...));

view-transition-name:
data(data-id type(<custom-ident>));
}
if (document.startViewTransition) {
    document.startViewTransition(() => {
        grid.dataset.sort = e.target.value;
    });
}
Screenshot of a code editor showing HTML, CSS, and JavaScript code, alongside a live preview of a "Smart Inventory Catalog" web application displaying product listings (Portable SSD, Bluetooth Speaker) with sorting functionality.

Smart Inventory Catalog

<div class="product">
...
.product {
  --stock: attr(data-stock type(<number>));
  --rating: attr(data-rating type(<number>));
  --sales: attr(data-recent-sales type(<number>));
  --promo: attr(data-promo type(<custom-ident>));

  view-transition-name:
    attr(data-id type(<custom-ident>));
}
if (document.startViewTransition) {
  document.startViewTransition(() => {
    grid.dataset.sort = e.target.value;
  });
}

Sort items by: -- Sort by: --

  • -- Sort by: --
  • Rating
  • Price: High-Low
  • Price: Low-High
  • Availability
A split screenshot showing a code editor on the left and a web application on the right. The code editor displays HTML, CSS, and JavaScript. The HTML shows a `div` with `class="product"`. The CSS defines custom properties (`--stock`, `--rating`, `--sales`, `--promo`) using the `attr()` function and `view-transition-name`. The JavaScript shows a conditional `document.startViewTransition()` call that sets `grid.dataset.sort`. The web application is an "Smart Inventory Catalog" with a "Sort items by" dropdown menu, which is open and highlights "Rating". Below are product listings for "Wireless Headphones" and "Wireless Charger", each with star ratings, price, and an "Add to Cart" button.

Smart Inventory Catalog

...
  class="product"
...
...
--stock: attr(data-stock type(<number>));
--rating: attr(data-rating type(<number...));
--sales: attr(data-recent-sales type(<n...));
--promo: attr(data-promo type(<custom-i...));

view-transition-name:
  attr(data-id type(<custom-ident>));
}
...
...
if (document.startViewTransition) {
  document.startViewTransition(() => {
    grid.dataset.sort = e.target.value;
  });
}
...
Screenshot of a code editor on the left and a web application on the right. The code editor shows HTML, CSS, and JavaScript. The CSS defines custom properties and `view-transition-name`. The JavaScript uses `document.startViewTransition` to update a dataset for sorting. The web application is an e-commerce catalog titled 'Smart Inventory Catalog', displaying product cards for items like 'Portable SSD' and 'Bluetooth Speaker'. A dropdown menu for 'Sort items by:' is open, with options including 'Rating', 'Price: High-Low', 'Price: Low-High', and 'Availability', and 'Price: High-Low' is highlighted.

Smart Inventory Catalog

Screenshot of a code editor displaying HTML, CSS, and JavaScript, next to a web application preview of a "Smart Inventory Catalog" with products like a Smart Watch and a Portable SSD.

Smart Inventory Catalog

class="product"
--stock: attr(data-stock t...);
--rating: attr(data-ratin...);
--sales: attr(data-recent-...);
--promo: attr(data-promo t...);

view-transition-name: attr(data-id type(<custo...);
}
if (document.startViewTrans...) {
  document.startViewTransi...;
  grid.dataset.sort = e.t...;
});
Screenshot of a code editor on the left and an e-commerce catalog web application on the right. The code editor displays CSS and JavaScript code. The web application shows a product listing with items like a Smart Watch, Mechanical Keyboard, Wireless Headphones, and a Webcam, along with prices, star ratings, and "Clearance" or "Rollback" labels.
.product {
  --stock: attr(data-stock);
  --rating: attr(data-rating);
  --sales: attr(data-recent);
  --promo: attr(data-promo);

  view-transition-name:
    attr(data-id type(<custom-ident>));
}
if (document.startViewTransition) {
  document.startViewTransition(() => {
    grid.dataset.sort = e.target.value;
  });
}

Smart Inventory Catalog

Screenshot of a web application showing an 'Smart Inventory Catalog' with various products (smartwatch, mechanical keyboard, portable SSD, wireless headphones, webcam, bluetooth speaker) displayed in a grid, next to a code editor showing CSS and JavaScript for view transitions and data attributes.

Smart Inventory Catalog

class="product"

  --stock: attr(data-stock);
  --rating: attr(data-rating);
  --sales: attr(data-recent);
  --promo: attr(data-promo);

  view-transition-name:
    attr(data-id type(<cust...));
}
...
if (document.startViewTran...) {
  document.startViewTransi(() => {
    grid.dataset.sort = e.;
  });
}
...
Screenshot of an e-commerce product catalog web page titled "Smart Inventory Catalog." The page displays a grid of six product cards, each with an image, product name (e.g., "Cable Organizer," "Phone Case," "Wireless Charger," "Wireless Mouse," "USB-C Hub," "Laptop Stand"), star rating, price, and an "Add to Cart" button. A "Sort Items by" dropdown with "Price: Low High" selected is visible at the top. Some product cards also have a "Clearance" badge.

Smart Inventory Catalog

--stock: attr(data-stock);
--rating: attr(data-rating);
--sales: attr(data-recent);
--promo: attr(data-promo);

view-transition-name:
  attr(data-id type);
}
...
if (document.startViewTran
  document.startViewTransi
  grid.dataset.sort = e.
})
...
A split screenshot showing a code editor on the left and a web application interface on the right. The code editor displays CSS properties including custom properties derived from data attributes and a `view-transition-name` property, alongside a JavaScript snippet related to `document.startViewTransition`. The web application is an "Smart Inventory Catalog" displaying various products with images, prices, ratings, and "Add to Cart" buttons. An open "Sort by" dropdown menu is visible, with "Rating" currently selected among options like "Price: Low-High", "Price: High-Low", and "Availability".

Smart Inventory Catalog

class="product"
   --stock: attr(data-stock);
   --rating: attr(data-rating);
   --sales: attr(data-recent-sales);
   --promo: attr(data-promo);

   view-transition-name:
     attr(data-id type(cust...
}
if (document.startViewTran...
  document.startViewTransi...
  grid.dataset.sort = e....
});
Screenshot of a web application for an inventory catalog displayed next to a code editor. The catalog features products like a Portable SSD, Mechanical Keyboard, Bluetooth Speaker, Smart Watch, Laptop Stand, and Phone Case, each with an image, name, star rating, price, and an "Add to Cart" button. The code editor shows CSS rules defining custom properties and a JavaScript snippet related to `document.startViewTransition` and `grid.dataset.sort`.

Smart Inventory Catalog

<div class="product"
--stock: attr(data-stock);
--rating: attr(data-rating);
--sales: attr(data-recent-sales);
--promo: attr(data-promo);

view-transition-name:
	attr(data-id type(<custom-ident>));
}
if (document.startViewTransition) {
	document.startViewTransition(() => {
		grid.dataset.sort = e.target.value;
	});
}
  • Sort items by:
    • Rating
    • Price: High-Low
    • Price: Low-High
    • Availability
A split-screen view shows a code editor on the left and a web application on the right. The code editor displays HTML, CSS, and JavaScript snippets, including a definition for a product class, custom CSS properties for stock, rating, sales, and promo, and a JavaScript snippet utilizing `document.startViewTransition`. The web application is an e-commerce catalog titled "Smart Inventory Catalog" with a "Sort items by" dropdown menu, which is open and shows "Availability" highlighted. Below the sorting options, several product cards are displayed, including a Portable SSD, Mechanical Keyboard, Bluetooth Speaker, Smart Watch, Laptop Stand, and Phone Case, each showing an image, name, star rating, price, and an "Add to Cart" button. Some products have "Rollback" or "Clearance" labels.

Smart Inventory Catalog


19     class="product"

9   --stock: attr(data-stock);
10  --rating: attr(data-rating);
11  --sales: attr(data-recent-sales);
12  --promo: attr(data-promo);
13
14  view-transition-name:
15      attr(data-id type(<cust
16  }

4   if (document.startViewTransi
5       document.startViewTransi
6           grid.dataset.sort = e.
7       });
A screenshot showing a split view. On the left, a code editor displays HTML, CSS, and JavaScript code snippets. The HTML snippet shows a class attribute. The CSS snippet defines custom properties using `attr()` and a `view-transition-name`. The JavaScript snippet shows an incomplete `if` statement involving `document.startViewTransition` and `grid.dataset.sort`. On the right, a web application interface titled "Smart Inventory Catalog" presents a grid of product cards. A dropdown labeled "Sort items by" is visible. Products shown include Wireless Headphones, Smart Watch, Wireless Charger, Bluetooth Speaker, USB-C Hub, and Mechanical Keyboard, each with an image, name, rating, price, and "Add to Cart" button. Some products have "Rollback" or "Clearance" labels.

Smart Inventory Catalog

...
19 class="product"
...
...
9 --stock: attr(data-stock
10 --rating: attr(data-ratin
11 --sales: attr(data-recent
12 --promo: attr(data-promo
13
14 view-transition-name:
15   attr(data-id type(<cust
16 }
17
18 --stor:
...
...
4 if (document.startViewTran
5   document.startViewTransi
6     grid.dataset.sort = e.
7 });
...
Screenshot of a code editor displaying HTML, CSS, and JavaScript code on the left, and a web application interface for a "Smart Inventory Catalog" on the right. The catalog displays product cards for items like Wireless Headphones, Smart Watch, Bluetooth Speaker, and USB-C Hub, each with an image, name, star rating, price, and "Add to Cart" button. Some products are labeled with "Rollback" or "Clearance".

But what if we need to make decisions based on the data?

New features that help

  • 1. if()
.card {
  --_bg-color: if(calc(var(--current-time) < 12), hotpink, dodgerblue);
  background-color: var(--_bg-color);
  animation: var(--current-time) linear infinite; /* ... */
}
A code example showing the CSS `if()` function used to dynamically set a custom property `--_bg-color` based on the value of `--current-time`.

if()

(Chromium only)

A stylized rectangular box with rounded corners and a gradient background, containing the text 'if()'.

if()

(Chromium only)

A graphic with the text 'if()' inside a blue rounded rectangle.
.selector {
  property: if(<if-condition>: <declaration-value>);
}
.selector {
  property: if(
    <if-condition>: <declaration-value>;
    <if-condition>: <declaration-value>;
    <if-condition>: <declaration-value>;
    else: <declaration-value>;
  );
}

media queries

.card {
    display: flex;
    flex-direction: if(
        media(width > 600px): row;
        else: column;
    );
}

feature queries

.grid-lanes {
	display: if(
		supports(display: grid-lanes): grid-lanes;
		else: grid;
	);
}

style queries

body {
  color: if(
    style(--theme: dark): hsl(0 0% 12%);
    style(--theme: dark-high-contrast): hsl(0 0% 100%);
    style(--theme: dark-low-contrast): hsl(0 0% 30%);
    style(--theme: colorful): hsl(261 76% 76%);
    else: #222;
  );
}

HTML

<div class="wrap">
  <div class="weather-cards"></div>
</div>

CSS

:root {
  --clr-rain: hsl(220 100% 61%);
  --clr-snow: hsl(220 100% 95%);
}

JavaScript

const data = {
  forecast: [
    {
      day: "Wednesday",
      date: "May 27",

Weather Forecast

  • Wednesday, May 27

    • Temperature: -4° (Night -14°)
    • Precipitation probability: 70%
    • Accumulation: 18.2cm
  • Thursday, May 28

    • Temperature: 12° (Night 6°)
    • Precipitation probability: 40%
    • Accumulation: 3.8mm
  • Friday, May 29

    • Temperature: 17° (Night 9°)
    • Precipitation probability: 10%
    • Accumulation: 0mm
Screenshot of a web development environment showing HTML, CSS, and JavaScript code editors on the left, and a live preview of a weather application with three forecast cards on the right.
<div class="wrap">
  <div class="weather-cards"></div>
</div>
:root {
  --clr-rain: hsl(220 100% 61%);
  --clr-snow: hsl(220 100% 95%);
}
const data = {
  forecast: [
    {
      day: "Wednesday",
      date: "May 27",
      ...
Screenshot of a code editor showing HTML, CSS, and JavaScript, alongside a web application preview. The preview displays three weather forecast cards for Wednesday, Thursday, and Friday. Each card shows the day, date, temperature (e.g., -4°, 12°, 17°), night temperature, percentage, and precipitation amount (18.2cm, 3.8mm, 0mm) visualized with blue progress bars at the bottom.
<div class="wrap">
  <div class="weather-cards"></div>
</div>
:root {
  --clr-rain: hsl(220 100% 61%);
  --clr-snow: hsl(220 100% 95%);
}

.weather-card {
  --weather: attr(data-weather type(<
  --percIpitation: attr(data-percipit
}
const data = {
...
A split-screen view showing a code editor on the left and a live web application preview on the right. The code editor displays HTML, CSS, and JavaScript. The web preview shows three weather forecast cards for Wednesday, Thursday, and Friday. Each card displays the day, date, temperature (day and night), and a percentage. The Wednesday card shows -4°C and a blue bar indicating "18.2cm". The Thursday card shows 12°C and a blue bar indicating "3.8mm". The Friday card shows 17°C and "0mm" with no blue bar.

HTML

<div class="wrap">
<div class="weather-cards"></div>

CSS

:root {
	--clr-rain: hsl(220 100% 61%);
	--clr-snow: hsl(220 100% 95%);
}

.weather-card {
	--weather: attr(data-weather type(<
	--percipitation: attr(data-percipit
}

.rainfall-visual {
	background: var(--clr-rain);
}

JavaScript

const data = {
A code editor interface is displayed, showing snippets of HTML, CSS, and JavaScript code. On the right side of the screen, a browser preview displays three weather forecast cards. The first card, for Wednesday, May 27, shows -4° and Night -14°, with 70% precipitation, and a blue bar indicating 18.2cm. The second card, for Thursday, May 28, shows 12° and Night 6°, with 40% precipitation, and a blue bar indicating 3.8mm. The third card, for Friday, May 29, shows 17° and Night 9°, with 10% precipitation, and 0mm.
<div class="wrap">
<div class="weather-cards"></div>
.weather-card {
  --weather: attr(data-weather type(
  --percipitation: attr(data-percipit
}

.rainfall-visual {
  background: var(--clr-rain);
}

.rainfall-info {
  position: relative;
}
const data = {
A screenshot showing a code editor on the left and a web browser preview on the right. The code editor displays HTML, CSS, and JavaScript. The CSS section is active, showing styles for `.weather-card`, `.rainfall-visual`, and `.rainfall-info`. The browser preview shows three weather cards for Wednesday, Thursday, and Friday. Each card displays the day, date, current temperature (e.g., -4°, 12°, 17°), night temperature, and a precipitation percentage. Below this, a blue bar indicates rainfall, with values displayed in a small label (e.g., 18.2cm, 3.8mm, 0mm).

HTML

<div class="wrap">
<div class="weather-cards"></div>

CSS

--percipitation: attr(data-percipit...
}

.rainfall-visual {
    background: var(--clr-rain);
}

.rainfall-info {
    position: relative;
    block-size: 8rem;
    background: var(--surface-3);
    border-top: 1px solid var(--border-...

JavaScript

const data = {

Weather Forecast

Wednesday

May 27

-4°

Night -14°

70%

18.2cm

Thursday

May 28

12°

Night 6°

40%

3.8mm

Friday

May 29

17°

Night 9°

10%

0mm

Screenshot of a code editor (VS Code) on the left displaying HTML, CSS, and JavaScript code. On the right, a web application preview shows three weather forecast cards for Wednesday, Thursday, and Friday, each detailing temperature, night temperature, precipitation percentage, and a blue rainfall visual bar with a measurement.

Code Editor and Weather App UI

<div class="wrap">
<div class="weather-cards"></div>
--percispitation: attr(data-percicipit
}

.rainfall-visual {
  background: if;
}

.rainfall-info {
  position: relative;
  block-size: 8rem;
  background: var(--surface-3);
  border-top: 1px solid var(--border-
const data = {
A split screen showing a code editor on the left and a weather application interface on the right. The code editor displays HTML, CSS, and JavaScript code. The HTML shows a div with class "wrap" and another with "weather-cards". The CSS shows rules for `--percispitation`, `.rainfall-visual` (with `background: if;` being typed), and `.rainfall-info`. The JavaScript shows `const data = {`. The right side displays three weather forecast cards. The first card is for Wednesday, May 27, showing -4° (Night -14°), 70% precipitation, and 18.2cm of rainfall. The second card is for Thursday, May 28, showing 12° (Night 6°), 40% precipitation, and 3.8mm of rainfall. The third card is for Friday, May 29, showing 17° (Night 9°), 10% precipitation, and 0mm of rainfall.

r(data-percipit, ...
	rface-3);

d var(--border-...
  • -4° Night -14° 70% 18.2cm
  • 12° Night 6° 40% 3.8mm
  • 10% 0m
Screenshot of a code editor displaying CSS-like code on the left, and three forecast cards from a weather application on the right showing temperature, precipitation chance, and precipitation amount.

// let myColor = rainfall
if (style.query('precipitationAmount', '>0'))
    myColor = 'blue'
else
    myColor = 'gray'
Screenshot of a code editor displaying a JavaScript code snippet that defines `myColor` based on a style query for `precipitationAmount`.

Code Editor Screenshot

<div class="wrap">
  <div class="weather-cards"></div>
  --percipitation: attr(data-percipit...
}

.rainfall-visual {
  background: if();
}

.rainfall-info {
  position: relative;
  block-size: 8rem;
  background: var(--surface-3);
  border-top: 1px solid var(--border-...
const data = {
Screenshot of a code editor showing HTML, CSS, and JavaScript code. On the right, a live preview displays two weather cards: one for Wednesday showing -4° and 18.2cm precipitation, and one for Thursday showing 12° and 3.8mm precipitation.
<div class="wrap">
  <div class="weather-cards"></div>
</div>
--percipitation: attr(data-percipit
}

.rainfall-visual {
  background: if(
    styl|
  );
}

.rainfall-info {
  position: relative;
  block-size: 8rem;
}
const data = {
A code editor showing HTML, CSS, and JavaScript, with a live preview on the right. The preview displays two weather cards: one for Wednesday, May 27th showing -4°C, 70% precipitation, and 18.2cm, and another for Thursday, May 28th showing 12°C, 40% precipitation, and 3.8mm.
<div class="wrap">
  <div class="weather-cards"></div>
--percipitation: attr(data-percipit);
}

.rainfall-visual {
  background: if(
    style(--)
  );
}

.rainfall-info {
  position: relative;
  block-size: 8rem;
const data = {
Screenshot of a code editor (likely VS Code) on the left, displaying HTML, CSS, and JavaScript code. On the right, a web application preview shows three weather cards for Wednesday, Thursday, and Friday, detailing date, temperature, night temperature, precipitation chance, and rainfall amount (18.2cm, 3.8mm, 0mm respectively).
<div class="wrap">
  <div class="weather-cards"></div>
.weather-card {
  --weather: attr(data-weat;
  --percipitation: attr(data-percipit;
}

.rainfall-visual {
  background: if(
    style(--weather: snow): var(--)
  );
}

.rainfall-info {
const data = {
Screenshot of a code editor on the left and a web application preview on the right. The web application displays three weather forecast cards for Wednesday, Thursday, and Friday, showing date, current temperature, night temperature, percentage, and precipitation amount.

<div class="wrap">
<div class="weather-cards"></div>
.weather-card{
	weather: attr(data-weather-type);
	precipitation: attr(data-percipitation);

.fall-visual {
	background: if((
		style(--weather: snow)
	)): var(--clr-snow);

.fall-info{{
const data = {
Screenshot of a code editor showing HTML, CSS, and JavaScript code. On the right, a live preview of a web application displays three weather forecast cards. The cards show weather for Wednesday (May 27, -4°, Night -14°, 70% chance of precipitation, 18.2cm of snow), Thursday (May 28, 12°, Night 6°, 40% chance of precipitation, 3.8mm), and Friday (May 29, 17°, Night 9°, 10% chance of precipitation, 0mm). The Wednesday card has a distinct background color, likely indicating snow.
<div class="wrap">
	<div class="weather-cards"></div>
r-card {
	ther: attr(data-weather type(<custom-
	cipitation: attr(data-percipitation t
}


ll-visual {
	round: if(
		le(--weather: snow): var(--clr-snow);


ll-info {
const data = {
Screenshot of a code editor displaying HTML, CSS, and JavaScript code on the left, and a preview of a weather application UI on the right. The UI shows three weather cards for Wednesday, Thursday, and Friday, each with date, temperature, night temperature, a percentage, and precipitation amount.
<div class="wrap">
<div class="weather-cards"></div>
.weather-card {
	--weather: attr(data-weath type(
	--percipitation: attr(data-percipit
}

.rainfall-visual {
	background: if(
		style(--weather: snow): var(--clr-
		else: var(--clr-rain)
	);
}
const data = {
A screenshot of a code editor (likely VS Code) with HTML, CSS, and JavaScript code on the left pane and a live preview of a web application on the right pane. The web application displays three weather cards side-by-side. The first card shows "Wednesday May 27, -4°, Night -14°, 70%, 18.2cm". The second card shows "Thursday May 28, 12°, Night 6°, 40%, 3.8mm". The third card shows "Friday May 29, 17°, Night 9°, 10%, 0mm".

HTML

<div class="wrap">
  <div class="weather-cards"></div>

CSS

.weather-card {
  --weather: attr(data-weather);
  --percripitation: attr(data-precipitation);
}

.rainfall-visual {
  background: if(
    style(--weather: snow): var(--clr-snow),
    else: var(--clr-rain);
  );
}

JS

const data = {
A screenshot of a code editor on the left and a browser preview on the right. The code editor displays HTML, CSS, and JavaScript. The browser preview shows three weather forecast cards. The first card for Wednesday shows -4° and a light gray bar indicating 18.2cm of snow. The second card for Thursday shows 12° and a blue bar indicating 3.8mm of rain. The third card for Friday shows 17° and an empty bar indicating 0mm of precipitation.
<div class="wrap">
  <div class="weather-cards"></div>
.weather-card {
  --weather: attr(data-weather type);
  --percipitation: attr(data-percipit
}

.rainfall-visual {
  background: if(
    style(--weather: snow): var(--clr
    else: var(--clr-rain);
  );
}
const data = {
A screenshot of a code editor displaying HTML, CSS, and partially visible JavaScript. To the right of the code, a UI preview shows three weather forecast cards for Wednesday, Thursday, and Friday, each displaying temperature, night temperature, precipitation percentage, and precipitation amount.

attr() has some rules around urls.

If a URL can be constructed with the value of an arbitrary attribute, purely from CSS, it can easily send any information stored in attributes to a hostile party, if 3rd-party CSS is allowed at all.

To guard against this. the values produced by an 'attr()' are considered attr()-tainted, as are functions that contain an attr()-tainted value.

The substitution value of an arbitrary substitution function is attr()-tainted as a whole if any attr()-tainted values were involved in creating that substitution value.

This extends to the equivalent token sequence when substituting values of registered custom properties.

A red oval highlights the sentence: "To guard against this. the values produced by an 'attr()' are considered attr()-tainted, as are functions that contain an attr()-tainted value." A green rectangular box highlights the text: "This extends to the equivalent token sequence when substituting values of registered custom properties." The phrases "arbitrary substitution function", "equivalent token sequence", and "registered custom properties" are visually underlined in blue.

Code Example and Rendered Output

<div class="example one"></div>
<div class="example two" data-test="1"></div>
<div class="example three"></div>
.one {
  --test: 1;
}

.two {
  --test: attr(data-test type(<number>
}
A screenshot showing an HTML and CSS code editor on the left and the rendered output of three div elements on the right. The top rendered div displays a mountainous landscape through a window. The middle rendered div is an empty white rectangle. The bottom rendered div shows a red-to-blue linear gradient with green circular markers along its internal borders. All three rendered divs have a red dashed outline.

HTML and CSS Code Example

<div class="example one"></div>
<div class="example two" data-test="1"></div>
<div class="example three"></div>
.one {
  --test: 1;
}

.two {
  --test: attr(data-test type(<number>
}
A code editor screenshot showing HTML and CSS. The HTML defines three divs with classes "example one", "example two", and "example three", with the second div also having a `data-test="1"` attribute. The CSS defines custom properties for classes "one" and "two". Next to the code, a browser preview shows three corresponding rectangular areas with red dashed outlines. The top area displays a mountain landscape view. The middle area is empty and white. The bottom area shows a red to blue gradient background with a border of green circular dots.
<div class="example one"></div>
<div class="example two" data-test="1"></div>
<div class="example three"></div>
.two {
  --test: attr(data-test type(<number>));
}

.example {
  background-image: if(
    style(--test: 1): url("https://ima..."),
  );
}
A split-screen view showing a code editor on the left and a browser preview on the right. The HTML code defines three div elements with classes "example one", "example two" (with data-test="1"), and "example three". The CSS code defines a custom property --test for the ".two" class, using attr(data-test type(<number>)). It also defines a background-image for ".example" using an experimental 'if' function based on the --test custom property. The browser preview shows three rectangular boxes. The top box, corresponding to "example one", displays a background image of mountains. The middle box, corresponding to "example two", is empty. The bottom box, corresponding to "example three", has a red to blue gradient background. The top two boxes have a dashed orange border, while the bottom box has a green dotted border.

HTML

<div class="example one"></div>
<div class="example two" data-test="1"></div>
<div class="example three"></div>

CSS

:: attr(data-test type(<number>));

{
  ound-image: if(
    le(--test: 1): url("https://images.unsp...
A screenshot of a code editor showing HTML and CSS code on the left, and the rendered output on the right. The HTML shows three `div` elements with classes "example one", "example two", and "example three", with "example two" also having a `data-test="1"` attribute. The CSS snippet shows a rule defining `::attr(data-test type(<number>))` and an incomplete `background-image: if(...)` rule. On the right, three rectangular boxes are displayed vertically. The top box contains an image of a mountain and lake landscape and has a dashed orange-red border. The middle box is empty and also has a dashed orange-red border. The bottom box contains a red to blue horizontal gradient background and has a green dotted border.
<div class="example one"></div>
<div class="example two" data-test="1"></div>
<div class="example three"></div>
.two {
  --test: attr(data-test type(<number>);
}

.example {
  background-image: if(
    style(--test: 1): url("https://ima
A screenshot of a code editor showing HTML and CSS code on the left, and a live preview on the right. The HTML code defines three div elements with classes "example one", "example two", and "example three", where "two" also has a `data-test="1"` attribute. The CSS code defines a custom property `--test` for the ".two" class, which gets its value from the `data-test` attribute. It also defines a background image property for the ".example" class with a conditional statement. The live preview on the right shows three rectangular boxes: 1. The top box displays a photograph of a mountainous landscape with a lake, viewed as if through a window, and has a dashed orange-red border. 2. The middle box is empty (white background) and has a dashed orange-red border. 3. The bottom box shows a gradient background from red to blue, and has a border composed of small green dots.

<div class="example one"></div>
<div class="example two" data-test="1"></div>
<div class="example three"></div>
.two {
  --test: attr(data-test type(number));
}

.example {
  background-image: if(
    style(--test: 1): url("https://ima..."),
    else: linear-gradient(red, blue)
  );

  border: if(
    style(--test: 1): 10px dashed orange red,
    ...
  );
}
Screenshot of a code editor (likely VS Code) on the left showing HTML and CSS code. On the right, a browser preview displays three rectangular div elements. The top div shows a background image of mountains and a lake through a window, outlined with an orange-red dashed border. The middle div is empty with a white background, also outlined with an orange-red dashed border. The bottom div has a background of a red to blue linear gradient, with a blue outline decorated with internal green dots.
<div class="example one"></div>
<div class="example two" data-test="1"></div>
<div class="example three"></div>
else: linear-gradient(red, blue);
);

border: if(
  style(--test: 1): 10px dashed orang
  else: 20px dotted limegreen;
);

content: "";
display: block;
width: 70vw;
height: 30vb;
margin: 20px;
The first rectangle displays an image of mountains and a lake seen through a window, enclosed by a 10px dashed orange border. The second rectangle is empty and white, with a 10px dashed orange border. The third rectangle has a red to blue linear gradient background, surrounded by a 20px dotted limegreen border, and features small green dots along its top and bottom inner edges.

HTML and CSS code demonstrating conditional styling

<div class="example one"></div>
<div class="example two" data-test="1"></div>
<div class="example three"></div>
.example {
  background-image: if(
    style(--test: 1): url("https://ima...");
    else: linear-gradient(red, blue);
  );

  border: if(
    style(--test: 1): 10px dashed orang...;
    else: 20px dotted limegreen;
  );
}
Screenshot of a code editor showing HTML and CSS code on the left, and the rendered output on the right. The HTML defines three div elements with class "example" and different attributes. The CSS defines conditional styling for these divs. The rendered output shows three rectangular boxes: the top box has a background image of a mountainous landscape and an orange dashed border; the middle box is empty with an orange dashed border; the bottom box has a red to blue linear gradient background and a limegreen dotted border.
<div class="example one"></div>
<div class="example two" data-test="1"></div>
<div class="example three"></div>
.example {
	background-image: if(
		style(--test: 1): url("https://imag..."),
		else: linear-gradient(red, blue)
	);
	border: if(
		style(--test: 1): 10px dashed orange,
		else: 20px dotted limegreen
	);
}
Three rectangular boxes demonstrate the results of the CSS code. The top box shows a scenic image of mountains and a waterfall within a red dashed border. The middle box is empty white space with a red dashed border. The bottom box displays a red to blue linear gradient background with a limegreen dotted border.
HTML
1 <div class="example one"></div>
2 <div class="example two" data-test="1"></div>
3 <div class="example three"></div>
CSS
8
9 .example {
10 	background-image: if(
11 		style(--test: 1): url("https://imag
12 	);
13 	else: linear-gradient(red, blue);
14 }
15
16 border: if(
17 		style(--test: 1): 10px dashed orang
18 	);
19 	else: 20px dotted limegreen;
A visual representation of three HTML `div` elements rendered with different CSS styles. The top `div` shows a background image of a mountain landscape with a waterfall and has a red dashed border. The middle `div` is empty with a dashed red border. The bottom `div` displays a background linear gradient from red to blue, surrounded by a border made of small dotted green-blue circles.
<div class="example one"></div>
<div class="example two" data-test="1"></div>
<div class="example three"></div>
.example {
  background-image: if(
    style(--test: 1), url("https://imag..."),
    else: linear-gradient(red, blue);
  );

  border: if(
    style(--test: 1), 10px dashed orang...),
    else: 20px dotted limegreen;
  );
}
Screenshot showing HTML and CSS code and its rendered output. The HTML defines three `div` elements. The CSS applies conditional `background-image` and `border` rules. The output shows three boxes: the first contains a landscape image; the second is an empty box with a dashed red border; the third has a red to blue gradient background and a dotted border with alternating orange and limegreen colors.

@container style()

(in all browsers now 🥳)

@container style()

(in all browsers now 😎)

The text "@container style()" is presented within a rounded rectangular box with a gradient background.

@container style()

(in all browsers now 😎)

<div class="wrap">
    <div class="weather-cards"></div>
</div>
:root {
    --icon-sun: url("data:ima...
    --icon-part: url("data:ima...
    --icon-rain: url("data:ima...
    --icon-snow: url("data:ima...
const data = {
    forecast: [
        {
            day: "Wednesday",
            date: "May 27",
        ...

Wednesday

May 27

14°

Night 7°

70%

8.2mm

Thursday

May 28

12°

Night 6°

40%

3.8mm

Friday

May 29

17°

Night 9°

10%

0mm

A screenshot of a code editor showing HTML, CSS, and JavaScript code, alongside a live preview of a web application displaying three weather forecast cards for Wednesday, Thursday, and Friday. The Wednesday card shows 14 degrees and 8.2mm precipitation, Thursday 12 degrees and 3.8mm, and Friday 17 degrees and 0mm.

HTML

<div class="wrap">
<div class="weather-cards"></div>
</div>

CSS

background-image: if(
    style(--weather: sun): var(--icon);
    style(--weather: part): var(--ico);
    style(--weather: rain): var(--ico);
);

JS

const data = {
    forecast: [
        {
            day: "Wednesday",
            date: "May 27",
...
A code editor on the left showing HTML, CSS, and JavaScript code. On the right, a live preview of a web application displays three weather cards. The first card shows "Wednesday May 27, 14°, Night 7°, 70%", with a blue rain bar showing "8.2mm". The second card shows "Thursday May 28, 12°, Night 6°, 40%", with a blue rain bar showing "3.8mm". The third card shows "Friday May 29, 17°, Night 9°, 10%", with "0mm" and no blue rain bar.

Code Example and Weather Forecast UI

<div class="wrap">
<div class="weather-cards"></div>
</div>
background-image: if(
  style(--weather: sun):
  style(--weather: part):
  style(--weather: rain):
);
const data = {
  forecast: [
    {
      day: "Wednesday",
      date: "May 27",
A split screen shows a code editor on the left and a weather forecast UI on the right. The code editor displays HTML, CSS, and JavaScript code snippets. The UI shows three weather forecast cards. The first card is for Wednesday, May 27, showing 14° Celsius, 7° at night, 70% chance of rain, and 8.2mm of precipitation. The second card is for Thursday, May 28, showing 12° Celsius, 6° at night, 40% chance of rain, and 3.8mm of precipitation. The third card is for Friday, May 29, showing 17° Celsius, 9° at night, 10% chance of rain, and 0mm of precipitation.

Code Editor and Weather Card UI

<div class="wrap">
  <div class="weather-cards"></div>
</div>
background-image: if(
  style(--weather: sun): var(--icon-sun)
  style(--weather: part): var(--icon-part)
  style(--weather: rain): var(--icon-rain)
);

@container style(--weather: sun) {
  background-image: var(--icon-sun)
}
const data = {
  forecast: [
  • Wednesday, May 27: 14°, Night 7°, 70%, 8.2mm
  • Thursday, May 28: 12°, Night 6°, 40%, 3.8mm
  • Friday, May 29: 17°, Night 9°, 10%, 0mm
A screenshot of a code editor showing HTML, CSS, and JavaScript code. Adjacent to the code, a web application preview displays three weather forecast cards for Wednesday, Thursday, and Friday, each showing temperature, night temperature, percentage, and precipitation amount, with blue bars indicating precipitation levels.

HTML

<div class="wrap">
  <div class="weather-cards"></div>
</div>

CSS

  style(--weather: sunny): var(--icon-sunny);
  style(--weather: part): var(--icon-part);
  style(--weather: rain): var(--icon-rain);
);

@container style(--weather: sun) {
  background-image: var(--icon-sun)
}
/*

JS

const data = {
  forecast: [
A screenshot of a code editor showing HTML, CSS, and JavaScript code on the left, and a web application displaying three weather forecast cards on the right. The first card shows Wednesday, May 27, 14° with Night 7°, 70% chance of rain, and 8.2mm of rain indicated by a blue bar. The second card shows Thursday, May 28, 12° with Night 6°, 40% chance of rain, and 3.8mm of rain. The third card shows Friday, May 29, 17° with Night 9°, 10% chance of rain, and a sun icon.

HTML

<div class="wrap">
  <div class="weather-cards"></div>
</div>

CSS

  background-image: var(--icon-sun)
}

@container style(--weather: part) {
  background-image: var(--icon-part)
}

/*
@container style(--weather: rain) {
  background-image: var(--icon-rain.
...

JavaScript

const data = {
  forecast: [
...
Screenshot showing a code editor on the left with HTML, CSS, and JavaScript code snippets. On the right, a live preview of a weather forecast UI is displayed with three cards. The first card is for Wednesday, May 27, showing 14° and a partly cloudy icon, with 8.2mm precipitation. The second card is for Thursday, May 28, showing 12° and a partly cloudy icon, with 3.8mm precipitation. The third card is for Friday, May 29, showing 17° and a sun icon, with 0mm precipitation.

HTML

<div class="wrap">
<div class="weather-cards"></div>
</div>

CSS

@container style(--weather: part) {
	background-image: var(--icon-part)
}

/*
@container style(--weather: rain) {
	background-image: var(--icon-rain)
}
*/

JavaScript

const data = {
	forecast: [

Weather Forecast Data

  • Wednesday

    May 27

    14°

    Night 7°

    70%

    8.2mm

  • Thursday

    May 28

    12°

    Night 6°

    40%

    3.8mm

  • Friday

    May 29

    17°

    Night 9°

    10%

    0mm

A screenshot showing a code editor (VS Code) on the left and a browser preview on the right. The code editor displays HTML, CSS, and JavaScript code snippets. The browser preview shows a weather forecast for three days and two weather icons: one partly cloudy and one sunny.
<div class="wrap">
    <div class="weather-cards"></div>
</div>
@container style(--weather: part) {
    background-image: var(--icon-part...
}

@container style(--weather: rain) {
    background-image: var(--icon-rain...
}
const data = {
forecast: [...
Screenshot of a code editor displaying HTML, CSS, and JavaScript code on the left, and a live preview of a weather application on the right. The HTML code shows a `div` with class "wrap" containing a `div` with class "weather-cards". The CSS code demonstrates two `@container style` queries: one for `--weather: part` and another for `--weather: rain`, each setting a `background-image` using a CSS variable. The JavaScript code shows the beginning of a `const data` object with a `forecast` array. The live preview on the right shows two weather cards: one for Wednesday, May 27, with 14°C (night 7°C), 70% chance of precipitation, 8.2mm, and a rain cloud icon; and another for Thursday, May 28, with 12°C (night 6°C), 40% chance of precipitation, and 3.8mm.
1 <div class="wrap">
2   <div class="weather-cards"></div>
3 </div>
38
39
40 @container style(--weather: part) {
41   background-image: var(--icon-part)
42 }
43
44
45 @container style(--weather: rain) {
46   background-image: var(--icon-rain)
47 }
48 
1 const data = {
2   forecast: [
...
A code editor on the left displaying HTML, CSS, and JavaScript code. The HTML defines a `wrap` div containing `weather-cards`. The CSS contains `@container style` queries linking weather conditions (`part`, `rain`) to background images. The JavaScript shows the beginning of a `data` object. On the right, a live preview of a web application displays three weather forecast cards for Wednesday (14°, rain, 8.2mm), Thursday (12°, partly cloudy, 3.8mm), and Friday (17°, sunny, 0mm).

HTML

<div class="wrap">
	<div class="weather-cards"></div>
</div>

CSS

container style(--weather: part) {
	background-image: var(--icon-part);
}
container style(--weather: rain) {
	background-image: var(--icon-rain);
}

JavaScript

const data = {
	forecast: [
...

Weather Forecast

  • Wednesday

    May 27

    14°

    Night 7°

    70%

    8.2mm

  • Thursday

    May 28

    12°

    Night 6°

    40%

    3.8mm

  • Friday

    May 29

    17°

    Night 9°

    10%

    0mm

Screenshot of a code editor on the left and a web application preview on the right. The web application displays three weather forecast cards. The first card for Wednesday shows a rainy cloud icon, 14 degrees Celsius, and 8.2mm of rain. The second card for Thursday shows a partly cloudy icon, 12 degrees Celsius, and 3.8mm of rain. The third card for Friday shows a sunny icon, 17 degrees Celsius, and 0mm of rain. The code editor shows HTML, CSS, and JavaScript. The CSS section highlights rules for changing background images based on container style queries for weather conditions like 'part' (partly cloudy) and 'rain'.
<div class="wrap">
  <div class="weather-cards"></div>
</div>
...
container style(--weather: part) {
  background-image: var(--icon-part);
}
...
container style(--weather: rain) {
  background-image: var(--icon-rain);
}
...
const data = {
  forecast: [
...
Screenshot of a code editor on the left displaying HTML, CSS container style queries, and JavaScript code. On the right, a weather forecast application UI shows three daily cards for Wednesday, Thursday, and Friday, each with a weather icon (rain, partly cloudy, sun), temperature, night temperature, percentage, and precipitation amount.

A few important differences.

Container style queries can't query themselves

.card { --theme: dark; }

@container style(--theme: dark) {
	.card {
		/* styles here will not work */
	}
}

.card-title {
	/* styles here will work */
}

Container style queries can't query themselves

.card { --theme: dark; }

@container style(--theme: dark) {
  .card {
    /* styles here will not work */
  }

  .card-title {
    /* styles here will work */
  }
}

Container style queries can't query themselves

.card { --theme: dark; }

@container style(--theme: dark) {
  .card {
    /* styles here will not work */
  }
}

.card-title {
  /* styles here will work */
}

if() is able to!

.card {
    --theme: dark;

    /* this works */
    color: if(style(--theme: dark): firebrick);
}

if() is able to!

.card {
  --theme: dark;

  /* this works */
  color: if(style(--theme: dark): firebrick;);
}

Declaration blocks vs. single values

@container style(--theme: dark) {
	.card-title {
		color: white;
		background: #222;
	}
}
.card-title {
	color: if(style(--theme: dark): white; else: black);
	background: if(style(--theme: dark): #222; else: #eee);
}
@container style(--weather: sun) {
  background-image: var(--icon-sun);
}

@container style(--weather: part) {
  background-image: var(--icon-part);
}

@container style(--weather: rain) {
  background-image: var(--icon-rain);
}
[data-weather="sun"]::before {
  background-image: var(--icon-sun);
}

[data-weather="part"]::before {
  background-image: var(--icon-part);
}

[data-weather="rain"]::before {
  background-image: var(--icon-rain);
}
A slide showing two CSS code examples side-by-side. The left column uses `@container style()` to set background images based on a `--weather` custom property. The right column uses attribute selectors `[data-weather="..."]::before` to achieve the same effect.
@container style(--weather: sun) {
  background-image: var(--icon-sun);
}
@container style(--weather: part) {
  background-image: var(--icon-part);
}
@container style(--weather: rain) {
  background-image: var(--icon-rain);
}
[data-weather="sun"]::before {
  background-image: var(--icon-sun);
}
[data-weather="part"]::before {
  background-image: var(--icon-part);
}
[data-weather="rain"]::before {
  background-image: var(--icon-rain);
}
[weather="rain"]::before {
  background-image: var(--icon-rain);
}
Screenshot of a code editor displaying CSS code.
@container style(--weather: sun) {
	background-image: var(--icon-sun);
}

@container style(--weather: part) {
	background-image: var(--icon-part);
}

@container style(--weather: rain) {
	background-image: var(--icon-rain);
}
[data-weather="sun"]::before {
	background-image: var(--icon-sun);
}

[data-weather="part"]::before {
	background-image: var(--icon-part);
}

[data-weather="rain"]::before {
	background-image: var(--icon-rain);
}
A comparison of CSS code examples, with container style queries on the left and attribute selectors with a pseudo-element on the right.

We can use the range syntax with both if() & @container style().

Currently in Chromium browsers.

We can use the range syntax with both if() & @container style().

Currently in Chromium browsers.

We can use the range syntax with both `if()` & `@container style()`.

Currently in Chromium browsers.

Code Editor and Smart Inventory Catalog Application

<header class="flow">
.product {
    --stock: attr(data-stock type(<number, auto>));
    --rating: attr(data-rating type(<number, auto>));
    --sales: attr(data-recent-sales type(<number, auto>));
    --promo: attr(data-promo type(<custom-ident, auto>));
}
.stars {
    --star-size: 50px;
    --star-rating: round(var(--rating));
    inline-size: calc(var(--star-size) * var(--star-rating));
}
const grid = document.querySelector(".
A screenshot of a code editor on the left and a web application on the right. The web application is titled "Smart Inventory Catalog" and features a sorting dropdown. Below the sorting, there are product cards displayed in a grid: Wireless Headphones ($99.99, 4.2 stars, "Rollback" label), Smart Watch ($249.99, 4.5 stars, "Clearance" label), Wireless Charger ($34.99, 3.8 stars), and Bluetooth Speaker ($79.99, 4.7 stars, "Rollback" label). Each product card has a price, star rating, and an "Add to Cart" button.
<header class="flow">
order: calc(attr(data-p...));
}

&[data-sort="price-high-low"] .prod {
	order: calc(attr(data-price type(...)));
}

&[data-sort="availability"] .produc {
	/* ... */
}
const grid = document.querySelector('...');
A split-screen view showing a code editor on the left and a web application preview on the right. The code editor displays HTML, CSS, and JavaScript fragments. The web application is an e-commerce smart inventory catalog with product listings for wireless headphones, smart watches, wireless chargers, and bluetooth speakers, along with sorting options.
<header class="flow">
  order: calc(attr(data-price type(number)));
}

&[data-sort="price-high-low"] .prod {
  order: calc(attr(data-price type(number)) * -1);
}

&[data-sort="availability"] .product {
  order: var(--stock);
}
}
const grid = document.querySelector('

Smart Inventory Catalog

A code editor displaying HTML, CSS, and JavaScript snippets, with a specific focus on CSS rules for sorting. The CSS code includes `order` properties that use `calc()` with `attr()` for `data-price` and a CSS custom property `var(--stock)` for `data-availability` sorting. Adjacent to the code editor is a screenshot of a web application titled "Smart Inventory Catalog," featuring a "Sort items by" dropdown and a grid of product cards including Wireless Headphones, a Smart Watch, a Wireless Charger, and a Bluetooth Speaker.

Code Editor Content

<header class="flow">
&[data-sort="availability"] .product {
	order:
		va
}
:root {
	--bg-app: #f8fafc;
	--text-main: #0f172a;
	--text-muted: #64748b;
}
const grid = document.querySelector('
A split screenshot showing a code editor on the left and a web application on the right. The code editor displays HTML, CSS, and JavaScript. The web application, titled "Smart Inventory Catalog," shows a product grid with items like "Wireless Headphones," "Smart Watch," "Wireless Charger," and "Bluetooth Speaker," each with price, rating, and an "Add to Cart" button. Some products have "Rollback" or "Clearance" labels.

Smart Inventory Catalog

<header class="flow">
}

&[data-sort="availability"] .product {
	order:
		var(--stock)
}
}

:root {
	--bg-app: #f8fafc;
	--text-main: #0f172a;
	--text-muted: #64748b;
}
const grid = document.querySelector('
Screenshot of a code editor (likely VS Code) displaying HTML, CSS, and JavaScript code. On the right, a web application called "Smart Inventory Catalog" is shown with product cards. A dropdown menu labeled "Sort items by" is open, and "Availability" is highlighted as the selected sorting option. Products visible include Wireless Headphones, Smart Watch, Wireless Charger, and Bluetooth Speaker.

Smart Inventory Catalog

<header class="flow">
&[data-sort="availability"] .produc
    order:
        var(--stock)
}

:root {
    --bg-app: #f8fafc;
    --text-main: #0f172a;
    --text-muted: #64748b;
}
const grid = document.querySelector(
A split-screen view showing a code editor on the left and a web application on the right. The code editor displays HTML, CSS, and JavaScript snippets. The web application is an inventory catalog with products like Wireless Charger, Wireless Mouse, Wireless Headphones, and Laptop Stand, along with a "Sort items by" dropdown currently set to "Availability".

Smart Inventory Catalog

Sort items by: Availability

<header class="flow">
&[data-sort="availability"] .product {
    order:
        var(--stock)
    }
    ...
    :root {
        --bg-app: #f8fafc;
        --text-main: #0f172a;
        --text-muted: #64748b;
    }
const grid = document.querySelector('
A split-screen view showing a code editor on the left and a web application on the right. The code editor displays HTML, CSS, and partially JavaScript. The CSS code includes a rule for `&[data-sort="availability"] .product` which sets the `order` using a CSS variable `--stock`, and also defines root CSS variables for app background and text colors. The web application shows an inventory catalog with product cards, including a wireless charger, a wireless mouse with a "Clearance" tag, wireless headphones with a "Rollback" tag, and a laptop stand. A dropdown menu at the top is set to "Availability".
<header class="flow">
&[data-sort="availability"] .produc
    order:
        if
            var(--stock)
    }
}

:root {
    --bg-app: #f8fafc;
    --text-main: #0f172a;
}
const grid = document.querySelector('

Smart Inventory Catalog

A split-screen view showing a code editor on the left and a web browser on the right. The code editor displays HTML, CSS, and JavaScript code snippets. The web browser displays an e-commerce product catalog titled "Smart Inventory Catalog".
1 <header class="flow">
44 }
45
46 &[data-sort="availability"] .product
47   order:
48     if(--stock )
49     var(--stock)
50 }
51 }
52
53 :root {
54   --bg-app: #f8fafc;
55   --text-main: #0f172a;
1 const grid = document.querySelector('
A split-screen view showing a code editor on the left and a web application on the right. The code editor displays HTML, CSS, and JavaScript code snippets. The web application shows a "Smart Inventory Catalog" with a "Sort items by" dropdown and a grid of products, including Wireless Headphones, Smart Watch, Wireless Charger, and Bluetooth Speaker, with prices, ratings, and "Add to Cart" buttons. Some products have "Rollback" or "Clearance" labels.

Smart Inventory Catalog

<header class="flow">
&[data-sort="availability"] .product
  order:
    if(--stock < )
      var(--stock)
  }
}

:root {
  --bg-app: #f8fafc;
  --text-main: #0f172a;
}
const grid = document.querySelector('
Screenshot of a code editor on the left and a web application preview on the right. The code editor shows HTML, CSS, and JavaScript snippets. The web application displays a "Smart Inventory Catalog" with a "Sort items by:" dropdown. Products displayed include "Wireless Headphones" (with a "Rollback" badge), "Smart Watch" (with a "Clearance" badge), "Wireless Charger", and "Bluetooth Speaker" (with a "Rollback" badge). Each product card includes an image, name, price, star rating, and an "Add to Cart" button. The "Wireless Charger" product's "Add to Cart" button is greyed out.

Smart Inventory Catalog

<header class="flow">
&[data-sort="availability"] .product {
	order:
}
:root {
	--bg-app: #f8fafc;
	--text-main: #0f172a;
	--text-muted: #64748b;
}
const grid = document.querySelector('
Screenshot of a code editor (showing HTML, CSS, and JavaScript) on the left, and a web browser displaying a "Smart Inventory Catalog" with products like Wireless Headphones and Smart Watch on the right.
1 <header class="flow">
43 }
44 }
45
46 &[data-sort="availability"] .produc
47 	order:
48 }
49 }
50
51 :root {
52 	--bg-app: #f8fafc;
53 	--text-main: #0f172a;
54 	--text-muted: #64748b;
55 	--border-subtle: #f1f5f9;
1 const grid = document.querySelector('

Smart Inventory Catalog

Sort items by: -- Sort by --

A screenshot showing a code editor on the left and a web application on the right. The code editor displays HTML, CSS, and JavaScript code snippets. The web application is an e-commerce product catalog titled "Smart Inventory Catalog" with a "Sort items by" dropdown. Four product cards are visible: Wireless Headphones (with "Rollback" badge), Smart Watch (with "Clearance" badge), Wireless Charger, and Bluetooth Speaker (with "Rollback" badge). Each card includes an image, product name, star ratings, price, and an "Add to Cart" button.

Smart Inventory Catalog

Sort items by: -- Sort by --

1 <header class="flow">
44 }
45 
46 &[data-sort="availability"] .product {
47 	order: if(
48 		style(--stock > 0): var(--stock)
49 	);
50 }
51 
52 
53 :root {
54 	--bg-app: #f8fafc;
55 	--text-main: #0f172a;
1 const grid = document.querySelector('(...
Screenshot of a code editor, likely VS Code, displaying HTML, CSS, and JavaScript code. On the right, a live preview of a web application shows an e-commerce product catalog with items like headphones, a smart watch, and speakers.
<header class="flow">
[data-sort="availability"] .product {
	order: if(
		style(--stock > 0): var(--stock);
		else: 99999;
	);
}
oot {
	--bg-app: #f8fafc;
}
const grid = document.querySelector('
A screenshot of a code editor (likely VS Code) displaying HTML, CSS, and JavaScript code alongside a web browser showing a "Smart Inventory Catalog" application. The application displays products like wireless headphones, a laptop stand, a portable SSD, and a Bluetooth speaker, sorted by availability, with some items marked "Rollback".
[data-sort="availability"] .product {
  order: if(
    style(--stock > 0): var(--stock);
    else: 99999;
  );
}

:root {
  --bg-app: #f8fafc;
}
const grid = document.querySelector('
A split-screen view showing a code editor on the left and an e-commerce product listing page on the right. The product page displays items like Wireless Headphones, Laptop Stand, Portable SSD, Bluetooth Speaker, Phone Case, and USB-C Hub, each with ratings and prices.

CSS for Product Sorting by Availability

<header class="flow">
[data-sort="availability"] .product {
    order: if(
        style(--stock > 0): var(--stock);
        else: 99999;
    );
}
--bg-app: #f8fafc;

The `order` property uses a conditional `if` statement to sort products. If `–stock` is greater than 0, its value is used for ordering. Otherwise, a large value (`99999`) is assigned, effectively pushing out-of-stock items to the end, similar to a z-index for visual layering.

const grid = document.querySelector("
A split-screen view showing a code editor on the left and a web application on the right. The code editor displays HTML, CSS, and JavaScript. The CSS code snippet for ordering products by availability based on a `--stock` custom property is highlighted. On the right, an e-commerce web application displays a grid of products including a Smart Watch, Mechanical Keyboard, Wireless Charger, and Wireless Mouse, with some items marked as "Clearance" or "Rollback".
<header class="flow">
...
}

[data-sort="availability"] .product {
	order: if(
		style(--stock > 0): var(--stock);
		else: 99999;
	);
}

.hot {
}
--bg-app: #f8fafc;
...
const grid = document.querySelector(";"
Screenshot showing a code editor on the left and a product listing web application on the right. The web application displays electronic products such as a smart watch, mechanical keyboard, wireless charger, and wireless mouse, some with "Clearance" or "Sold Out" badges.

HTML

<div class="wrap">
  <div class="weather-cards"></div>
</div>

CSS

:root {
  --icon-sun: url("data:image/svg+xml;...
  --icon-part-cloud: url("data:image/svg+xml;...
  --icon-part-rain: url("data:image/s...
  --icon-rain-light: url("data:image/...
}

JavaScript

const data = {
  forecast: [
    {
      day: "Wednesday",
      date: "May 27",
    }
    ...
  ]
}
Screenshot of a code editor showing HTML, CSS, and JavaScript code. On the right, a weather forecast UI is displayed with three cards: Wednesday, Thursday, and Friday. The Wednesday card shows 14 degrees Celsius, Night 7 degrees, 70% precipitation, and a sun icon, with a "0.3mm" bar. The Thursday card shows 12 degrees Celsius, Night 6 degrees, 40% precipitation, and a partly cloudy icon, with a "0.5mm" bar. The Friday card shows 17 degrees Celsius, Night 9 degrees, 10% precipitation, and a sun icon.

HTML

<div class="wrap">
  <div class="weather-cards"></div>
</div>

CSS

:root {
  --icon-sun: url("data:image/svg+xml,...");
  --icon-part: url("data:image/svg+xml,...");
  --icon-rain: url("data:image/s...");
  --icon-rain-light: url("data:image/.");
}

JavaScript

const data = {
  forecast: [
    {
      day: "Wednesday",
      date: "May 27",
      ...
    }
  ]
};
Screenshot of a weather forecast application interface displaying three daily forecast cards. The cards show weather for Wednesday (14° day, 7° night, 70% chance of precipitation), Thursday (12° day, 6° night, 40% chance of precipitation, with a partially cloudy icon), and Friday (17° day, 9° night, 10% chance of precipitation, with a sunny icon). Small buttons indicating precipitation amounts are visible below the forecast details on the cards.

HTML

<div class="wrap">
  <div class="weather-cards"></div>
</div>

CSS

:root {
  --icon-sun: url("data:image/svg+xml
  --icon-part: url("data:image/svg+xm
  --icon-part-rain: url("data:image/s
  --icon-rain-light: url("data:image/

JavaScript

const data = {
  forecast: [
    {
      day: "Wednesday",
      date: "May 27",
Screenshot of a code editor showing HTML, CSS, and JavaScript, alongside a browser preview displaying three weather forecast cards. The Wednesday card shows 14 degrees Celsius and 8.2mm of rain. The Thursday card shows a partly cloudy icon, 12 degrees Celsius, and 3.8mm of rain. The Friday card shows a sunny icon, 17 degrees Celsius, and 0mm of rain.
<div class="wrap">
	<div class="weather-cards"></div>
</div>
:root {
	--icon-sun: url("data:image/svg+xml...
	--icon-part: url("data:image/svg+xm...
	--icon-part-rain: url("data:image/s...
	--icon-rain-light: url("data:image/...
}
const data = {
	forecast: [
		{
			day: "Wednesday",
			date: "May 27",
		...
	]
};
Screenshot of a code editor showing HTML, CSS, and JavaScript, alongside a live preview of a weather application displaying two weather cards. The first card shows "Wednesday, May 27", "14°" (Night 7°), "70%" chance of rain, and "8.2mm" precipitation. The second card shows "Thursday, May 28", "12°" (Night 6°), "40%" chance of rain, and "3.8mm" precipitation.

HTML

<div class="wrap">
  <div class="weather-cards"></div>
</div>

CSS

:root {
  --icon-sun: url("data:image/svg+xml
  --icon-part: url("data:image/svg+xml
  --icon-part-rain: url("data:image/s
  --icon-rain-light: url("data:image/
  --icon-rain-heavy: url("data:image/
  --icon-snow: url("data:image/svg+xm

JavaScript

const data = {
  forecast: [
    {
      day: "Wednesday",
      date: "May 27",

Weather Forecast Preview

  • Wednesday, May 27

    • 14° (Night 7°)
    • 70% chance of rain
    • 8.2mm precipitation
  • Thursday, May 28

    • 12° (Night 6°)
    • 40% chance of rain
    • 3.8mm precipitation
Screenshot of a code editor (IDE) with separate panels for HTML, CSS, and JavaScript code, along with a live preview displaying two weather forecast cards for Wednesday and Thursday.

Weather App Code

<div class="wrap">
  <div class="weather-cards"></div>
</div>
:root {
  --icon-sun: url("data:ima...
  --icon-part: url("data:ima...
  --icon-part-rain: url("data:ima...
  --icon-rain-light: url("data:ima...
  --icon-rain-heavy: url("data:ima...
  --icon-snow: url("data:ima...
}
const data = {
  forecast: [
    {
      day: "Wednesday",
      date: "May 27",
...
Screenshot of a development environment (likely a live code editor like CodePen) displaying HTML, CSS, and JavaScript code. The HTML shows a basic structure with `div` elements, the CSS defines custom properties for weather icons using data URIs, and the JavaScript shows a `data` object containing forecast information. On the right, a live preview renders two weather cards: one for Wednesday showing 14°C and 8.2mm of rain, and another for Thursday showing 12°C and 3.8mm of rain.
<div class="wrap">
	<div class="weather-cards"></div>
</div>
:root {
	--icon-sun: url("data:image/svg+xml...
	--icon-part: url("data:image/svg+xml...
	--icon-part-rain: url("data:image/svg+xml...
	--icon-rain-light: url("data:image/svg+xml...
	--icon-rain-heavy: url("data:image/svg+xml...
	--icon-snow: url("data:image/svg+xml...
	--icon-wind: url("data:image/svg+xml...
}
const data = {
	forecast: [
		{
...
A screenshot of a code editor showing HTML, CSS, and JavaScript code panels, alongside a live preview of a web page displaying two weather forecast cards. The first card shows "Wednesday, May 27", "14°", "Night 7°", "70%", and "8.2mm". The second card shows "Thursday, May 28", "12°", "Night 6°", "40%", and "3.8mm".
<div class="wrap">
	<div class="weather-cards"></div>
</div>
:root {
	--icon-sun: url("data:image/svg+xml,...
const data = {
	forecast: [
		{
			day: "Wednesday",
			date: "May 27",
			high: 14,
			night: 7,
			chance: 70,
			precipition: 8.2,
			condition: "rain",
			...
A screenshot of a web development environment showing HTML, CSS, and JavaScript code editors on the left, and a live preview of a weather application on the right. The HTML editor shows a div with class 'wrap' containing a div with class 'weather-cards'. The CSS editor shows a `:root` selector defining a `--icon-sun` custom property. The JavaScript editor displays a `data` object with a `forecast` array containing an object for Wednesday's weather, including day, date, high, night, chance of precipitation, precipitation amount, and condition. The live preview shows two weather cards: one for Wednesday, May 27, with a high of 14°C, night 7°C, 70% chance of precipitation, and 8.2mm of rain; and another for Thursday, May 28, with a high of 12°C, night 6°C, 40% chance of precipitation, and 3.8mm of rain.
<div class="wrap">
  <div class="weather-cards"></div>
</div>
:root {
  --icon-sun: url("data:image/svg+xml...
  --icon-part: url("data:image/svg+xm...
  --icon-part-rain: url("data:image/s...
  --icon-rain-light: url("data:image/...
  --icon-rain-heavy: url("data:image/...
  --icon-snow: url("data:image/svg+xm...
  --icon-wind: url("data:image/svg+xm...
}
const data = {
  forecast: [
...
Screenshot of a code editor interface showing HTML, CSS, and JavaScript code. On the right, a live preview displays two weather forecast cards. The first card is for Wednesday, May 27, showing 14 degrees (Night 7°), 70% chance, and 8.2mm of precipitation. The second card is for Thursday, May 28, showing 12 degrees (Night 6°), 40% chance, and 3.8mm of precipitation.
<div class="wrap">
  <div class="weather-cards"></div>
</div>
.weather-card::before {
    content: "";
    position: absolute;
    inset-block-start: var(--space-s);
    inset-inline-end: var(--space-s);
    inline-size: 7.5rem;
    block-size: 7.5rem;
    background-repeat: no-repeat;
    background-size: contain;
    background-position: center;
    /* ... */
}
const data = {
  forecast: [
    /* ... */
Screenshot of a code editor showing HTML, CSS, and JavaScript code, next to a live preview of a web application displaying two weather cards. The first card shows "Wednesday May 27", "14°", "Night 7°", "70%", and "8.2mm" precipitation. The second card shows "Thursday May 28", "12°", "Night 6°", "40%", and "3.8mm" precipitation.

Code Editor with Weather Cards Preview

<div class="wrap">
  <div class="weather-cards"></div>
</div>
}

@container style(--weather: part) {
  background-image: var(--icon-part
}

@container style(--weather: rain) {
  background-image: var(--icon-rain
}
}
const data = {
  forecast: [
...
Screenshot of a code editor (likely VS Code) displaying HTML, CSS, and JavaScript code in separate panels. To the right, a live preview shows two weather forecast cards. The first card for "Wednesday, May 27" displays 14°, Night 7°, 70% chance of rain, and an 8.2mm precipitation bar. The second card for "Thursday, May 28" displays 12°, Night 6°, 40% chance of rain, and a 3.8mm precipitation bar.

HTML

<div class="wrap">
  <div class="weather-cards">
</div>

CSS

}

@container style(--weather: part) {
  background-image: var(--icon-part);
}

@container style(--weather: rain) {
  background-image: var(--icon-rain);
}
}

JS

const data = {
  forecast: [
...
Screenshot of a code editor, likely VS Code, displaying HTML, CSS, and JavaScript code for a weather application. On the right, a preview panel shows a weather widget for "Wednesday, May 27", with "14°" temperature, "Night 7°", "70%" humidity, and "8.2mm" precipitation displayed in a blue bar.
<div class="wrap">
  <div class="weather-cards"></div>
</div>
@container style(--weather: part) {
  background-image: var(--icon-part);
}

@container style(--weather: rain) {
  background-image: var(--icon-rain);
}

.rainfall-info {
  ...
}
const data = {
  forecast: [
    ...
  ]
}
A code editor displays HTML, CSS, and JavaScript code for a weather application. A sidebar widget shows weather details for Wednesday, May 27, with a temperature of 14°, a night temperature of 7°, 70% chance of rain, and 8.2mm of rainfall.
<div class="wrap">
	<div class="weather-cards"></div>
</div>
@container style(--weathe: part) {
	background-image: var(--icon-part);
}

@container style(--weathe: rain) and {
	background-image: var(--icon-rain);
}
}

.rainfall-info {
const data = {
	forecast: [
Screenshot of a code editor showing HTML, CSS, and JavaScript code. A browser preview pane on the right displays a weather forecast interface with the current date, temperature (14°), night temperature (7°), chance of rain (70%), and a blue bar indicating 8.2mm of rainfall.
<div class="wrap">
  <div class="weather-cards"></div>
</div>
@container style(--weather: part) {
  background-image: var(--icon-part);
}

@container style(--weather: rain) and
{
  background-image: var(--icon-rain);
}
}
const data = {
  forecast: [
...
A screenshot of a code editor showing HTML, CSS, and JavaScript code. On the right, a weather widget displays "Wednesday May 27", "14° Night 7°", "70%", and "8.2mm".
<div class="wrap">
  <div class="weather-cards"></div>
</div>
@container style(--weather: part) {
  background-image: var(--icon-part);
}

@container style(--weather: rain) and
  style({
    background-image: var(--icon-rain);
  }
}
const data = {
  forecast: [
A screenshot of a code editor interface showing HTML, CSS, and JavaScript panels. On the right, a preview panel displays a weather application with information for "Wednesday, May 27", a temperature of "14°", "Night 7°", "70%", and a blue bar indicating "8.2mm" of precipitation.

HTML

<div class="wrap">
  <div class="weather-cards"></div>
</div>

CSS

@container style(--weather: part) {
  background-image: var(--icon-part);
}

@container style(--weather: rain) and
          style(--precip: {
  background-image: var(--icon-rain);
}
}

JS

const data = {
  forecast: [
A screenshot of a code editor showing HTML, CSS, and JavaScript code snippets. To the right, a live preview displays three weather forecast cards. The first card is for Wednesday, May 27, showing 14° day, 7° night, 70% chance of rain (8.2mm), with a partly cloudy icon. The second card for Thursday, May 28, shows 11° day, 6° night, 40% chance of rain (3.8mm), with a partly sunny icon. The third card for Friday, May 29, shows 17° day, 9° night, 10% chance of rain (0mm), with a sunny icon.

Code Example: Container Style Queries

HTML:

<div class="wrap">
  <div class="weather-cards"></div>
</div>

CSS:

@container style(--weather: part) {
  background-image: var(--icon-part);
}

@container style(--weather: rain) and
  style(--precip > 5 ) {
  background-image: var(--icon-rain);
}

JavaScript:

const data = {
  forecast: [
...
Screenshot of a code editor (likely VS Code) displaying HTML, CSS, and JavaScript code. On the right, a preview pane shows a weather widget with "Wednesday, May 27", "14°", "Night 7°", "70%", and "8.2mm".

Code Editor and Weather App Preview

<div class="wrap">
  <div class="weather-cards"></div>
</div>
@container style(--weather: part) {
  background-image: var(--icon-part);
}

@container style(--weather: rain) and
  style(--precip > 5) {
  background-image: var(--icon-rain-heavy);
}
}
const data = {
  forecast: [
Screenshot of a code editor split into HTML, CSS, and JavaScript sections on the left, and a live preview of a weather application on the right. The weather app shows three cards for Wednesday, Thursday, and Friday. Wednesday shows a heavy rain icon with 14 degrees and 8.2mm rain. Thursday shows a partly cloudy icon with 12 degrees and 3.8mm rain. Friday shows a sun icon with 17 degrees and 0mm rain.
<div class="wrap">
  <div class="weather-cards"></div>
</div>
@container style(--weather: part) {
  background-image: var(--icon-p...);
}

@container style(--weather: rain)
  style(--precip > 5 ) {
  background-image: var(--icon-1...);
}
const data = {
  forecast: [
...
Screenshot of a code editor showing HTML, CSS, and JavaScript code on the left, and a live preview of a weather application on the right. The weather application displays three forecast cards: 1. Wednesday, May 27: 14°C, Night 7°, 70% chance of rain, with a rainy cloud icon and 8.2mm precipitation shown by a filled blue bar. 2. Thursday, May 28: 12°C, Night 6°, 40% chance of rain, with a partly cloudy icon (sun behind a cloud) and 3.8mm precipitation shown by a partially filled blue bar. 3. Friday, May 29: 17°C, Night 9°, 10% chance of rain, with a sunny icon and 0mm precipitation.

Code Example: Container Style Queries for Weather Display

HTML

<div class="wrap">
  <div class="weather-cards"></div>
</div>

CSS

@container style(--weather: part) {
  background-image: var(--icon-part);
}

@container style(--weather: rain) and
  style(--precip > 5 ) {
  background-image: var(--icon-rain-heavy);
}
...

JS

const data = {
  forecast: [
...
Screenshot of a code editor displaying HTML, CSS, and JavaScript code. The CSS code snippet for `@container` style queries is highlighted, showing rules for `--weather` and `--precip` custom properties. On the right, a live preview displays three weather forecast cards: Wednesday (rainy, 14°, 8.2mm precipitation), Thursday (partly cloudy, 12°, 3.8mm precipitation), and Friday (sunny, 17°, 0mm precipitation).

HTML

<div class="wrap">
  <div class="weather-cards"></div>
</div>

CSS

@container style(--weather: part) {
  background-image: var(--icon-part);
}

@container style(--weather: rain) and
  style(--precip > 5 ) {
  background-image: var(--icon-rain-heavy);
}
}

JS

const data = {
  forecast: [
A screenshot of a code editor split into HTML, CSS, and JavaScript sections on the left. On the right, a live preview displays a weather application showing three forecast cards for Wednesday, Thursday, and Friday, each with an icon, temperature, night temperature, precipitation chance, and precipitation amount (8.2mm, 3.8mm, 0mm respectively).
<div class="wrap">
  <div class="weather-cards"></div>
</div>
@container style(--weather: part) {
  background-image: var(--icon-part);
}

@container style(--weather: rain) and
  style(--precip | 5 ) {
  background-image: var(--icon-rain-heavy);
}

@container style(--weather: rain) and
...
const data = {
  forecast: [
...

A screenshot of a code editor showing HTML, CSS, and JavaScript code, alongside a live preview of a weather forecast application. The HTML section shows a wrapper div containing a weather cards div. The CSS section defines container styles, including a rule for "--weather: part" setting a background image, and a partial rule for "--weather: rain" and "--precip | 5" setting a heavy rain icon. The JavaScript section shows the start of a "data" object with a "forecast" array. The live preview displays three weather cards for Wednesday, Thursday, and Friday. Wednesday shows a heavy rain cloud icon, 14 degrees, 70% chance of precipitation, and 8.2mm of rain. Thursday shows a partly cloudy icon, 12 degrees, 40% chance of precipitation, and 3.8mm of rain. Friday shows a sunny icon, 17 degrees, 10% chance of precipitation, and 0mm of rain.

HTML

<div class="wrap">
	<div class="weather-cards"></div>
</div>

CSS

@container style(--weather: part) {
	background-image: var(--icon-part);
}

@container style(--weather: rain) and
	style(--precip <= ) {
	background-image: var(--icon-rain-heavy);
}

@container style(--weather: rain) and

JS

const data = {
	forecast: [
Screenshot of a code editor (likely VS Code) displaying HTML, CSS, and JavaScript files, alongside a live preview of a weather forecast UI showing three daily cards with icons, temperatures, and precipitation levels.
<div class="wrap">
  <div class="weather-cards"></div>
</div>
@container style(--weather: part) {
  background-image: var(--icon-part);
}

@container style(--weather: rain) and
  style(--precip &le; 5) {
  background-image: var(--icon-rain-heavy);
}

@container style(--weather: rain) and
...
const data = {
  forecast: [
...
Screenshot of a code editor on the left displaying HTML, CSS, and JavaScript code, and a weather forecast application on the right. The application shows three weather cards for Wednesday, Thursday, and Friday, detailing temperature, night temperature, precipitation percentage, and precipitation amount (8.2mm, 3.8mm, 0mm).

HTML

<div class="wrap">
  <div class="weather-cards"></div>
</div>

CSS

@container style(--weather: pa
  background-image: var(--icon
}
@container style(--weather: ra
  style(--precip <= 5
  background-image: var(--icon
}
@container style(--weather: ra

JavaScript

const data = {
  forecast: [
Screenshot of a code editor (likely VS Code or similar) showing HTML, CSS, and JavaScript code panels on the left, and a live preview of a web application on the right. The web application displays a weather forecast with three cards: Wednesday (14°, 8.2mm rain), Thursday (12°, 3.8mm rain), and Friday (17°, 0mm precipitation). Each card includes a weather icon (rainy, partly cloudy with sun, sunny) and a blue bar representing precipitation amount.

Code Example: Weather Card Data and Structure

<div class="wrap">
  <div class="weather-cards"></div>
</div>
@container style(--weather: pa...
const data = {
  forecast: [
    {
      day: "Wednesday",
      date: "May 27",
      high: 14,
      night: 7,
      chance: 70,
      precipition: 8.2,
      condition: "rain",
    },
...
Screenshot of a web development environment, displaying HTML, CSS, and JavaScript code panels on the left, and a live preview of a weather forecast application on the right. The application shows three distinct weather cards: Wednesday with rain and 8.2mm precipitation, Thursday with partly cloudy skies and 3.8mm precipitation, and Friday with sunny weather and 0mm precipitation.

HTML

<div class="wrap">
  <div class="weather-cards"></div>
</div>

CSS

@container style(--weather: pa

JavaScript

const data = {
  forecast: [
    {
      day: "Wednesday",
      date: "May 27",
      high: 14,
      night: 7,
      chance: 70,
      precipition: 1.2,
      condition: "rain",
    },
Screenshot of a code editor showing HTML, CSS, and JavaScript code, next to a live preview of a web application displaying three weather forecast cards. The cards show weather details for Wednesday (rain, 14°, 7°, 70% chance, 1.2mm precipitation), Thursday (partly cloudy, 12°, 6°, 40% chance, 3.8mm precipitation), and Friday (sunny, 17°, 9°, 10% chance, 0mm precipitation). Each card features a weather icon and a blue bar indicating the precipitation level.
<div class="wrap">
  <div class="weather-cards"></div>
</div>
@container style(--weather: pa
const data = {
  forecast: [
    {
      day: "Wednesday",
      date: "May 27",
      high: 14,
      night: 7,
      chance: 70,
      precipitation: 122,
      condition: "rain",
    },
    // ...
  ],
};
A screenshot of a code editor on the left and a weather forecast user interface on the right. The code editor displays HTML, CSS, and JavaScript. The HTML code defines a wrap div containing a weather-cards div. The CSS shows an incomplete `@container` rule. The JavaScript code defines a `data` object with a `forecast` array; the first item for "Wednesday" has its `precipitation` value shown as `122` with a cursor editing it. The user interface displays three weather cards for Wednesday, Thursday, and Friday. The Wednesday card shows a rainy condition with 14 degrees high, 7 degrees night, 70% chance, and 1.2mm precipitation. The Thursday card shows partly cloudy with 12 degrees high, 6 degrees night, 40% chance, and 3.8mm precipitation. The Friday card shows sunny with 17 degrees high, 9 degrees night, 10% chance, and 0mm precipitation.

HTML

<div class="wrap">
  <div class="weather-cards"></div>
</div>

CSS

@container style(--weather: pa

JavaScript

const data = {
  forecast: [
    {
      day: "Wednesday",
      date: "May 27",
      high: 14,
      night: 7,
      chance: 70,
      precipition: 8.2,
      condition: "rain",
    },
...
Screenshot of a code editor interface on the left and a live web application preview on the right. The web application displays three weather forecast cards. The first card, for Wednesday, shows a rain cloud icon, 14°, Night 7°, 70% chance of precipitation, and 8.2mm of rain. The second card, for Thursday, shows a partly cloudy icon, 12°, Night 6°, 40% chance of precipitation, and 3.8mm of rain. The third card, for Friday, shows a sun icon, 17°, Night 9°, 10% chance of precipitation, and 0mm of rain.

HTML

<div class="wrap">
<div class="weather-cards"></div>
</div>

CSS

@container style(--weather: pa) {
  background-image: var(--icon)
}
@container style(--weather: ra)
  style(--precip <= 5) {
  background-image: var(--icon)
}
@container style(--weather: ra)...

JavaScript

const data = {
  forecast: [
...

Weather Forecast

  • Wednesday, May 27: 14° (Night 7°), 70% chance of rain, 8.2mm precipitation.
  • Thursday, May 28: 12° (Night 6°), 40% chance of rain, 3.8mm precipitation.
  • Friday, May 29: 17° (Night 9°), 10% chance of rain, 0mm precipitation.
Screenshot of a code editor (HTML, CSS, JavaScript) on the left, and a live preview of a web application displaying a three-day weather forecast on the right. The forecast cards show daily temperatures, night temperatures, precipitation percentages, and weather icons (rain for Wednesday, partly cloudy for Thursday, sun for Friday), along with a visual bar and exact precipitation amount at the bottom of each card.

1 <div class="wrap">
2   <div class="weather-cards"></div>
3 </div>
...
    

34 @container style(--weather: part) {
35   background-image: var(--icon-part);
36 }
37
38 @container style(--weather: rain) and
39   style(--precip <= 5) {
40   background-image: var(--icon-rain-light);
41 }
42
43 @container style(--weather: rain) and
...
    

1 const data = {
2   forecast: [
...
    
A screenshot of a code editor showing HTML, CSS, and JavaScript code, positioned to the left of a live preview displaying three weather forecast cards. The weather cards show forecasts for Wednesday (rain, 14°, 70% chance of rain, 8.2mm precipitation), Thursday (partly cloudy, 12°, 40% chance of rain, 3.8mm precipitation), and Friday (sunny, 17°, 10% chance of rain, 0mm precipitation).
<div class="wrap">
<div class="weather-cards"></div>
</div>
@container style(--weather: part) {
    background-image: var(--icon-part);
}

@container style(--weather: rain) and
style(--precip <= 5 ) {
    background-image: var(--icon-rain-light)
}
const data = {
forecast: [
...
A split-screen view showing a code editor on the left and a web application preview on the right. The code editor displays HTML, CSS, and JavaScript code. The web application preview shows three weather forecast cards for Wednesday, Thursday, and Friday, each displaying a weather icon, temperature, precipitation chance, and precipitation amount.

Code Example: Weather Cards

<div class="wrap">
  <div class="weather-cards"></div>
</div>
@container style(--weather: part)
{
  background-image: var(--icon-part);
}

@container style(--weather: rain) and
  style(--precip <= 5 ) {
  background-image: var(--icon-rain-light...
const data = {
  forecast: [
  ...
Screenshot of a code editor, likely VS Code, displaying HTML, CSS, and JavaScript code on the left. On the right, a web browser preview shows a three-day weather forecast application. It features three vertical cards for Wednesday, Thursday, and Friday, each displaying a weather icon, current temperature, night temperature, precipitation percentage, and a horizontal bar graph indicating precipitation in millimeters.

Code Editor and Weather App Preview

<div class="wrap">
<div class="weather-cards"></div>
</div>
@container style(--weather: part) and{
  background-image: var(--icon-part);
}
@container style(--weather: rain) and
  style(--precip ≤ 5 ) {
  background-image: var(--icon-rain-light
}
const data = {
  forecast: [
A screenshot shows a code editor on the left with HTML, CSS, and JavaScript code snippets. On the right, a live preview of a web application displays three weather forecast cards for Wednesday, Thursday, and Friday. Each card shows the day, date, current temperature, night temperature, precipitation percentage, and a weather icon (rain for Wednesday, partly cloudy for Thursday, sunny for Friday). Blue bars at the bottom of the Wednesday and Thursday cards indicate precipitation amounts (8.2mm and 3.8mm respectively).
<div class="wrap">
  <div class="weather-cards"></div>
</div>
@container style(--weather: part) and {
  background-image: var(--icon-part);
}

@container style(--weather: rain) and
style(--precip &lt;= 5 ) {
  background-image: var(--icon-rain-light...
}
const data = {
  forecast: [
...

Screenshot of a code editor displaying HTML, CSS, and JavaScript code, with a live preview on the right showing three weather forecast cards. The cards display weather for Wednesday (14°C, rain, 8.2mm), Thursday (12°C, 3.8mm), and Friday (17°C, sun, 0mm).

<div class="wrap">
	<div class="weather-cards"></div>
</div>
@container style(--weather: part) and
          style(--pref{
	background-image: var(--icon-part);
}

@container style(--weather: rain) and
          style(--precip <= 5 ) {
	background-image: var(--icon-rain-light
const data = {
	forecast: [
Screenshot of a code editor (VS Code) on the left, displaying HTML, CSS, and JavaScript code. On the right, a browser preview shows a weather application with three vertical cards. The first card, for Wednesday May 27, shows a rain cloud icon, 14 degrees Celsius, a night temperature of 7 degrees, 70% chance of precipitation, and 8.2mm of rain. The second card, for Thursday May 28, shows a partial cloud icon, 12 degrees Celsius, a night temperature of 6 degrees, 40% chance of precipitation, and 3.8mm of rain. The third card, for Friday May 29, shows a sun icon, 17 degrees Celsius, a night temperature of 9 degrees, 10% chance of precipitation, and 0mm of rain.

HTML

<div class="wrap">
  <div class="weather-cards"></div>
</div>

CSS

@container style(--weather: part) and
  style(--precip > 0){{
  background-image: var(--icon-part);
}

@container style(--weather: rain) and
  style(--precip <= 5 ) {
  background-image: var(--icon-rain-light);

JS

const data = {
  forecast: [
A screenshot of a code editor showing HTML, CSS, and JavaScript code on the left, and a browser preview of a weather forecast widget on the right. The weather widget displays forecasts for Wednesday, Thursday, and Friday. Friday's forecast shows a bright sun icon, a temperature of 17°, a night temperature of 9°, 10% chance of precipitation, and 0mm of precipitation. Wednesday shows 14°, Night 7°, 70% precip, 8.2mm. Thursday shows 12°, Night 6°, 40% precip, 3.8mm.

Code Editor and Weather App UI

<div class="wrap">
	<div class="weather-cards">
	</div>
@container style(--weathe
	style(--precip > 0.)
	background-image: var(--ico
}

@container style(--weathe
	style(--precip <=
	background-image: var(--ico
const data = {
	forecast: [
A code editor is shown on the left with HTML, CSS, and JavaScript code snippets. On the right, a dark-themed weather application UI displays three daily forecast cards. The first card for Wednesday, May 27, shows a rainy cloud icon, 14° temperature (Night 7°), 70% chance of rain, and 8.2mm precipitation. The second card for Thursday, May 28, shows a partly cloudy with rain icon, 12° temperature (Night 6°), 40% chance of rain, and 3.8mm precipitation. The third card for Friday, May 29, shows a sun icon, 17° temperature (Night 9°), 10% chance of rain, and 0mm precipitation.
<div class="wrap">
  <div class="weather-cards"></div>
</div>
...
@container style(--weather: p) {
  style(--precip > 0) {
    background-image: var(--ico...)
  }
}
@container style(--weather: r...) {
  style(--precip <= ...)
  background-image: var(--ico...)
}
const data = {
  forecast: [
    ...
  ]
}

Screenshot of a development environment with code on the left and a rendered user interface on the right.

The left side displays HTML, CSS, and JavaScript code snippets. The HTML shows a basic structure with div elements for 'wrap' and 'weather-cards'. The CSS uses container queries with style queries to conditionally apply background images based on weather properties like '--precip' (precipitation). The JavaScript shows a 'data' object with a 'forecast' array.

The right side shows a UI preview of three weather forecast cards:

  • Wednesday, May 27: Cloudy with rain icon, 14°C (Night 7°C), 70% chance of rain, 6.3mm precipitation.
  • Thursday, May 28: Partially cloudy with rain icon, 12°C (Night 6°C), 40% chance of rain, 3.8mm precipitation.
  • Friday, May 29: Sunny icon, 17°C (Night 9°C), 10% chance of rain, 0mm precipitation.

JavaScript

CSS

Two rectangular outlined boxes are displayed. The left box is labeled 'JavaScript' and the right box is labeled 'CSS'.

JavaScript

Fetch data

CSS

A diagram showing two large rectangular boxes, one labeled 'JavaScript' and the other 'CSS'. Inside the 'JavaScript' box, there is a smaller rectangular box with a dashed border labeled 'Fetch data'.

JavaScript

  • Fetch data
  • Pass on values

CSS

  • Get & scope values
  • add type
A diagram contrasting JavaScript and CSS. The JavaScript section shows a flowchart with 'Fetch data' leading to 'Pass on values'. The CSS section lists 'Get & scope values' and 'add type'.

JavaScript

Fetch data

Pass on values

CSS

Get & type values

  • attr()

Logic & styling

  • if() @container style()
  • calc() round() min() max() clamp()
A diagram comparing the responsibilities and capabilities of JavaScript and CSS. The JavaScript column shows a flow from "Fetch data" to "Pass on values". The CSS column shows a flow from "Get & type values" (including attr()) to "Logic & styling" (including if() @container style(), and functions like calc(), round(), min(), max(), clamp()).

JavaScript

  • Fetch data
  • Pass on values

CSS

  • Get & type values

    attr()

  • Logic & styling

    if() @container style()

    calc() round() min() max() clamp()

A diagram comparing JavaScript and CSS capabilities. Under JavaScript, a flowchart shows 'Fetch data' leading to 'Pass on values'. Under CSS, a flowchart shows 'Get & type values' highlighted with a blue dotted border, leading to 'Logic & styling' highlighted with a red dotted border. Both CSS boxes list various functions and keywords.

JavaScript

  • Fetch data
  • Pass on values

CSS

  • Get & type values
    • attr()
  • Logic & styling
    • if()
    • @container style()
    • calc()
    • round()
    • min()
    • max()
    • clamp()
A diagram presenting two columns, "JavaScript" and "CSS". Under "JavaScript", a box labeled "Fetch data" flows with an arrow to a box labeled "Pass on values". Under "CSS", a box labeled "Get & type values" which includes "attr()" flows with an arrow to a box labeled "Logic & styling" which includes "if()", "@container style()", "calc()", "round()", "min()", "max()", and "clamp()".

JavaScript

Fetch data

Pass on values

CSS

Get & type values

  • attr()

Logic & styling

  • if()
  • @container style()
  • calc()
  • round()
  • min()
  • max()
  • clamp()
Diagram illustrating a comparison between JavaScript and CSS responsibilities. The JavaScript column shows a flow from a box labeled "Fetch data" to a box labeled "Pass on values". The CSS column shows a flow from a box labeled "Get & type values" (which lists attr()) to a box labeled "Logic & styling" (which lists if(), @container style(), calc(), round(), min(), max(), and clamp()).

CSS isn't eating JS, it's simply growing into it's own.

Thank you!

A colored line fades from pink to purple below the text.

Thank you!

Slides: kevinpowell.co/talks/css-is-eating-js

Start writing CSS with confidence: cssdemystified.com CSSDAY20

Thank you!

Slides: kevinpowell.co/talks/css-is-eating-js

Start writing `CSS` with confidence: cssdemystified.com `CSSDAY20`

Thank you!

Slides: kevinpowell.co/talks/css-is-eating-js

Start writing CSS with confidence: cssdemystified.com CSSDAY20

A geometric logo made of rectangular blocks arranged in a grid pattern.
A stylized logo or design composed of black rectangular blocks arranged into two distinct geometric patterns on a light background.

People

  • Bramus
  • Manuel
  • Temani Afif
  • Yuna

Technologies & Tools

  • ATTR function
  • Attribute selectors
  • Checkbox hack
  • Chromium
  • Container style queries
  • CSS anchor positioning
  • CSS custom properties
  • CSS Grid
  • CSS if()
  • CSS math functions
  • CSS min()
  • CSS reading-flow
  • CSS round()
  • CSS trig functions
  • Firefox
  • Range syntax
  • React
  • Registered custom properties
  • Safari Technical Preview
  • Scroll-driven animations
  • View transitions

Standards & Specs

  • CSS custom-ident
  • Data attributes

Concepts & Methods

  • Graph theory
  • Separation of concerns

Organisations & Products

  • MDN
  • The Weather Network
  • Walmart