Modern CSS rendering performance: The internals of web pages optimization
Okay, let's start with next generation CSS performance.
What do we see on the right is a diagram that shows us what happens if we try to center a div in Chrome in a browser.
No, I'm just kidding.
This is basically the latest version of Chrome's rendering engine and includes a bunch of things that will help us to make the browser rendering and also layouting way faster than we're able to do it now.
So let's start to dive in.
In this talk, I will talk about two CSS properties-`contain` and `content-visibility`, and they will help us to skip particular parts in our render pipeline.
A quick before and after.
Here we see flame charts, an overview.
And this is the after part where we include all improvements, including the offscreen effect, and we see it really brings drastic improvements.
But it is not really easy to understand all the edge cases.
So basically the first thing that we need to do is understand the browser render pipeline.
And this is what I'm here for today.
I introduced myself already, but again here, my email address and Twitter handle.
If you want to contact me.
And I basically will try to explain all the details that you need to know to gain that performance impact in your applications.
The browser render pipeline is basically everything that needs to be done in the browser to display a pixel.
And sometimes there is scripting involved.
So we basically.
Have some events that display on mouse hover, some the DOM or whatever.
To do that we need to first know what elements are on the page and how they are styled, and this is the calculate styles or recalculate styles phase, and is basically very hard to skip this one because it is essential to know which style belong to which element.
The next one is layouting.
Layouting is very much about dimensions and it helps us to place stuff, and layout stuff in the browser.
Hit tests-this is whenever we interact with our page, we need to know where the exact mouse interaction or any other keyboard interaction took place-for example focus.
Then we have paint.
This is one of the last steps in the browser, very close to when we see the pixels.
And this is basically generating the pixel map of one part of your browser image that you will see later on.
And one of the last steps or the last step is the composite step, where we put all the different pixel images that could appear in the page into one single layer and render that pixels to the page.
With that in mind.
And the goal of course, that we want to improve the performance of those steps, I want to introduce some concepts that will help us to take a different feeds.
One of them that will help us to reduce the purple color in our flame charts is the border-box-a concept is basically tells us what is the dimensional measure of a element in the page.
The second point is the visual visible boundaries.
So that means in that element or that element itself has some boundaries and everything outside of those boundaries is maybe, or maybe not visible.
Those are the visible boundaries.
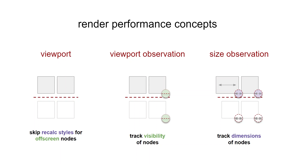
And then we have the screen's viewport.
This is basically everything that is maintained in, in the screen, or there could also be element's dedicated viewports.
With those three concepts we jump right in and we start with explaining the environment and how I will do the measures.
So let me quickly open up the page and what we see here-I have it open already-are any area that may contain content and here uh, I could insert some demo content just to test, and then some triggers and then some applications of layout.
And what I basically want to do, I want to add a couple of nodes to my DOM, and this will be visible in a second in purple here I hope.
If I clicked the button correctly.
Yes.
And then I could trigger a layouting or paintwork here over those buttons.
And I did already measure to save your time, I will not doit live-and here we see for example, if I have, if I have paint, I'm sorry-the purple.
Content here, which is layouting content.
And I hover over the paint button-and this is visible because the green color changes slightly, then nothing really happens.
But, if I hover over the layouting button, we see layouting work is performed.
So this is basically my testing environment in which I did all my measures.
Back to the presentation itself.
I will start with the first CSS property `contained`.
And here we will look at two different properties in that because they will help us with the performance the most.
And this is layout and paint.
Will be slightly look on size too.
So here is `contained` supported?
And this is pretty nice, contained is supported in all the major browsers' latest versions, and it is for quite a while, already supported.
So a very old feature that we can really rely on.
What does it do?
Contain provides us different properties-one of those is the `contain: layout` property and contain: layout helps us to basically, to do different things.
It helps us to maintain the layouting cost.
Contained can also maintain the paint property.
And it helps us to reduce the cost of our painting work and contain can also be set to `size`, and then it will help us in the cost of calculating a lot of stuff relating to dimensions.
The biggest impact can be landed with the layout property.
So let's look into layout property's performance impacts.
What will layout, contained-layout, give to us?
If we have a div and we put contained: layout on it, we can shield it from other layouting work.
Which means work that is applied to other parts of the DOM will not affect this part.
Same, it will contain a layouting that is only applied to its children, because if they don't change the containers dimensions, nothing else needs to be calculated.
I will show pretty nice measures afterwards, but first everything has implications.
Let's look at what changes if apply that property, which is pretty important.
So if you apply layout the following things changed-your border-box or the let's say the div on which you apply, or the element on which you apply this property will get its own stacking context, which means since inside positioned are like, you would change it to one of those things that's changed the stacking index.
On the right side we see that the overlap is also changing.
And if we are not aware of that, we could basically make some mistakes in our layout.
I can quickly demonstrate this in our examples here.
I will remove the the content and I will insert some demo content.
And if I hover over it, you see this menu.
And if I would apply layout to every single children, the last one works.
But the rest, as you can see is overlapped by other things because the z- index, the stacking index basically changed.
This should be something that we should keep in mind when we apply the contain: layout property.
And now let's see the real impact what we can measure.
I did the measure, we won't do it live because it takes some time, but it very easy to reproduce with the demoexamplethat I shared.
We did the, like, raw measure that you saw before, then we apply it contain: layout on the container and we see a drastic improvement in the, on all the onscreen nodes and if we flip all nodes to offscreen, so every content is not visible, but way down below we have no improvement.
Very good to know.
The next one is `paint`.
Paint is all about the visual boundaries and I will directly look at the performance impact that paint give us.
contain: paint shields again from other work.
`contain: paint` maintains the paintwork inside of the div.
It cuts the edges.
contain: paint will also skip child elements, as well as the full node, if it is outside of the screen from painting, and this is pretty, pretty nice.
The design implications or the impact here is not that bad.
I mean, if we are familiar with overflow hidden.
This is basically exactly the concept that is here.
We basically cut all the edges.
I mean, the dropdown as we saw before, I will demo that in the second year, is not working because we cut the edges completely, having not applied paint.
And we see none of those, not even the last one.
We now overflow, this is the downside, but still it brings, this potential to a lot of fields in our apps, especially to everything that is, images and so on.
And if we applied that, I can demonstrate two different improvements.
First of all.
Unoptimized, all the nodes are painted-a lot of work is done.
The second thing shows you that if I apply contain: paint on the container, I reduce it drastically.
And if I would shift all of those nodes outside of the viewport, look at this really nice improvement nearly no work is done.
And this is really incredible.
If you think about just apply contained: paint on any image of your application would drastically improve all the paints outside of your viewports too.
Very very nice thing.
The last one, I will just quickly sketch it because `contain: size` is very limited in what performance impact it brings us.
It reduces the time and the how you calculate the dimensions because you have to apply the dimensions manually.
This means if you don't apply that manually, all our boxes would collapse.
And this isn't, well not really ... a good thing.
So this means if you want to apply all those properties, it would be very hard to maintain a stable site with no bugs introduced with that property.
They are shorthands of course, because you can use multiple of those properties on the same element.
There are two short cuts.
There is `contain: content` and `contain: strict`.
contain: content is basically a combination of layout and paint, and contain: strict is a combination of layout, paint and size.
I would very suggest to use the contain: content.
Here I presented everything in an overview.
I will compare the performance impact, how hard it is to use and what design implications you have to consider.
As you can see the content section here is one of the best ones in terms of impact and usability.
And this is also the stuff that is suggested by the official docs.
The next area is pretty exciting.
It is a Chrome only feature at the moment, but still you can land incredibly huge impacts with that one.
Before we start with it, let me introduce some more concepts.
So I spoke before of the viewport.
Now lets dive a little bit more into that concept.
We have the viewport, the stuff that we basically see on our screen and all the nodes that are visible on our screen are basically named the 'onscreen nodes' or 'above the fold' content.
And everything that is below the visual boundary of our screen is called 'offscreen nodes' and 'below the fold' content.
And there is one edge case, which is when you have a very long element with a lot of child nodes, and the top of this element is visible in your viewport, and the rest of your elements are invisible.
Then this is called an 'obscured node' because the element itself is visible, but most of its children are not.
With that three things in mind in this theory, let's jump right into content visibility, content visibility maintains three different tools.
First of all, I explained the viewport already, so this is a main thing.
Then we have observers.
So we have elements in the viewport and then you need to observe different attributes of that element of the elements.
One of those observer concepts that we need to know or need to understand is the 'viewport observer' concept.
Which means it's tiny logic that detects if an element is visible in our viewport and where, if it is onscreen, or offscreen.
And what is the distance to the visual boundary of the screen.
The second observerable concept, observer concept that we want to learn or understand is the 'resize observer' or the 'size observer'.
And here basically we try to observe the elements dmensions, and if I change those dimensions, I basically can get notifications on those changes.
Those things are the underlying principles of the content-visibility styles property that I want to present in the last part of the presentation.
And we have two measures `auto` and `hidden` I will only focus on the auto at the moment, because this presentation is only 20 minutes time.
So I will try to focus on the most important things.
Where is it supported?
It's supported in Chrome, in Edge, but not in Firefox or Safari.
So, everyone that lands, that runs the blink engine has a luck and can apply this very nice and exciting feature.
What are the performance impact?
If we apply that feature, we apply all performance impact of layout.
On top of that we apply all the performance impact of paint.
So this is basically even with contain: content and on top of that, it is the very first highly impactful feature in the browser, CSS's only feature in the browser that helps us to skip the recalculate styles process.
How does it do that?
Basically it ignores any element that is not visible in the vewport and skips recalculating styles in any other step in the browser render pipeline.
And this is really huge.
The design implications are that those boxes will collapse, if you apply it to them, which means you have to give them a size that they can maintain when they are outside of the viewport.
And there is this setting called maintain intrinsic size, and you can basically tell them how big the size should be if they are off screen to avoid some flicker in the scrollbar.
What is the impact, and this is really exciting, and I cannot tell you how exciting this is.
So I took both measures from the before, just to show you that they land the impact on both things.
They land the same impact onscreen, as we had with contain: content.
On top of that, with offscreen they land all the impact from before on paint, even more, and no cost for recalculate styles or anything.
So if you look at the chart, this chart is basically empty.
As those notes would not exist.
Huge impact with just a few lines of CSS.
I have of course an overview on how usability is, what the impact of that is.
And if it is onscreen or offscreen impacts, so you can have a look on that after my presentation.
When you rewatch the video.
But now let's do a finishing of this presentation and show you a real measures.
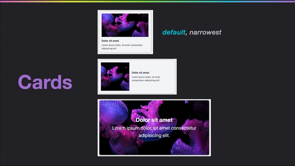
Of course, I did demo measures with cards, with images and everything.
And here we see offscreen flicker, here we see layouting cost and here we see initial render cost.
This was before, unoptimized.
If I optimized that, we see a drastic reduction in paint itself.
Nearly no rendering and no flickering or no other action that would cause stuff outside of the viewport would be caused by stuff outside of the viewport, sorry.
This also is done at run time.
So we see here before and after optimization, at runtime, which is also, if you look that, incredible.
But this was a theoretical and staged lab measure.
I also did some real life measures.
I optimized an already highly optimized page, and I tried to land some improvements there.
Even if this was focusing on performance.
And even here I could land a really nice improvement overall rendering time from around 150-60 milliseconds, down to twenty-five and total paint time to seven compared to 30 before.
This was one thing, another thing we applied those techniques to clickupm a really huge application with thousands of nodes.
And we could also land drastical improvements there to reduce the time.
That's basically it that was all I could present in this very limited time of 20 minutes.
My name is Michael.
Again, feel free to contact me if you're interested in that content or any other content related to performance.
Of course we do all this and we support your company to get better with that topic.
So feel free to contact us and that's it from my end.
