Cascade Layers
Today, I want to talk to you about cascade layers.
It's a new and exciting way by which we get to write our CSS.
Because with cascade layers, we can slice up our style sheet into several layers, and then we get to control the order of these layers.
It's really exciting stuff.
But before we dive into cascade layers itself, let's take a look at the bigger picture, which is the cascade, the CSS cascade itself.
Now I could give you the formal definition there from the spec, but it's a bit boring and a bit difficult because here I have a more simple definition namely this one.
The CSS cascade is the algorithm that determines the winner from a group of competing declarations.
Now, if that's also confusing for you, no worries, here's a small example to clarify.
Here, we have this simple, a little bit of markup-input type is password, and we have an element attached they're attached to it, namely color blue.
But in our style sheet, we also have three CSS rules that also want to set the color.
So these are all competing, the declarations, the core declarations, they are all competing with each other.
And that was the question which one of these rules will win.
Is it the first one, the last one, the loudest one?
Well, that's what the CSS cascade does.
It gives us an answer.
It's picks a winner from these competing declarations and it does this using these five steps.
Now there's this without taking cascade layers into account just yet.
So cascade layers later on will fit there somewhere inside of the scheme, but these are the five steps without layers.
Nd what the cascade does, well, it checks each and every one of those layers, one after the other, until one of those steps can determine the winner.
For example, if specificity can determine the winner, then the cascade will say, okay, well, here's your winner.
This declaration wins.
And I won't check any of the other steps.
And this is by the way, in the same way how a waterfall works, because we see a lot of these photos here from ... from cascade, from waterfall.
If you take a look at the water in the center, there, it takes five steps before it hits the bottom, before it hits the lower level of the water.
But if you look at the right hand side of the photo, well, there the water only takes one step before it hits the bottom.
So our CSS cascade works in a similar way.
It can, it can take one step to determine the winner, or it can take five steps to determine the winner.
And later with layers, even six steps.
Now let's, let's take a look at the steps themselves, because what, what are they?
The first step that the cascade checks well that's origin and importance.
The specification's pretty straightforward on this.
It says, well, the origin of declaration is where it come from, where it comes from.
And it's importance.
If we take a look at the different origins that we have in the browsers, we have eight and we can rank these.
We can rank these from lowest priority at the bottom to highest priority at the top.
And the specification says, well, CSS rule sets in a higher priority origin, those will win from rule sets in a lower priority origin.
Pretty straightforward.
But what are these origins?
Well, to start off, we have three origins sitting at the bottom there-the normal user agent declarations, the normal user declarations and the normal author declarations.
Normal user declarations, those are the styles that the browser brings with it.
So these are the styles provided by your browser.
Think of the white background, text is Times New Roman, Text is black, links are blue.
Text is 16 pixels by default.
That kind of stuff.
Well, that's all in there.
On top of that, we have the normal user declarations.
This is an origin that contains preferences from the user of the browser.
So that's actually the person sitting at the computer and using the browser.
For example, if somebody is visually impaired, well they can enter a setting and say, you know what?
I don't want these 16 pixels by default text size.
I want it to be bigger.
I want it to be 32 pixels so they can set it there.
And what they set there, well, that will always win from the normal user declarations that sits below because normal use declarations has a lower priority.
And then the third layer on top of that is our normal author declarations.
What are authors?
Well, 'author' is spec lingo for a CSS developer.
So there go the styles that we as CSS developer define, and these will override the user declarations and also override their normal user agent declarations.
You can see this in the dev tools, by the way.
So if, look at a form there I have to input type is 'search'.
And we inspect it using the dev tools, then at the bottom there in the styles panel, we can see which styles get applied, which declarations get applied.
Now, let me make it a little bit bigger there.
We see clearer here at the top we have a padding set by four pixels, but then it's the right hand side.
It says, well, this is from this specific style sheet.
And then below that we have a few other styles, which I didn't write.
No, because these are part of a user agent style sheet.
And it's also mentioned here on the right.
So they are ... visually stacked on top of each other which is correct and confirms what I just told you.
Now, something interesting happens when you use '!Important'.
You may think, well in inside of these three origins, if I use an !Important it will make something important inside of the one origin?
No, that's not the case.
What happens here is we take our three origins that we have now and we stack them in reverse, on top, like this.
So at the bottom normal user agent, normal user, normal author, and then we have !Important author, !Important user and !Important user agent.
And this, this kind of makes sense because if a user really wanted 32 pixels font size, they can add an !Important to it.
And then their 32 pixels, which is made important at that moment, it will win from our from our own important order declarations.
And to finalize, we have two other origins namely the transition origin at the top, and then in the middle there, right between the normal ones and the important ones that we have animation declarations.
If you take a look at an example, well, here we have this.
We have all these CSS rules and these declarations that are competing, which one will win?
Well in the first step, the cascade will take a look at the origins.
And here we see that the input type is password that selector there, the hot pink has an !Important added to it.
So this is from an origin with higher, with a higher priority than our other ones.
So the hot pink !Important is part of the !Important author declarations and all the other declarations that you see there, these are part of the normal author declarations.
Cool.
Right.
So the next step is context.
This has to do with web components and shadow DOM.
And what the specs say there, well normal rules, these declarations, from our context, these will win from inner context.
And then for important rules, it goes the other way, round to the ones from the inner context will win from those from the outer context.
Say our CSS rules are part of the same context, then we move on to element attached styles.
element attached styles it's very simply translated to the contents of a style attribute.
These will win from normal style declarations.
So here again, we have a small example.
At the top, there we have the element attached style.
Namely color is blue.
Well, since it's an element attached style, it will win from our other declarations that we see there from the other CSS rules.
So the text will actually be blue.
Moving on to the next step.
Specificity, it's pretty straightforward.
The declaration with the high specificity wins.
But how do you calculate specificity?
Well, that, that's, that's another question, of course.
But let's just jump into, into an example.
Here we have several declarations, again, part of the same origin, part of the same context, no element attached style is being used.
So we have to look at specificity.
We calculate the specificity for each and every one of those selectors.
And then we see, well, aha, the ID selector there.
This one has the highest specificity, so we, we choose that one from the list.
If you need a little bit of help with calculating specificity, there is a wonderful tool made by Kilian Valkhof, and he will be speaking later today.
And there's wonderful tool by Kilian Valkhof, which is the CSS specificity calculator.
You paste in a selector in there and out there at the bottom comes the specificity.
Not only does it give you the specificity, it also explains you why you have reached a certain specificity.
Highly interesting tool, I would really recommend it to you.
If you want to calculate specificity from it in your own coat, that's also possible for this, you can use a package that I made.
It's named @bramus/specificity.
You import the calculate function from it.
You pass a selector into there and out comes the specificity.
Really handy.
If you want to do it from it within your code.
Now, bringing you back through to our grand scheme of things.
Say we have CSS rules in the same origin, same context, no element attached styles, and then the specificity of a selectors is the same.
What do we do then?
Well, then we check the last and final step namely order of appearance and it goes like this.
Well, the last declaration in the document order wins, Again a little example.
All in the same context here.
So we pick the last one and the color will be lime, yay.
So these are five steps of the cascade.
I hope I made it a little bit clearer to you.
But now let's move on to layers, of course, because this is a talk about cascade layers . If we take a look back again at our scheme.
Well, if we're really honest we're like mostly fiddling with these two steps, because most of the time our CSS rules are part of the same origin, have the same importance, same context, no element attached styles.
And then we are like battling with either specificity or order of appearance and we can run into some problems.
For example, say I have this here in my CSS reset style sheet.
Very nice.
It will remove the margin and padding and the list style from UL, which has a class attached to it.
Good, nice.
But then if I want to like set the margin on my NAV, which is also a UL, then I have a problem.
It won't be applied though, because the specificity from the topmost selector, it has a higher specificity than the selected there at the bottom.
Uh, A work around that we can use for this is we can kind of cheat by bumping up the specificity so that it has the same specificity.
And then the next step in the cascade, which is order of appearance will come into play and pick the, the last declaration that you see here.
Yup.
Not that nice, but yeah, it's a solution.
Another example.
This is from a carousel that you can use.
So it's a third party style sheet say we want to adjust the slider item.
Well, again, we have a problem there.
We could try and bump up the specificity or try to give it like a higher specificity or what we mostly do in those cases, we add an !Important on there, and then it becomes part of a different origin, a more higher priority origin.
And then it will win that way.
Not always feasible because if we want to like override it again later on, well then we're running into problems.
Another cool, a cool example is say you declare a card_content element in your markup.
So you have div class is card_content, for example, but you also add the u-text-center utility class on there.
Well, the text will always be left aligned.
That is because the card_content selector in our style sheet, comes later than the u-text-center utility class that we have there.
And since they have both specificity, order of declaration is the determining factor.
As olution that we can do there as well, we can move the content of our style sheet.
But again, this is not always something that we can do or are allowed to do, especially in larger code bases.
We can, we can run into problems.
So we just kind of confirmed that well we're mostly fighting with specificity and order of appearance.
What if you didn't need to, what if there was an extra step inside of the cascade that would determine the winner for us and without us needing to fall back to specificity or order of appearance?
Well, that's exactly what layers do because it's this extra step inside of the cascade and if the layer step can determine the winner.
Well, you don't have to worry about specificity or order of appearance.
Pretty great, right?
What, what can you, what can you do with cascade layers?
With cascade layers, you get to slice up your single origin styles into several layers and control the priority of each and every one of those layers.
And you do this using the @layer or at-rule.
Bringing back to our example, the one with the reset that was over-riding things: with layers we can solve this like this.
We wrap both of these in a separate layer and it will work magically.
How come?
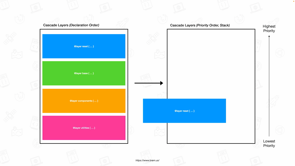
Well, the spec says cascade layers are ordered by order of appearance, and then they are given a certain priority.
Visualized, it looks like they say we have four layers declared.
So on the left here, we have the declaration order.
First in our style sheet comes @layer reset with some contents and @layer base, @layer components, and finally @layer utilities.
The cascades will sort them by order of appearance, which you can see on the left, but the priority is not the same as the order of appearance.
No, it's the reverse, because the first declared layer, that one gets the lowest priority.
And the layer declared after that gets a bit of a higher priority.
And so forth.
And then finally the last declared layer, that one has the highest priority.
And then the spec says, well, for normal rules, the cascade layer with the highest priority wins.
So if you take a look again at this example, in a reset layer, we have that little bit of a reset styles.
And then in the components layer, we have the nav specific styles.
Well, they will win.
Document declaration order is reset, base, components, utilities, but then the priority order is reversed.
Reset has the lowest priority, and then components, the components layer has a higher priority.
So it will win.
Yay.
Pretty cool, right?
I think so.
These are the basic concept of layers.
But of course, as with everything, there's more to say about it because there are some edge cases, some, some finesses to, to include.
So let's get, let's go over them.
Layer name reuse, looking again at the spec at the spec lingo, it says the cascade layers are sorted by the order, by which they are declared.
That means that if you reuse a layer name, you won't declare it again.
What will happen there is the contents of both of these @layer statements, using the same layer name, they will get merged.
So you can also write the thing there on the, on the right.
So the code snippet there on the left and the code snippet on the right, they are equivalent.
Anonymous layers.
That's another finesse of the spec.
You don't need to give a leader a name so you can do this: @layer, no name and just the contents you put them in there.
One caveat with that you can't append to an anonymous layer because these two statements here, they won't merge the contents, no these will create two separate anonymous layers.
Predefining Layer Order.
That's something else.
It's something that I would highly recommend you to do.
Because if, if you take a look at our style sheet, with our several layers in, and then we have the priority order on the right.
If we move some of these layers in our declaration order.
Well, then our priority or also changes.
And that's [not] something, not something that we always want.
We can solve this by using the @layer statement.
And with the @layer statement, we can predefine layer order upfront.
It looks like this is.
This little extra rule that you put at the top of your style sheet-@layer, and then you name your layers, one after the other.
Reset, base, components and utilities.
So we declare them there right upfront.
And that way, if we move one of our layers, well, our priority order will always remain the same because we have predefined it.
I think that's, that's a really neat and a really handy thing to do.
I would really highly recommend you to do it.
If you're wondering about external CSS files, can you load, can you load these into layers?
Yes, you can.
If you're using @import, you can add an extra layer function to here.
So they're here.
In this example, we have predefined layer order at the top, and then we load in all of these external CSS files into their layer, using its layer name.
And then at the bottom we can write our own style sheets again in layers, if you want.
Can you do this for markup?
Yes.
You can also do it from mark.
You do it using the layer attribute.
So you have link rel style sheet, href, name of the CSS file and then layer equals reset.
But that won't work entirely because older browsers that don't support layers, well, they, they will discard the layer attribute there.
So, so browser don't support layer attribute, they will discard the contents there and they will load those style sheets not in a layer.
How can you solve this?
Well, there's this extension to the media attribute that you can do, and there you can detect support for the @layer, at-rule.
So this at-rule, there it's a new function.
It's not entirely finalized at this moment, but it's, it's, it's being worked on.
So use the little code snippet from the bottom.
That one will work definitely.
Unlayered Styles.
Do you need to use layers?
Are you forced to use layers?
No, you can still write styles without using any layers.
But the question then is, well, where do they fit in the order?
Did they get the highest priority or the lowest priority.
Well, unlayered styles, these always get the highest priority.
So no matter where you have your unlayered styles, unlayered styles, the will always win from layered styles.
And that's, that's kind of a cool thing to know, that they will always be.
Layer nesting.
It's possible to nest layers.
You have an @layerblock.
And in there you put some other @layers, @layer blocks.
For example, here inside of our these, you have light and dark, and also some unlayered styles that perfectly works.
If you want to later on append content to a nested layer, you use the dot notation.
So if you are used to writing JavaScript, this will look really familiar referring to the dark layer inside of the theme layer.
!Important.
oooh, remember the thing from origins, where like the priority stacked in reverse on top?
Well, with cascade layers, we have the same.
If we use an !Important inside in one of our layers, then, well, the order will get stacked in reverse on top.
So yes, you're unlayered styles will always win from layered styles, but also yes, !Important, which is being used inside of a layer, these will always win from the unlayered style.
And then rolling back layers.
Just like how you can roll back cascade origin using the revert keyword, you can do the same in cascade layers, but then you need the revert-layer keyword.
So here, if we have an a.normal somewhere in our markup, it won't be colored hot pink, no, it will be, it will have applied color revert layer.
So it will fall back to the previous layer.
Which is the base layer, which says, well, the core will be lime.
So a.normal, those elements will have the lime color, and then the regular a's, well these eventually will have the hot pink color.
And one thing too, to close off it, if you're wondering about browser support can you use them well?
Yes, you can.
It's supported in all major browsers.
So all of these versions, they should be released around this time when, when this is being aired.
So Chrome 99 chromium 99, I should say.
So that's the engine that sits underneath Google Chrome Microsoft Edge Brave and all kinds of things.
They all use the blink renderer.
They're all based on chromium.
And then Gecko Firefox.
They have shipped it with version 97, which was from early February.
And then Safari has it enabled behind a flag in Safari technology preview 133 and it will, it will ship with version 15.4.
Now, what about old browsers do they support it?
Well old browsers, they look at your style sheet and they go like, yeah, I don't understand this layer thing and what they will ... essentially do there is well, they will discard the entire content so they won't apply any layered styles.
That can be a bit of a problem, cause it, you could be missing some essential styles there.
How can we solve this?
Well, if you could use a preprocessor of some kind to preprocess the contents, then we would be able to use it.
It would end up with a style sheet like this.
So all the styles would be processed, but again, would become un-levered.
There are two projects that are working on it.
You can see the links onscreen here, but they are not finalized yet.
So, so we still have to wait a little bit before they get shipped , these these converters that we can use.
So, yeah.
Wow.
That was a lot of information.
In summary.
Cascade layers, it's this extra step that sits in the cascade right before specificity and order of appearance.
That way, if the layers step from the cascade can determine the winner that we don't need to worry about specificity or order of appearance of the rules that are of the selectors that are used in the other layers.
They have a declaration order from top to bottom, but then the priority order, well, it's in reverse and know that unlayered styles always sit at the top.
So unlayered styles have the highest priority.
If you're looking for like a practical approach, how would you do this?
Or how will you migrate from a non layered style sheet to a layered style sheet?
Well, this here is our a non layered style sheet.
So we start off with this.
What I would recommend you to do is first start off with loading up your reset styles and your third-party styles into layers.
Like this.
So we have our layer statement there at the top, reset and third-party, and then we load those style sheets into their proper layers.
And then we keep our own styles unlayered, because again, unlayered styles will always win from layered styles.
Cool.
Should your codebase become bigger and bigger and bigger?
And you're working towards approaches, for example, like ITCSS, well, then you can start layering up your own styles and it would look like, like this.
And that was it.
I want to thank you for your attention.
If you have any questions, try and look me up in the chat right now.
I should be there.
But perhaps I won't be due to time zone things like that, and otherwise try and reach me on Twitter.
My name is Bramus.
I work from Belgium.
I also run a bram.us, that's also on Twitter.
Finally here, this is the link to an article that I wrote regarding cascade layers.
So if you're, if you want to read up on it again in your own time that you can do it right there.
Thank you.
When writing CSS, we have to carefully think about how we write and structure our code. Without any proper “plan of attack” the Cascade can suddenly work against us, and we might end up with pieces of code overwriting each other, selectors getting heavier and heavier, a few !important modifiers here and there, … — Uhoh!
To regain control over the Cascade in those situations there’s a new CSS language feature to help us: Cascade Layers (CSS @layer).
Let’s take a look at what these Layers are, how we can use them, where they fit in, and what benefits they bring.