Let’s build a web component!
(upbeat electronic music) - I guess everybody here knows what a web component is, at least vaguely, right? Yes? Who doesn't know what a web component is? Cool, I won't explain that then.
Like John said, my name's Erin.
I work at Shine Technologies, at Shine Solutions.
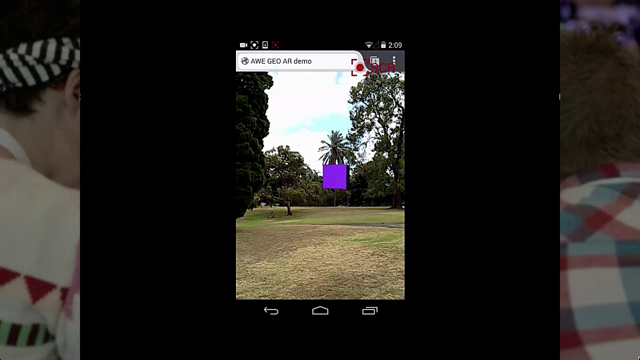
I'm a Google Developer Expert and I'm also a Mozilla Tech Speaker and apparently that is not a conflict of interest. (laughter) So today we're going to build a web component. This is what we're gonna build.
I think given the amount of trouble that Facebook has been in with privacy issues lately, and like Twitter's got that whole Nazi thing going on, it's maybe time to build a new social media platform. So we're gonna build a social media post.
Obviously this our MVP, so it's pretty simple. We've got our user avatar on the side there. We've got our actual post in the middle which could contain mock up, and like any good social media network, we've got a way for people to react to your posts. And you can do that using the three classic responses, happy, sad and a aerial tramway.
(laughter) Aerial tramway was the least popular emoji on Twitter for like 60 days in a row last year and I'm not gonna have that happen.
(laughs) And then, down the bottom you can see we've got a list of all of the reactions that have been made in the past. I don't know why this browser displays the emoji differently in the different places.
It's a thing.
All right, cool, so let's write some code.
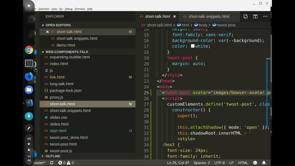
Here we've got, it's just a basic HTML empty page with some CSS in it so things look nice.
I've got a, like a LiveReload server running, so it's just gonna refresh the page when we write code. But there's no libraries, there's no frameworks, there's nothing up my sleeves.
(laughter) Its all just gonna be pure vanilla JavaScript. Cool, so the first thing we wanna do is, oh, align those script tags, yeesh.
(laughter) We need to, first of all, we need to define our custom element, so the custom element what we're creating.
And we can do that via Custom Elements, which is just available as a like a global on window. We can call it define.
We need to parse these two things.
The first is the name, which is gonna be the tag that our HTML element has and you can use anything you like, but has to have a hyphen in it.
So that's gonna stop it clashing with any existing HTML tags.
So we're call ours, oops, need to make it a string, twoot-post.
The second then we need to parse in is a class that's going to describe the behaviour of our element. So we need to parse a class and it needs to extend HTML element.
HTML Element.
The spec does allow for extending like child classes of HTML element, like HTML button element, but the syntax is a bit naff and it's not supported in Safari and Apple are pretty not keen on ever supporting it, so maybe don't.
All right, so now inside our class, we need a constructor and our constructor needs to call super.
Oop.
And that's enough to define our custom element. It doesn't do anything yet, but we can now put it on the page.
Just like any other HTML element except you don't get, already complete, yep.
And now we have a look in our browser.
I'm just gonna auto reload there.
We can see our posts.
Oh, our element in the DevTools and in Firefox at least, I'm not sure about Chrome, you get a little link here that will take you to the actual definition, which you can't see because everything's huge. Trust me, it's there.
Okay, so now we're ready to start building what's in our element.
So, first thing we wanna do is create a ShadowRoot, so if you're not familiar with the Shadow DOM, it basically provides a way of encapsulating the stuff inside of your element.
So any CSS that you'd find inside your element, isn't gonna leak out and effect the rest of your page, and CSS's outside your page, will only get in if you decide to let it.
So to create some Shadow DOM, we just attach Shadow. And we need to parse it, a config object that has a single property, which is mode, and this can be open or closed. The mode that you choose determines whether JavaScript can target your ShadowRoot. So if we go with open, we can do document, query select, oh, oops, and find our post, and then we can find the ShadowRoot of the post. And, you can see it's there.
There's nothing in it yet, but it's there.
If we change this to closed and do the same thing, we can't find that ShadowRoot anymore.
So I'm sure there are some use cases for closed, but I don't know what they are and I would recommend, do yourself a favour and just keep it open. All right, now we can start attaching some HTML to our ShadowRoot, and we can do that anyway that you would normally attach HTML to an element. So you can do document.createElement and then append it, or you can like create a template mode and clone it. We are gonna go with good old-fashioned innerHTML just because it makes life easy for this demo. Probably don't wanna do it in real life though. All right, now I promised that this was all gonna be vanilla JavaScript, but I'm not typing out all the HTML and CSS. So, bear with me one tick.
All right so now we've got all of our mock up and styling, so it's just these, this element here is the post itself and then we've got the avatar, the content, the reaction, they're just containers for those to go in. And then through the magic of CSS Grid, we've got a nice grid there and this is Firefox Nightly, so I could totally have put some grid if I wanted. (laughter) The interesting thing in the CSS is first off all this selector here, host, which refers to the ShadowRoot itself.
It's the top level of your element.
The other fun thing is here, where I've defined the colour of the borders, I'm using a CSS custom property.
And that CSS custom property isn't defined inside my ShadowRoot, it's actually defined up here in my Light DOM.
So, I can change this here to rebeccapurple, yeah. And you change it on the page, you can see it changes there. So custom properties are the way that you can get CSS from the outside into your Shadow DOM if you want it. I'm gonna stick with the blue though.
All right, so now we're ready to stick some stuff inside of our element.
So the first thing we wanna do is stick in that user avatar picture and the way we're gonna do that is we just wanna parse in a URL that refers to an image that we can then put inside our avatar here.
So we're gonna have an image with some source which we will work out shortly.
So we can just parse that as an attribute on our post, on our twoot-post, the same as we would any other attribute, just be careful with this that you don't use an attribute that already exists in HTML, 'cause I have tried to set a title on something and it doesn't work.
That ones already being used.
What is it? Bowser. Avatar.png.
All right did I get that file name right? Lets just check.
Bowser, yes.
Cool, now we can access this attribute from inside of our element, just the same as you can access the attribute of anything. And because this is a template string, we can just whack a variable in here.
We can do this which refers to our element. We can grab the attributes, and then we can just grab that avatar attribute and the value of it.
And now we get the avatar in our picture.
Cool, so the next thing I wanna do is add the content of the posts.
And, we don't want to do that using attributes, because I mean it could be quite long, which is a bit weird to put in an attribute I guess, but it could also contain characters that aren't legal in attribute.
So instead what we can do is just add that as the actual content of the element. The same as you can stick something inside a div. So we can grab that here.
One of the advantages to doing this, this way, is if your custom element doesn't render for whatever reason, like you'd be doing be doing server side rendering. This is gonna come down to the browser, like as this. But you're still gonna be able to see the content, up until it renders and it's all great.
So we can see that inside.
We can't see it here now, because the custom element is rendering and because we've got this ShadowRoot here, and we've also got this Light Dom, the ShadowRoot takes preference, takes precedence over the light and I don't know if that's a metaphor for something, but (laughs) it's how it works.
So, what we need is a way to provide some kind of link between these Light DOM elements and our Shadow DOM inside of our custom element. And we can do that using a special, a new HTML tag, which is called slot.
And slot basically works like a symlink kind of thing between the Light DOM and the Dark DOM.
So we now go here.
We can see inside our ShadowRoot in the dev tools there, our post inside the content, we've got this slot and then it's linking to those Light DOM elements in the Light DOM.
So, that's pretty cool.
The one problem there is though that anchor tag's by default are styled blue, so we wanna style it white to look like everything else and we kind of can't because it's in the Light DOM and our CSS is in the Shadow DOM and things can't get from inside the Shadow DOM to out. So we need a way to deal with that.
And we do that using another fancy CSS selector which is called slotted.
Now, slotted takes another selector as an argument. In our case we just wanna style everything so we'll just use star and inside here, we'll just go colour inherit. And that should fix up the colour, perfect. And that's the other thing that will actually cross over the Shadow boundary if you inherit a property, it will inherit through the Shadow boundary. All right so now for the fun bit, we need to add our emoji picker and to do that, we're actually gonna build another custom element, because why not.
Custom elements all the way down.
So we're gonna go customElements.define, we'll call this one emoji-picker and we'll have a class which extends HTMLElement.
Just like before we need a constructor and we're gonna call super and we're going to attach our Shadow DOM and we're gonna make it open 'cause we don't hate ourselves. And once again, we're going to stick in some innerHTML. And once again, I am going to copy and paste it, partly 'cause it's long and partly because I haven't worked out how to type emoji's.
Also don't know why all my (chuckles) emoji's don't show up properly in my ID.
If you really need emoji's in your ID, maybe don't get a Chromebook.
Okay so we've just got some pretty straight forward mock up there.
We've got the button that's got the plus on it, that's gonna change the emoji when we select something and then we've got the list of emoji that we can pick. And initially it's gonna be hidden.
Oops, we need, what have we missed? Ah, some.
(audience members talking) It's not the inside, the oh, no I put them there and then I didn't use them.
(clicks tongue) Oh, oh, ah, where's the end? All right.
Done.
So now if we have a look here, oh no we won't. It won't be there because my ID still can't my mind and it doesn't know that I wanna put my element in here. This is one reason I don't really recommend using template strings, is you lose all of your auto completes and it's a pain. All right so there's our emoji picker ready to go, again the colour is wrong and that is because in our CSS here I've got this picker colour that haven't defined, so I can go define that.
And I can define that now inside my other custom element so it doesn't need to necessarily be from the Light DOM, it can be from inside and out of the Shadow DOM. So we're gonna go picker-color and it's gonna be the same as our theme-color here, so that is a nice easy way to provide a bit of theming for your custom elements.
Right so now it's blue, it's great.
So now we need to add some behaviour.
The first thing we wanna do is when we click this button we want the list to appear.
And this stuff, it just works the same as any other sort of HTML.
So we can grab a reference to the button, ShadowRoot.querySelector just the same as, and we can just use this selected class 'cause that's there and we grab a reference to the list and that's gonna be the same.
And in this case we can use this super generic selector because we know that this selection is only gonna run inside of our ShadowRoot and we know what's in there. So we know that our CSS is gonna be fine.
All right so now we need a EventListener on the button. So it's gonna be a ClickHandler exactly the same as you would do in the Light DOM. And, when we click it, we want to remove that hidden class from our list so that we can see it.
(whispering) Cool so now we click the button and we get a list of emoji, we can see our aerial tramway.
So then we need to add a handler to these buttons, so that when we click one of the buttons, the list is hidden again and the plus sign on the other button changes to the emoji that we picked.
So this.list.addEventListener.
Click, and this time we need to parse in the event 'cause we're gonna need that.
Okay so the first thing we wanna do is just hide this. And then we need to grab the...
Like the button that got clicked, so event target is the actual emoji that got clicked and we can just get the emoji itself by using textContent and we can set the button it's textContent to the textContent of the emoji button that we clicked. So now we can open it up.
We can select aerial tramway and that changes to the aerial tramway and closes. Cool, so the one thing we've got left to do now is that we need to notify the parent element that we selected that emoji, right? So we need a way to parse that information back up. And, we can do that using another really standard HTML technique which is HTML Events. So we can create our own custom event.
So from our element we can dispatch an event and it's gonna be a new CustomEvent.
And we need to parse that a name, so emoji-selected and we need to set a couple of properties here. So first of all we wanna set the actual emoji and that needs to be in the property detail, which is gonna be this.button.textContent.
Oops don't put semi-colons in your objects. We need set it to bubble so that it will bubble upwards to it's parent element instead of just going down to it's children, and then we're all good.
We can now listen for this event in our parent element. If we can find it.
Lets do it after all this.
So the element, the event, is gonna arrive on the ShadowRoot.
So, we need it to listen on the ShadowRoot. Ah, emoji-picker.
Oops.
And, we need the event so we can find out which emoji it was obviously.
And we just do a console.log(event.detail). (audience member murmuring) Emoji, yeah it was thank you (chuckles).
And we select one there where you can see it in the console there.
The one thing here that I was saying though with the ShadowRoot is that the event won't bubble past that ShadowRoot. So if we put an event listener on window for the same event, and do the same console.log lost? (laughs) That's worrying.
In window.
No.
We'll still see that one is bubbling up to the ShadowRoot, but the window doesn't see the event because it doesn't, it stops at that Shadow barrier, it won't keep bubbling past.
If you do need it to bubble past like that, you can just add another property here to your custom event, which is composed.
I don't why it's called composed, I don't know what that means.
But I guess that it seems like it's calm and composed so it can go through.
(laughing) But now you can see it in the window element as well. So it's up to you like your particular use case whether you're gonna need that or not.
Either way it's fine.
Cool, let's just get rid of that window listener for now. And now in here it's pretty straightforward. Let's create a list of reactions.
And then we'll grab a reference to the HTML element, this.reactionsElement equals this.shadowRoot.querySelector. And then, when we get this event we can, just push it into our list and then, reactionsElement.textContent is gonna be reactions.
I just need to join it with an empty string otherwise it'll join with commas between everything, 'cause JavaScript is helpful.
And now we can pick our emoji and they're gonna appear oddly deformed in the bottom of the screen there. So cool, that's it, that was like 20-minutes, we've built two web components.
How easy was that? (chuckles) (applause) This is a link to a page that will link you to the demo and the fully completed demo with a bunch of annotations and stuff in the source code in case you can't remember everything that happened.
Cool.
(upbeat electronic music)
The time has finally come for web components. The specs have been standardised. They’re now (or soon to be) supported in all modern browsers. You can use them with your favourite framework.
So, how do you get started? There are a bunch of libraries around that can help you build web components. But, to help you really get what they’re about, we’re going to build one from scratch, on stage, in twenty minutes.
No frameworks, no libraries, no build tools. Just you, me and an IDE.
Love coding time! @ErinJZimmer walking us through on how to make a web component #code19 pic.twitter.com/DdD7xqAaAV
— Xavier Ho ?️?? (@Xavier_Ho) June 21, 2019
Code-heavy which doesn’t transcribe well – see…
A few notes…
:rootselector refers to your component when used inside it- You can access CSS custom props from outside your shadow DOM
- You cannot use attributes on your component that exist in raw HTML
slotacts as a sort of symlink between the shadow DOM and light DOM, so you can place content- To style things in slots you use
::slotted, which can accept a selector - Adding behaviour is very much the same as normal DOM scripting and SPAs, it’s a matter of linking references and events. Custom events add flexibility.
- Events won’t bubble up past the shadow root, unless you add a
composedproperty to your custom event in the component