Writing universal modules for Deno, Node, and the browser
Hey folks.
I'm Luca Casonato,I'm gonna be giving a talk today on writing universal libraries for Deno, Node, and the browser.
And what that's gonna entail is that we're gonna write a little library.
We're gonna run in Deno.
We're gonna run in Node.
We're gonna see if it runs in the browser.
All from a single code base using Deno's builtin tooling.
Before we get started with that, let me introduce myself.
I'm Luca.
I work at the Deno company as a software engineer.
I primarily work on the open source Deno CLI.
So that is the run time that you can download yourself and execute on your own computer.
I also work on Demo Deploy, which is our edge compute offering.
It's the the run time where you can deploy your Deno code to run it anywhere, close to your users on the cloud.
Additionally I work on Fresh, which is a Web framework for Deno, a full stack framework, which released just a few weeks ago.
And if you wanna learn more about that, you can go to fresh.deno.dev.
Additionally, to, to my work at the Deno company, I am also a, well actually, I also do this as my work at the company is that I do a bunch of Web standards work at TC39, which is the standards committee that standardized JavaScript, but also at W3C and WHATWG.
For yeah, like Web specs, like fetch and HTML spec, things like that.
And I'm involved in all of them obviously, but there's some of them that I work on.
So with that outta the way we're gonna be talking about Deno today.
So it's only fair if I give you a little bit of a recap on what Deno is.
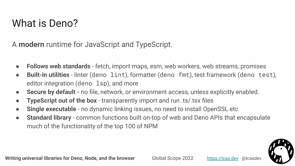
Deno is a modern run time for JavaScript and TypeScript which has a bunch of key selling points that other serverside runtimes, don't.
One of them being that, you know, very closely follows Web standard.
So we support fetch we've supported fetch for over four years now longer than pretty much any other server side run time.
Import maps are a ?? resolution system that browsers have and Deno has to.
We support ECMAscript modules are our way of doing Yeah, modules in JavaScript, right?
We don't have support commonJS.
We use the standards here Web workers for threading Web streams for streams, promises, for async operations, you name it.
We, we try to stick very closely to the Web standards.
We also have a bunch of built in utilities because you know, it's not just a runtime, but it's a fully integrated JavaScript tool chain.
It has a linter built in, a formatter, test framework, benchmarking framework, editor integration, which works with essentially every editor under the sun through the language server protocol.
A documentation generation, Deno compile.
There's a bunch of stuff in there that I didn't name.
But there's a lot, there's a bunch of built in utilities other than the runtime.
Going back to the run time though, Deno's runtime is secure by default, just like the browser, so you can execute random code in it.
And it's very likely to not break your computer.
And the way we do this is by disallowing any IO permissions like network access or file access by default.
And instead requiring that users explicitly opt into them either through a prompt or through a flag that you specify on startup.
Deno also supports TypeScript out of the box.
We can transparently run your dot TS and dot TSX files without you having to compiler them.
Deno's a single executable that you download.
And it does not contain any like DLLs, does not need to dynamically link to open SSL.
None of that.
And Deno also has very extensive standard library, which is a library written in TypeScript that is shipped together with Deno, which has a bunch of common functionality that you would usually have to pull in NPM modules for, to use.
But in Deno, you don't, they're maintain these, these standard library modules are maintained by the same group of people that build the Deno runtime are tested by by us.
And yeah, are insured to work with Deno.
And it encapsulates much of the functionality of the top 100 NPM modules.
So now that that's outta the way let's actually talk about quickly what we're gonna actually be doing today.
So we're gonna do a bit of live programming.
Let's hope the, it all works out.
We're gonna be exploring how easy it is to build stuff with and for, Deno.
What do you mean by that?
I mean, we're gonna try to just build a library.
Like just build it and see what all the Deno tooling is that we can use and see where we need to maybe reach outside of the Deno project, if we even need to do that.
Our library is gonna be very simple.
It's gonna just create a greeting messages.
Get to that in a second.
We're gonna do some unit testing using build, using Deno's built in testing, testing framework.
We're gonna format and lint the code using built using Deno's builtin formatter and linter.
We're gonna do or get automatically generated documentation through Deno doc, our documentation generator or the, the doc website at doc.deno.land-get to that later as well.
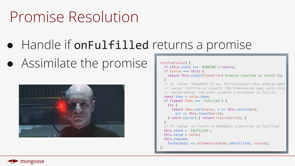
And then so far, this has all been Deno, but I promise that this is a universal library that can run in both Deno and Node and the browser.
But to be able to run stuff in Node, you know, you probably have, you have to publish things to NPM, right.
And Deno does not use NPM by default.
So we have to somehow get our code onto NPM and we also probably wanna make sure that the code that we publish to NPM actually works in the, in Node.
So we wanna test the code in Node.
We'll get to all of that.
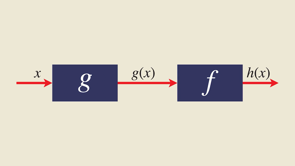
Okay, so let's get started with the library itself.
It's gonna be very simple.
It exports a single greet function, which takes a name and a greeting and returns, a sentence, which links the name and the greeting together in some cohesive form.
And you can specify any name you want.
And the greeting has to be one of the greetings inside of a TypeScript enum which you can pass as the second argument.
So let's actually get started with programming.
For programming today we're gonna use VSCode 'cause it's just the editor I like using.
You can use any editor you want, you can go to the Deno manual to figure out how to setup Deno for your editor.
I'm gonna set up the project structure for a Deno project.
You'll see that that's actually not like there's not much to it.
And we're gonna write the actual library code here, and then we're gonna quickly check that the library's working before we start writing tests.
Okay.
So first thing we have opened VScode we're in a new project or a new folder.
First thing we wanna make sure is you have the Deno extension installed.
So you go to extension pane, type in 'deno', install the Deno extension.
And the next thing you wanna do is you want to open the command palette, so you press F1 and then you press 'initialize workspace configuration'.
You get a few questions you can answer.
Yes.
Here.
We don't need unstable APIs, and then it's gonna generate this VSCode folder with a settings JSON file, which just says that this workspace has Deno enabled.
Yeah.
And this tells Deno that this is now a, or this tells VSCode that this is now Deno workspace.
Next thing we can do is set up the actual files we need to for the project.
Deno projects do not require configuration file or manifest file or anything like that.
So the first file we're gonna create in this project is the file that we're gonna write our source code in, which is very nice.
No, no boiler plate files.
Right.
Why is this called mod.ts?
You might be familiar with Node where in Node index files treated called index.js.
And in Node they have like special resolution.
So that index index files are treated differently to other files.
Deno does not have any of this.
And to make clear that that's, we don't have that, we name our index files mod.ts,.
following the Rust convention.
Not a special name this, you can name this, whatever you want.
Now that we've created our mod.ts file, let's actually start putting some code into it.
So, first thing we're gonna do is put in the TypeScript enum for the greetings, and these are all the different greetings your user will be able to specify: "hello", "hi" and "good evening".
Those are the different greetings we're gonna support.
And then now that we have the greetings, we're gonna add the code to actually take those greetings and turn them into turn them into like a greeting string with the name in it.
So this greet function takes a name, it takes a greeting.
If you don't specify greeting, it'll default to the "hello" greeting and it'll return a string, which is the greeting, plus the name plus an exclamation mark, all concatenated together.
So this is all, this is the source code we need.
But to be able to later get nice documentation generation, what we're gonna do is we're going to add a JSDoc comment to our greet function, which will you'll you'll actually already see this in the editor here.
It'll be used to give better autocompletion and to it'll show up on the documentation automatically generated documentation later.
This is our entire library.
It's now completely written.
It's done.
What we're gonna do now is we're gonna run the Deno REPL here.
So just type in 'deno', you're gonna get to ??? Loop and then we can do "import greet from mod.ts", and you can see, I can just import a dot TS file.
And then I can call this greet function with my name and it'll return the greeting.
Okay, cool.
So the function is working library seems to be working, but how do we ensure it continues to work?
That's where testing comes in, right?
Any project any project that you care about, you probably wanna have tests for and, Deno makes it really easy to write tests through our 'deno test' built in test runner.
It has really simple interface, but it allows for very advanced capabilities.
So you can start out very easy, but if you wanna do advanced things like snapshot testing or BDD style testing or any number of other things, those are all supported.
But you can start out really easily.
It's very nicely integrated.
You'll see all of that.
So what we're gonna do next?
We're gonna write a test for the greet function, and I'm gonna show you how nicely VSCode integrates with Deno's testing system and then how you can run and debug your tests directly from VSCode.
Okay.
So test files in Deno usually end with underscore test TS, any file that ends with underscore test JS or Ts or JSX or whatever is gonna be automatically picked up by the Deno test runner.
Files that are not named underscore tests, you can still put tests in them, but you need to specify them manually when you're invoking deno test.
So let's actually write the test here.
So the first test we're gonna do, actually, first thing we're gonna do is we're just gonna import, greet and greeting from mod.ts because this, this is what we're gonna be testing.
And then we can start writing our test.
So to declare a new test, you type in 'deno test', first argument of this thing is the name of the test.
So let's do our first test that we test the default value of the second argument to make sure that you don't have to specify a greeting parameter.
But it'll, it'll default to something.
To do this, we'll do here.
Const greeting is equal to greet, and then we're gonna call this Node or sorry.
Oh boy.
gLobalscope.
There we go.
And then we wanna assert equals that greeting is equal to "hello global scope!".
Okay.
You'll see, assert equals is not actually imported.
Let's fix that.
So assert equals is a function from the Deno standard library, which we need to explicitly import.
We can do that using this URL import here, Deno imports from URLs by default.
And yeah, so our standard library is hosted at deno.land/std.
I specify the latest version and, we import the 'asserts' module from the testing library.
So that's our Deno test.
What we're gonna do next is we're gonna add a test where we explicitly specify a greeting.
In this case, let's specify the "hi" greeting to make sure that that works.
And then we're gonna add another test that checks that the "good evening" greeting is also working.
So how do we now run these tests?
First way we can run the test is by just typing 'deno test'.
And it'll find all the test falls in our project and run them and you can see-ran, found three tests.
It ran all three tests.
They all passed.
No failures.
That's great.
Second way of testing.
We can use this little green button here which comes from VSCode and the Deno extension.
You can click that.
It'll run this specific test.
So it ran the default test.
I can also run the "hi" test, the "good evening test" and they all pass.
I can also run all the tests on the project if I click this button and you can see this is actually running the test.
If I, if I change the test here to fail, Deno test will fail here with an error that the assertion does not match.
And if I run the test using VSCode, it will also say the assertion doesn't match and it'll put the assertion error right in the right place here in my file, so I can debug.
Let's fix that.
Run the tests again, and they all pass.
Fantastic.
Okay.
So we now have a project which we have the library and it's tested and we manage to test using the VSCode integration and using the Deno test command.
Next thing we're gonna do is format and lint our project.
Formatting ensures that there's a consistent style across the, across a, this project and also across all of the different projects that use Deno, which is very nice if you're, for example, contributing to an open source project, you don't know if they use prettier or if they use like some other formatting system.
If they're a Deno project, they probably use 'deno fmt', and if you run 'deno fmt' in a project, it'll just work.
It won't like mess up all the styles and put tabs instead of spaces and spaces instead of tabs and whatever else.
It'll just be the default consistent, Deno style.
It's very similar to prettier, but it's written in rust, so it's much faster.
It's, I don't know, orders of magnitude faster and it can format JavaScript, it can form a TypeScript, JSON, markdown, and we're always working on other formatters as well for it.
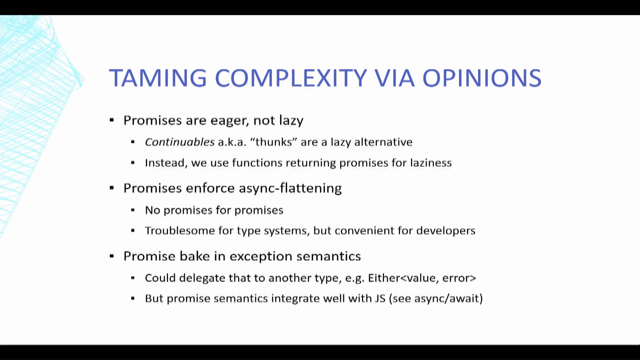
In addition to the formatter, we also have a linter, linters are things that don't check for formatting mistakes so when you put like a semicolon in the, there, when you're not meant to, or when, or use single quotes instead of double quotes or something like that.
But instead the linter checks things that are logic errors.
So for example, are you comparing to an NAN value, not a number value, cuz that's something that's illegal in JavaScript, catch these kinds of issues.
So it enforces yeah, that you don't have logic errors.
This 'enforces styling' thing is wrong.
Should be up here.
Bug in my slides.
Sorry for that.
Okay.
So let's run deno fmt, and deno lint, and also show you how these integrate with the editor.
So 'deno fmt', easy as that which this will find all the TypeScript or JavaScript or JSON or markdown files in my project.
And it'll format them three files because I have these two files and this is a JSON file that also formatted that.
Also run Deno lint.
Which checks just my JavaScript file for logic errors.
As you can see, there's no formatting or logic errors.
The reason for that is because this is all directly integrated into VSCode as well.
Like my formatter is set to Deno which means that if I do this and then I say 'format document', it'll all format it as to deno fmt's preferences.
And if I do this here with deno fmt, you'll see, that also works.
So I don't have to use the editor.
Same works for the linter.
And if I put in a logic error here, for example, I'm comparing 12 is equal to 12.
Let's see if 12 is equal to 12 foo, you can see that demo lint wins because this is probably a logic error, you don't wanna be comparing two constants.
This isn't doesn't make sense.
It's always gonna return true.
Right.
And deno lint in the terminal also catches this and displays the error.
Yeah, and then you can fix this.
And if you fix it, the lint error goes away away.
This is the, let's see, there we go.
This is this gonna, okay.
Now TypeScript's complaining, whatever, if you change this to well, it's also gonna complain about, I, I don't know how to make it stop complaining about this.
This is just a terrible if statement.
Don't use those statements like this people.
If I get rid of the if statement and deno lint again, the error goes away.
It goes away from my editor as.
Okay.
Next slide.
So we have a module now.
It's tested, it's formatted it's linted.
We wanna publish it for our Deno users to consume.
Deno has a first party registry called, or a Deno first module registry.
Sorry.
It's not a first party registry, at Deno land.
Which allows you to publish deno modules there and people can import them.
It directly integrates with GitHub the versions are immutable, so they can't be changed after the fact which prevents things like spoofing of, of dependencies or, or malicious code injection.
But it's not a blessed registry, right?
Deno inports from URLs, which means it can imort from any URL.
You can also import from your own local Web or your own web Server, you can host your modules anywhere, even on your own domain.
It doesn't need to be deno.land/x, but deno.land/x is pretty nice, I think.
And if you wanna learn more about how to publish too, you can go deno.land/x and, and press the links on screen there.
We're not gonna go through right now because we don't have that much time.
But what we're gonna do instead is look at our first class documentation generation.
So Deno has a built in documentation generator called 'deno doc' that I can use to get documentation for a specific module.
For example, I wanna get documentation for this mod.ts file.
I can do that by typing in Deno doc and then the file that I want documentation for, and it's gonna print out all the definitions in that file that are exported.
So for example, the greeting enum with all the different variants and the greet function.
And it's also gonna print out the JSDoc here for me to consume.
So yeah, that's very nice.
If I wanna, for example, look at the documentation of the assert modules I can type in 'deno doc asserts' and it'll return all of the different functions in here.
If I look for 'assert equals' where is it?
There it is.
You can see that this is the signature for certain equals.
And then this is a little example of how to use it.
And the document.
This also exists online in the Web.
You can go to Deno dot or sorry, doc.deno.land and type in a URL to look at, I'm gonna look at this assert module again.
And you can see here, it has all the same things.
If I want to dig into asset equals, where was it?
Equals, there we go.
I can click on that.
That'll give me nice page here again with the signature and the Doc comment, all the different parameters.
It has everything like that.
And even a link where I can just copy to import that.
That's documentation iteration.
This works for any URL on the internet which is a valid ES module and has TypeScript or sorry, JSDoc comments.
It works especially, well, if you have TypeScript annotations in your code, but yeah, this doesn't, you can't just use this for Deno, but you can also use this for things like for get, which is a module that's published to NPM.
If we import this by esm.sh, you can see that we also get documentation for this.
Preeact doesn't have very nice comments on its files.
Actually, maybe a better example is FireStore here.
Give it a second to load and you can see here, this is the the firestore module from NPM all documented by Deno doc.
And yeah, you can click on this and, and view all the different methods on this class and everything like that.
So that's Deno doc.
It's also gonna power our upcoming global symbol search in on the Deno website.
Gonna learn more about that in the future.
I might give a talk on that because it's really cool, actually.
And it's also powers your inline documentation at deno.land/std and deno.land/x.
So before we're done here, let's actually publish to Node.
So we've used a bunch of Deno here.
Deno supports loading TypeScript modules, natively, but Node and the browser do not, which means that to be able to publish or to be able to use these modules from Node, we need to emit dot JS files.
Node consumes, yeah, Node can only consume JS files, right?
So we have to, we have to do this emit.
Additionally, Node can only import packages from NPM, or you usually only Input packages from NPM in Node, which means if we want to have any chance of our module, actually being used by developers that are using Node, we need to publish our module to NPM.
I'm gonna show you how to do that.
Also, Node does not support the same level of Web API's that browser search and Deno do, which means that sometimes if you use a given Web API in your project, which isn't available in Node, you'll need to polyfill it for your Node users.
That's some, that's a consideration that you need to take into account.
To solve all these problems, we have a tool called DNT the Deno Node Transform, which is a Deno project tool.
And it does automatic transpilation from your Deno source code to common JS and pure JavaScript ESM modules that you can distribute on ESM or on NPM, right.
It can automatically replace globals that are not available in Node with polyfills.
It can transpile and one really cool feature is that it can actually transpile your Deno test tests.
To, to your Node distributable and then run them in Node to ensure that your code doesn't just work in Deno, but that the transpiled code actually also works in Node.
This gives you the best of both worlds.
You can develop using all the built-in Deno tooling the linter, formatter, testing framework, stuff like that, and the editor integration.
But you can still make your module available to the large number of users that are currently using Node.
Right.
So let's see how to do that to do that, we're gonna need to set up a little bit of a build script because we, we need some place to transform our code.
We're gonna then run our tests in Node and then publish it NPM.
So first thing we're gonna do is create a build script.
I'm just gonna call this build dot TS.
This is what we're gonna run to build a project.
First thing we're gonna do is import the build function and this utility function from the DNT module on deno.land/x.
Then we're gonna, oh, then we're gonna empty the NPM directory, if that exists.
The NPM directory is the file, is the folder we're gonna emit to.
So if we wanna run this multiple times, we don't want the files to override each other and conflict.
So what we're gonna do is we're gonna delete the NPM folder first, then recreate it and put all the distribute, like all the output files in there.
What we're gonna do then is copy over the build function here.
So this, we need to specify some, this is the thing that's actually gonna invoke DNT and tell it to build the project.
We need to specify the entry points for our library.
In this case it's gonna be mod.ts because that's our entry point.
We need to specify the directory we want to emit the the transpiled code into which is gonna be the NPM directory.
And then we can specify something called shims.
Shims are things that are, are these polyfils right.
So if we're gonna run tests in Node, we need to polyfill the Deno test command for Node because Node does not have the Deno test command or Deno test function.
So we're gonna tell it that for tests.
So for development mode, we're gonna emit, or we're gonna shim the deno.land space.
And then we can just specify what we want our package JSON, to look like.
So the name is gonna be lucacasonato/greeter on NPM.
The version I'm gonna take as the first argument from the command line arguments that I'm gonna pass in here.
And the description, a demo project for my scope talk and the licenses is MIT.
What are we gonna do next?
Let's actually copy over our readme as well here.
So just to make that nice.
And then in our little build script also ensure that after we've done, we're done with the build, we copy over the readme into the NPM directory.
So it also gets published.
We would then call 'deno run - A _build.ts, and then this is gonna run DNT.
It's gonna run NPM install to install the NPM directories or all the NPM files.
It's gonna build the project.
It's gonna type check the project in Node.
It's gonna emit the TypeScript declaration files, ESM package, the common JS package, it's gonna then run tests.
These tests are let's.
Yeah, so these are, are tests here that we ran, that we wrote earlier in mod.ts file, This time they're running inside of Node, they're not inside of Deno with our emitted cod it runs them twice once against the commonJS output once against the ESM output for Node.
Just to ensure everything is working.
And then once that's done, it says complete, it copies over the read me file.
And then we have this nice NPM directory here with our ESM folder, which is our ESM version of the package, our commonJS version of the package the types and our file that we use to, to create the test or to run the tests.
Can then CD into this directory call NPM, actually, let me confirm that I did not put a version in there.
0.1.2.
Sorry.
Let's run it again quickly with the version number this time.
Okay.
Ran the tests again, we're gonna CD into the NPM directory, call NPM run, NPM publish.
That's gonna require a one time passcode, which is that that's published.
And now if we go to NPM let's just go there and where is it?
And there we go-published a few seconds ago, 0.1.2, and we can use this Node now.
Don't have enough time.
So I'm not gonna actually showcase this, but trust me, you can.
Back to the slides.
Final slide.
So what should we do just now?
We wrote a library written in TypeScript that runs in Deno, Node, and the browser.
We added and ran tests.
We set up linting and formatting.
We published deno.land/x and to NPM and we actually needed no tooling outside of what the Deno project provides.
You wanna get started yourself?
That's cool.
You can install Deno from deno.land from the Deno land website.
Follow all the links in here, the manual, the examples of where to install DNT, the example repo and you can deploy your code to the edge with our deno deploy runtime, deno.com/deploy.
Thanks for listening to my talk and I'll see you all soon.
This talk will walk you through writing a module in TypeScript that can be consumed by users of Deno, Node, and browsers. I will walk through how to set up formatting, linting, and testing in Deno, and then how to publish your module to deno.land/x and npm. I will also start out with a quick introduction on what Deno is