The Art of Authentication & Authorization
So today I'm going to talk to you about the art of authentication and authorization.
Now, when tackling an auth project, adding auth to an app can often look something like this.
I really like this tweet from Nick Craver.
It says, "step one.
Are you ready to add work on the auth code?
Step two.
Yes.
Bring it." And then step three, the lived experience often ends up looking something a little bit more like this.
Now here's the thing.
The first step to adding auth is often Googling how to do it.
And then you're supposed to kind of just magically know and understand everything else that goes into coming up with that fully realized auth solution.
And this is actually feasible.
It's basically feasible if you use something like an identity as a service provider or an identity solution, maybe you've even implemented auth before doing this, but what was actually happening and why was a black box to you.
And you did a bunch of things, but you weren't confident in your knowledge of why those things worked, the way that they did.
So today I really want to kind of take you deeper.
I want to show you how to draw the owl by going into the foundational concepts behind authorization and authentication.
And like I said, you don't need to be an expert in all of this to get to a productive end result.
But since you're here, I assume that you're interested in learning more.
So we're going to start with an introduction to commonly used open standards.
I'm going to go through this in an approachable way.
I'm going to provide you with a foundational knowledge on standards based auth.
So we're going to start with the concept of identity.
Now, my job used to be working in identity and when I would tell like family members that they thought that I worked at the secretary of state issuing driver's licenses, or maybe I helped people recover from identity theft or credit card fraud.
But the reality is I worked with digital identity and digital identity is defined as a set of attributes that define an individual user in the context of a function that's delivered by a particular application.
Which is a bunch of words that kind of sound meaningless.
But let me give you an example.
Let's say that you are an online shoe retailer.
The digital identity of your users might be their credit card number, their shipping address, and their purchase history.
Because that's what's applicable in the context of your application.
So when we say authentication, what do we mean?
Well, in a broad sense, authentication refers to the process of verifying that the user is who they say that they are.
Then what's authorization?
Well, authorization is about granting or denying rights to access resources.
And when we talk about authorization, we need to talk about OAuth.
OAuth2 standards are very clearly defined, but the document itself is really dense.
So what I'm going to do here is I'm going to go over the broad, applicable concepts.
And in order to do that, I kind of need to do a little bit of a history lesson because things were a lot different before OAuth.
OAuth 1 was established in December of 2007.
And before that, if we wanted to access third party resources, it looked a little bit like this.
I'm going to give you an example here.
Let's say that you use a web app called HireMe.
Let's say you also use a web app called MyCal in order to manage your personal calendar.
Maybe HireMe wants to add an event to your MyCal.
Maybe it's an appointment to meet with a recruiter for an interview.
What's going to happen is HireMe is going to use a browser to ask you to provide your MyCal username and password to HireMe.
HireMe then would take your MyCal credentials and use them in order to access the MyCal API.
This now means that HireMe can access MyCal's API to do things like create calendar events by using the credentials for MyCal that you provided to HireMe.
Now this approach relied on sharing a user's personal credentials from one app with a completely different application.
In general, this is kind of for obvious reasons, not a good idea.
For one thing, if HireMe doesn't do their due diligence, they have a lot less at stake than MyCal.
If they leak your MyCal credentials than HireMe can kind of get away with saying, oh, whoops, my bad.
But for MyCal, it might actually be catastrophic.
Now also HireMe just has way too much access to the MyCal API.
You gave your MyCal credentials to HireMe, that means HireMe can do everything in MyCal that you can do-they could change your name.
They could delete your events.
They could completely create different settings for you.
So this problem gave birth to OAuth.
We needed a way to solve this problem.
I'm specifically going to talk about OAuth 2 in this talk.
And OAuth 2 is an open standard for performing what we call delegated authorization.
Using OAuth myCal can do things like delegate authorization to HireMe in order to grant HireMe limited access to the MyCal API without incurring the risks that I talked about.
And it does this by using something called an authorization server.
An authorization server is a set of endpoints to interact with the user and issue tokens in its simplest definition.
So let's go back to our scenario with HireMe and MyCal.
Only, now let's view this through the lens of using OAuth 2.
Now using OAuth 2 MyCal has an authorization server.
And let's assume that HireMe has already registered as a known client with MyCal.
So MyCal is already aware that HireMe is going to be asking for access to its APIs.
Let's say that you are logged in with HireMe already and HireMe wants to set a calendar event on your calendar in MyCal.
HireMe is going to use the browser to perform a GET, to send an authorization request to MyCal's authorization server.
The MyCal authorization server then prompts you to log in with MyCal, if you're not already logged in.
You're going to authenticate with MyCal.
And then the MyCal authorization server's going to prompt you in the browser for your consent to allow HireMe to access the MyCal APIs to add an event on your behalf to your calendar.
But not do any more than that.
If you agree, then the MyCal authorization server sends an authorization code to HireMe in the browser and HireMe takes that code and its own applicant credentials, and it returns those to the authorization server using Server Side.
MyCal can then issue a token, which HireMe can use to call the MyCal API within the scope of permissions that were accepted by you, the user.
So now HireMe, can set calendar events for you using the MyCal API on your behalf.
And nothing insidious is happening now.
MyCal is asking you to log in with MyCal.
HireMe is not asking for your MyCal credentials.
HireMe can now only create events, but not do other things like read all of your events or change your settings.
And we have the issues with sharing credentials and providing too much access, basically resolved and no longer a problem.
Only the thing that happened was that apps wanted to do more than call APIs.
Once they had access to this OAuth system, they really wanted to be able to sign users in with accounts that lived in other systems.
So for example, if we apply this to our hypothetical, then maybe HireMe wants a MyCal user to be able to log into HireMe using their MyCal account, despite not having a HireMe account.
Now OAuth 2 is for delegated access.
It's not an authentication protocol.
That means that if HireMe, does something like use that access token for the MyCal API and assume that having that access token and calling the API with it means that the user can be considered authenticated with HireMe, then we start running into problems.
Those problems include things like someone could have stolen the token, the token could be from a completely different user.
The token could be obtained from another client that's not HireMe and then just injected into HireMe.
And we call this the confused deputy problem, because HireMe doesn't actually know where this token came from or who it was issued for.
And if you remember, when we talked about authentication, authentication is about verifying the user is who they say they are.
And HireMe, can't know this from using this access token.
So to address this, we needed to formalize authentication on top of OAuth.
This leads us to the rise of openID Connect or OIDC.
Now OAuth 2 specialized in delegated authorization and openID connect covers authentication, specifically OIDC's and identity layer on top of OAuth 2, for authenticating users using an authorization server.
So let's talk a little bit more about that authorization server.
We know that it has a function to issue tokens.
So for authentication with OIDC, we use something called ID tokens.
In this scenario, our authorization server can issue ID tokens similarly to the way that it issues access tokens.
But ID tokens are meant for the client and they're a fixed format that clients can parse and validate.
They do this in order to extract identity information from the token.
And therefore they can know who the user is.
They can authenticate the user.
OIDC extends OAuth 2.0, to show how to issue ID tokens.
The OIDC spec also declares a fixed format for ID tokens, and this format is JSON Web Token.
So JSON Web Tokens.
often abbreviated JWT, which is pronounced jot, oddly enough, look like this.
There are three strings segments concatenated with periods.
The first segment is adjacent object containing a signing algorithm and the token type, which is JWT.
This is then base64 URL encoded so that it's safe for URLs and file names.
And the second segment is a payload segment.
These are data claims.
This is a JSON object that contains statements about the user and also statements about the authentication event itself.
This is also base 64 URL encoded.
And finally we have the crypto segment or the signature.
JSON Web Tokens are signed so that they can't be modified in transit.
So when an authorization server issues an ID token, it signs it using a key.
And then when the client receives that ID token, it validates that signature using a key as well.
And if we use an asymmetric signing algorithm, then different keys are used to sign and to validate the tokens.
And if this is the case, then only the authorization server holds the ability to sign tokens.
That's done with a private key and then a public key is available to clients that want to validate tokens.
As per their moniker, ID tokens provide identity information.
So in that payload segment, those data claims, we have that JSON object with things like statements about the end user and also information about the authentication event itself.
Those authentication claims can look something like this.
We might have an issuer.
This is your authorization server.
It's the party that issued the token in the first place.
We might have an audience.
This is the ID of the applications the token has been issued for-it's the intended recipient of the token.
We have some timestamps.
These tell us when the token expires and when it was issued.
And then we have something called a 'nonce', and this is important.
This is a cryptographically random string that binds the client to the ID token that it receives.
This nonce is present in both the authorization request and in as a claim that the authorization server inserts into the token that it sends back to the client.
So the client application then receives this token, it decodes it, and it needs to check to verify that the nonce and the token matches the nonce that it sent with its authorization request to the authorization server, because if they don't match, then the token should be rejected.
This is done in order to prevent something called token injection, which is tokens coming from somewhere other than the authorization server.
So in addition to validating the signature, the client also needs to do things like verify that the authentication claims like the issuer, the audience, the timestamps, and the nonces.
And as I mentioned, claims also contain statements about the end user.
Some of the standard claims that we can ask the authorization server to provide are things like profile information.
We have a subject, this is a unique user identifier.
We can get profile claims like address, nickname, maybe an avatar, website, email, all kinds of information.
So I talked about access tokens very briefly when we introduced OAuth 2, but now I want to come back to them because now we've covered ID tokens, let's say the user is authenticated.
So now we're ready to call a resource API.
So we're ready to cover access tokens in a little bit more depth.
As I said before, access tokens are for accessing resources.
For example, granting access to the MyCal API and unlike ID tokens, which are JSON Web Tokens, as per the specification, access tokens have no specific defined format.
They don't have to be, and are not necessarily JSON Web Tokens.
However many authorization servers do use the JSON Web Token format for access tokens as well.
These include services like Auth0, Amazon Cognito, Microsoft identity server, Okta, and others.
And they do this because the format, the JWT format enables validation.
Access tokens are for the resource API, they're intended for the API.
And unlike ID tokens, access tokens are opaque to the client.
The content in an access token can change at any time, And the client should never contain code that relies on what's in the access token content.
What does API access with an access token look like?
Well, let's say our user is logged into our client application and we have our authorization server and we request an access token to get resources from an API.
So when we go to call the API from the client, in order to request data and resources, we attach the access token to that request.
We send the request to the API and then the API validates the token using middleware.
If everything checks out.
Then the API returns the requested data to the application.
But how does the API know what access it should give the app when it's asked for those resources?
Well, we do this through delegation with scopes.
Remember this?
We only want HireMe to create calendar events using the MyCal API.
We don't want it to be able to do more than that.
Scopes basically limit what an application can do on the behalf of the user.
Scopes can't grant privileges that the user doesn't already have.
So if your, MyCal user doesn't have a privilege to set up new MyCal enterprise accounts, for example, then scopes granted to HireMe, won't ever allow the user to set up new enterprise accounts either.
Scopes delegate access control to the API or the resource.
The API is then responsible for combining those incoming scopes with known actual user privileges, and then it's going to make the appropriate access control decisions.
This is sort of where delegated authorization comes from.
So in practice, we have our user using our application and they're going to access a third party MyCal API.
And let's say we've already acquired an access token from our authorization server.
The token that's received from the authorization server already contains information like the user identifier, the subject, it contains the audience saying that the token is intended to be used by the MyCal API.
And maybe it contains a scope that says it has permission to write calendar events.
We then send that request with the token to the API.
And we have this scope with this 'write events', permission, but the API has the ability to access everyone's calendars.
It can access the calendars of the hundreds of thousands, maybe millions of users.
So in addition to looking at the token's scope, the resource API really needs to use the subject identifier in order to only allow this user to exercise their own capabilities and not access, for example, other user's calendars by accident.
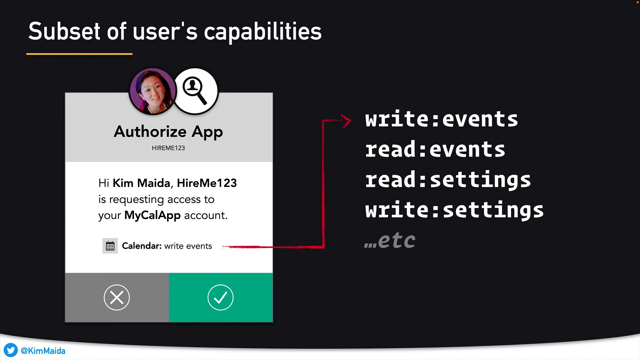
So in the context of delegated authorizations, scopes express what an application can do on the user's behalf.
Scopes are a subset of the users capabilities.
Now remember when we prompted the user for consent for MyCal to allow HireMe to do certain things?
Well, more realistically, that consent dialogue might look something like this.
HireMe could potentially ask for a variety of different scopes, but you shouldn't overload scopes with user specific permissions.
Scopes are really intended for app level permissions.
So what have we learned?
We've taken the concept of going from a vague idea to a fully finished solution, and we filled in a lot of the concepts behind things like OAuth2, openID Connect, authorization servers, iD tokens and JSON Web Token format.
We covered access tokens, scopes, and delegated authorization.
And I encourage you to stay tuned for the next talk at Safe, which is going to discuss how to take these specifications and apply the concepts and implement authorization authentication in your applications.
So I hope that this talk has demystified some of the crucial background around the standards and the basics of authorization and authentication.
Once again, my name is Kim Maida.
I am a Google developer expert in security, privacy payments, and identity.
I'm an Auth0 ambassador and I'm also the former head of developer relations at Auth0.
And I'm currently the vice president of DevRel at Ionic.
I wrote a pretty in-depth blog article, that's linked here, and you can find all of this content as well as links to a lot more resources on these topics there.
I really enjoy connecting with people on Twitter, and I really appreciate you joining me today.
So thank you very much.
Authentication and authorization are daunting topics for many developers. Open standards for auth are well defined, but challenging to understand; OAuth, OIDC, JWT, IETF, PKCE?! I’ll demystify the specs and concepts step-by-step, giving you the knowledge you need to tackle auth in your front-end apps.

